Pivot Tables Transformed To Work with SSIS
You can work with pivoted data in SSIS package, as if it were just another data set. But it requires the Pivot transformation and jumping a few hoops to get there.
- By Eric Johnson
- 08/02/2010
The Pivot transformation is one of the most useful transformations in SSIS, and also the biggest pain to configure. It comes with one editor, the Advanced Editor, so no pretty GUI here. Let's walk though an example and hopefully it will help you learn how to use pivot. First off, let's define the source data and the destination of our pivoted data. We will work from a small set of survey data where each person was asked four questions as shown in Fig. 1.
There are three surveys, each with four questions. We want to pivot this data so that there is one row of data for each survey and the answers are in columns, as in Fig. 2.
 |
| Figure 1. Sample input for working with Pivot Transformations. |
 |
| Figure 2. How our Pivot Transformation will lay out the data we seek. (Click image to view larger version.) |
This is where our Pivot Transformation comes into play. Each source column needs to have a PivotUsage assigned to it in order to tell SSIS how to handle the column during the pivot. The valid values are as follows.
- 0 - The column is not pivoted
- 1 - The column is part of the set key. This identifies the grouping of data. In our example, SurveyID will be a 1 to define one row for each survey.
- 2 - The column is a pivot column. The data in this column will be used to provide the new column names. In our example, each question will become a column, so Question will have a value of 2
- 3 - The values from this column are placed in columns that are created as a result of the pivot. In our case, each Answer will be placed in the new question columns, so Answer will have a value of 3.
Now that we have the PivotUsage values, we can configure the Pivot Transformation. When you open up the Pivot transformation, the first thing you need to do is define the input columns that you want to work with. Naturally, it's done through the Input Columns tabs. Fig. 3 shows that we've selected to work with Question, Answer and SurveyID. We are ignoring the id column, as it is a tracking column in the source table and not needed in our destination.
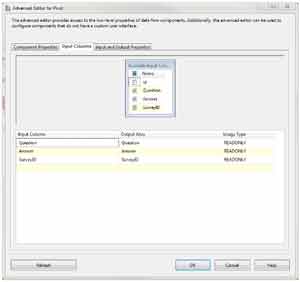 |
| Figure 3. Configure information you'll want in your Pivot Transformation using the Input Columns tab. (Click image to view larger version.) |
Next we switch to the Input and Output Properties tab (Fig. 4). Here, we need to expand Pivot Default Input and then Input Columns. Now we need to set the PivotUsage value for each column. Question will be a 2, Answer will be 3, and SurveyID will be 1.
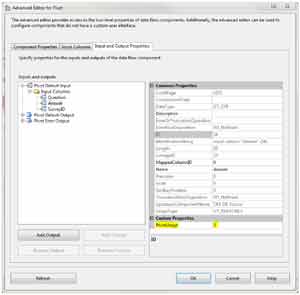 |
| Figure 4. Input and Output Properties tab is where you expand what you want in the Pivot Transformation. (Click image to view larger version.) |
Now here is where it gets a little weird. We have to add columns to output for each column that will exist after the pivot. In our case, we will have the five columns we saw earlier in our example destination.
To add the columns, expand Pivot Default Output and select Output Columns. Next, click the Add Column button five times. Then you will need to go through each column and set up a more logical name than the default of Column, Column 1, etc. Select each column and change the Name property so you end up with five columns named SurveyID, Name, Height, FavColor, and Age, as shown in Fig. 5. (Note that I called the Favorite Color column FavColor to save space).
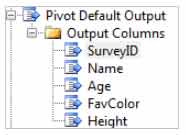 |
| Figure 5. Adding columns as needed for output. |
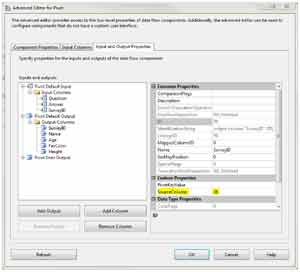
So now that we have an input and an output, we need to connect the two. This is done by setting the SourceColumn property on each output column to the LineageID property of the correct input column. This tells the transformation where each output column will get its data. So, the first output column, SurveyID, comes from SurveyID. The value for the other four output columns all come from Answer input column. So for SurveyID, we find the input column LineageID on the property page, as in Fig. 6.
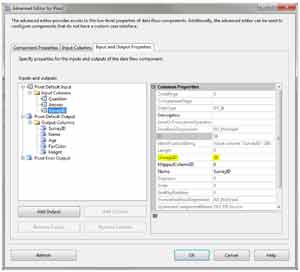 |
| Figure 6. Mapping inputs to outputs can be tricky. Like in this example. (Click image to view larger version.) |
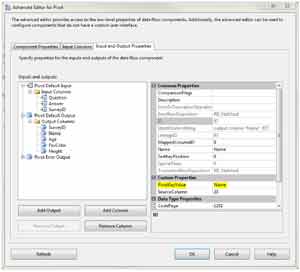
Now you will need to write down that value or remember it and then manually enter it into the SourceColumn property of the SurveyID output column (see Fig. 7).
 |
| Figure 7. Make sure to write down the value of LineageID, as it's not intuitive how to map the input and output columns together. (Click image to view larger version.) |
Repeat this step and enter the LineageID from the Answer input column into each of the other output column's SourceColumn property.
We are almost there, but we have one more step. For each of our new output columns, Name, Age, FavColor, and Height, we need to tell them which values in the Question column signify that the data belongs in each column. This is done by setting the PivotKeyValue for each of these columns to the actual text in the Answer column. What this means, basically, is that this answer is for the question contained in this column. So for the Name column, we enter "Name" into the PivotKeyValue. This tells the transformation to take the value from the Answer input column and place it in our Name output column anytime it encounters the text "Name" in the Question column.
 |
| Figure 8. Specify the PivotKeyValue properties. (Click image to view larger version.) |
That's it! Now, we can work with the pivoted data in our SSIS package, just like any other data set. I know that's a lot and it is very confusing, but if you play with it a few times you will get it. Good luck and happy coding.
About the Author
Eric Johnson, SQL Server MVP, is the owner of Consortio Services in Colorado Springs providing IT systems management and technology
consulting. He is also the President of the Colorado Springs SQL Server
User Group. He can be contacted at www.consortioservices.com.