Posey's Tips & Tricks
Build Your Own Custom Copilot, Part 1: Getting Started
With Microsoft's Copilot Studio, it's easy to get up and running in just a few minutes.
When Microsoft first introduced Copilot for Microsoft 365, there was mention of the fact that Copilot would be extensible, thereby making it possible to build your own Copilots. At the time, I didn't really give this extensibility all that much thought, because I assumed that building a custom Copilot would be the sort of thing that only a developer would be able to do. As it turns out though, Microsoft has created a low code / no code tool for creating Copilots. This tool is called Copilot Studio and you can access it here.
When you first open this site, you will be prompted to sign in using your Microsoft 365 account and you will be asked to specify your primary language. After doing so, you will be taken to a screen like the one shown in Figure 1. As you can see in the figure, Microsoft is using Copilot for the purpose of building other copilots. As such, the first step in the process is to type a detailed description of what it is that you want for your custom copilot to be able to do.
 [Click on image for larger view.] Figure 1. You can begin the process by describing the Copilot that you want to create.
Interestingly, telling Copilot what it is that you want seems to be a conversational process. As an experiment, I told Copilot that I wanted to build a Copilot that would allow me to search through my archives to see if I have written about a particular topic in the past so that I can avoid writing about something that I have already covered. As you can see in Figure 2, Copilot asked me various questions in order to gain a better understanding of what it is that I actually want.
 [Click on image for larger view.]
Figure 2. Copilot may ask a series of follow-up questions to get a better feel for what it is that you want.
[Click on image for larger view.]
Figure 2. Copilot may ask a series of follow-up questions to get a better feel for what it is that you want.
When you are all done, you can click Create to create your Copilot. Of course in the real world, there is always the possibility that Copilot might not fully understand what it is that you need. It's also possible that you might ask for something that goes beyond Copilot's current capabilities. In these types of situations, Copilot Studio allows you to take a more granular approach to creating copilots. Let me give you an example.
In the previous example, I asked Copilot to create a Copilot that would let me search my archives to see if I have ever written about a particular topic in the past. While this probably seems like something that would be really easy for Copilot to do, there is just one problem. My archives are located on an on-premises file server. I do not store my archives within SharePoint. This means that the archives that I asked Copilot to search are locked away in a location that is inaccessible to Copilot. Fortunately, there is a solution.
The solution is to create a new Copilot action. To do so, go to the main Copilot Studio screen and then click Create. As you can see in Figure 3, you can choose between creating a new Copilot or creating a new Microsoft Copilot action. Incidentally, there are also a number of templates available, which you can use to simplify the Copilot creation process.
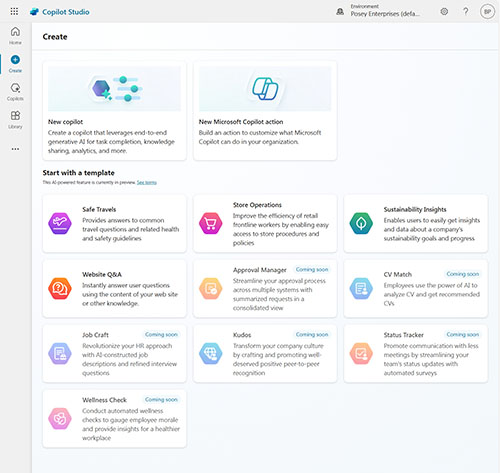 [Click on image for larger view.] Figure 3. You can create a new Copilot or a new Copilot Action.
Go ahead and click on the New Microsoft Copilot Action button. When you do, you will be asked if the action should be associated with Copilot for Microsoft 365 or Copilot for Sales. Choose the Copilot for Microsoft 365 option. This will cause Copilot Studio to prompt you as to the type of action that you want to create.
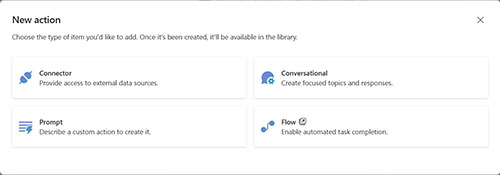 [Click on image for larger view.]
Figure 4. You can use this screen to create a new action.
[Click on image for larger view.]
Figure 4. You can use this screen to create a new action.
There are a few different options on this screen. The first option is to create a connector. This is the option that I would use to link Copilot to my archives. You can also use connectors to link Copilot to other external data sources.
Another option is Prompt. The Prompt action lets you create a custom action by describing what it is that you want to do.
The third option is Conversational. This option lets you create focused topics and responses.
Finally, the last option is Flow. Flow lets you create automated workflows.
Now that I have talked about the various types of actions that you can perform, I want to go ahead and create a custom Copilot that is equipped with a connector. I will show you how in Part 2.
About the Author
Brien Posey is a 22-time Microsoft MVP with decades of IT experience. As a freelance writer, Posey has written thousands of articles and contributed to several dozen books on a wide variety of IT topics. Prior to going freelance, Posey was a CIO for a national chain of hospitals and health care facilities. He has also served as a network administrator for some of the country's largest insurance companies and for the Department of Defense at Fort Knox. In addition to his continued work in IT, Posey has spent the last several years actively training as a commercial scientist-astronaut candidate in preparation to fly on a mission to study polar mesospheric clouds from space. You can follow his spaceflight training on his Web site.