Posey's Tips & Tricks
Lessons Learned About Windows Subsystem for Linux Accounts, Part 1: Reset
Here's how I was able to fix my mistake when I was locked out of my Linux account.
Recently, I have been spending quite a bit of time working with the Windows Subsystem for Linux in relation to a project that I have been working on. Although I have occasionally dabbled in Linux, it isn't the sort of thing that I use every day -- or even every year. Needless to say, there has been a bit of a relearning curve. In fact, I ran into some problems from the very beginning.
I have to confess that these problems were self-inflicted and could have easily been avoided if I had just adhered to some really simple best practices. As embarrassed as I might be to admit my mistake, I ultimately decided to go ahead and write about the experience just in case I might be able to help someone else.
By now I'm sure you are probably wondering what happened. The problems began when I installed the Windows Subsystem for Linux (along with Ubuntu) onto a lab machine that is running Windows 11. When you deploy Ubuntu, the installation process requires you to provide a username and password that can be used to log into the Linux environment.
My problem was that I tried to use a blank password. Upon doing so, Ubuntu tried to force me to provide a password. I had the idea that maybe I could simply close the Linux window and then reopen it as a way of avoiding being forced into using a password. This resulted in the creation of an Ubuntu deployment with no default user account. Opening an Ubuntu tab in Windows Terminal simply took me to the Root environment.
I know, I know. Best practices have long stated that you should always use a long and complex password. Even Microsoft has recently said that it is going to be stepping up its security efforts, placing security at the forefront of everything that it does. In this case however, I was working with an isolated lab machine. There was absolutely no reason why that machine needed a password, and I really didn't want to have to deal with logging in every time that I opened a Linux tab in Windows Terminal.
In working with the Windows Subsystem for Linux, I have found that there are two main ways to fix this problem. One option is to completely reset the Linux environment and then reinstall the Ubuntu distribution (making sure to use a password). The other option is to leave the existing environment in place and manually create the required user account. Regardless of which method you use, it is possible to configure the account for auto logon so that you don't actually have to enter a password.
Resetting the Linux Environment
When I first experienced the problems described above, my first instinct was to remove and then reinstall the Windows Subsystem for Linux. However, I found that performing a basic removal and reinstallation did not fix the problem because profiles associated with the original Linux deployment (the user accounts or lack thereof) remained. Here is how I successfully removed and redeployed the Linux distribution.
The first step in the process is to open Windows Terminal with administrative privileges. You will then need to display a list of any existing Linux deployments. The command used for doing so is:
wsl --list --verbose
Once you have displayed a list of the Linux distributions that are installed, you will need to unregister each of the distributions. Here is the command:
wsl --unregister <distribution name>
You can see what this process looks like in Figure 1.
 [Click on image for larger view.] Figure 1. This is how you list and then unregister the Linux distributions that exist on your machine.
Once the distributions have been unregistered, the next step in the process is to disable the Windows Subsystem for Linux. You will need to do this from an elevated command prompt. The command used for doing so is:
dism.exe /online /disable-feature /featurename:Microsoft-Windows-Subsystem-Linux /norestart
If you are using Windows 11, then this should be the only removal command that is required. However, if you are using an earlier version of the Windows Subsystem for Linux then you may also need to disable the underlying virtual machine platform. The command used is:
dism.exe /online /disable-feature /featurename:VirtualMachinePlatform /norestart
You can see what the disable command looks like in Figure 2. Once you have completed this process, be sure to reboot your machine.
 [Click on image for larger view.] Figure 2. You can use the DISM.exe tool to disable the Windows Subsystem for Linux.
When the system reboots, open an elevated Terminal session and then reenable the Windows Subsystem for Linux. The command for doing so is:
dism.exe /online /enable-feature /featurename:Microsoft-Windows-Subsystem-Linux /all /norestart
Finally, reinstall the Windows Subsystem for Linux by entering this command:
wsl --install
As you can see in Figure 3, I am now being prompted to create a new default user account.
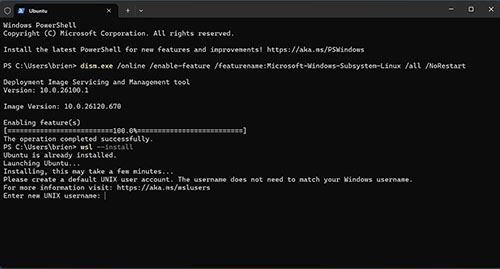 [Click on image for larger view.] Figure 3. I am now being prompted to create a new default user account.
Now that I have shown you how to reset the Linux environment, I want to revisit the subject in Part 2 and show you how to manually create the missing account.
About the Author
Brien Posey is a 22-time Microsoft MVP with decades of IT experience. As a freelance writer, Posey has written thousands of articles and contributed to several dozen books on a wide variety of IT topics. Prior to going freelance, Posey was a CIO for a national chain of hospitals and health care facilities. He has also served as a network administrator for some of the country's largest insurance companies and for the Department of Defense at Fort Knox. In addition to his continued work in IT, Posey has spent the last several years actively training as a commercial scientist-astronaut candidate in preparation to fly on a mission to study polar mesospheric clouds from space. You can follow his spaceflight training on his Web site.