Posey's Tips & Tricks
Using Microsoft Office to Build a Network Diagram 2
Now that we've set up our process, let's dig in with the actual execution.
In the previous article, I explained that if you want to build a detailed network diagram using Microsoft Visio, then one of the first things that you should do is to create an Excel spreadsheet containing your network inventory. Of course, depending on the types of information that you want to include in your network inventory, the process of populating the spreadsheet with data can be quite labor intensive.
In my case, most of the hardware was new, so I manually entered most of the information into my spreadsheet based on the specs listed on the boxes that the hardware was packaged in. For some of my older components, I looked up the specs on the Web sites where I had originally purchased the hardware. Another option however, is to use PowerShell to compile the necessary information for you. This is of course, assuming that the systems that you want to inventory are running Windows.
There are three high-level steps involved in using PowerShell to build a hardware inventory spreadsheet. The first step is to query each of the PCs that you want to include in the inventory report. The second step is to extract the required information. The third step is to write the information to a report. I will provide you with sample code for all three steps. Just keep in mind that you will probably have to modify the code for use in your own environment. For the purposes of this article, I am also assuming that WinRM is enabled on each machine and that there are no firewalls blocking communications.
Create the Spreadsheet File
For the purposes of this article, I am not going to be creating an Excel spreadsheet, but rather a CSV file. Once created, you can open the CSV file in Excel and then save it as an Excel workbook.
The first thing that we need to do is to create a CSV file that contains a header row. This header row will define columns for the various PC attributes that we will be documenting. Again, you can pick and choose the items that you want to include in the inventory. In this case however, I will be including the following items:
- Host Name
- Processor
- Memory
- OS Name
- The date when the OS was installed
In case you are wondering, the reason why I am capturing the OS installation data is that it gives some idea as to when the PC might have been put into service.
To create the CSV file containing the header rows, enter these commands:
$CSVFile = “C:\Scripts\PCInventory.csv”

  $CSV = {} | Select “Name”,”Processor”,”Memory”,”OS”,”Date”  | Export-CSV $CSVFile -NoTypeInformation
You can see these commands and the resulting file in Figure 1.
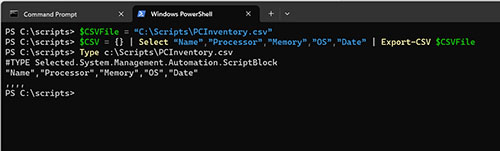 [Click on image for larger view.] Figure 1. The CSV file has been created.
Connecting to the PCs
[Click on image for larger view.] Figure 1. The CSV file has been created.
Connecting to the PCs
The next step in the process is to set up a script that will be able to query the PCs that you want to inventory. Again, there are several different ways to do this, but here is one technique that you can use:
$PCs=”PC1,PC2,PC3”

  ForEach ($PC in $PCs){

  Invoke-Command  -ComputerName $PC -ScriptBlock {

  Write-Host  ‘This is where you would insert the code to extract remote PC information'

  }

  }
This block of code creates a variable called $PCs. The variable is then assigned a list of the PCs on a network. In real life, this list would consist of hostnames or IP addresses. A ForEach loop then cycles through each PC on the list, one at a time. The Invoke-Command cmdlet establishes a remote session with the PC. Depending on how your network is set up, you will likely need to add a set of credentials to this command via the -Credentials parameter.
As it stands right now, this block of code doesn't really do anything other than to establish a remote session and then display a message saying that this is where you would insert the code to extract remote PC information. You will need to replace the Write-Host cmdlet (which only serves as a placeholder) with the code used to retrieve inventory information.
Retrieving the Information
The next step in the process is to retrieve the inventory information. Windows includes a command line utility called SystemInfo. Although this is not a PowerShell utility, it is possible to use PowerShell to extract the information that is presented by this utility. The first thing that we have to do is to capture the SystemInfo command's output into a variable. Here is a command that can be used for this purpose:
$Info=SystemInfo
Next, you will need three lines of code for each attribute that you want to capture. The first of these lines uses pattern matching to locate the line within the output containing the information that you are interested in. In the case of the HostName for example, this line is:
$Line=$Info | Select-String -Pattern HostName
The next thing that we have to do is to take the data within the $Line variable that we just created and put it into string format. Here is a command that can be used for this purpose:
$LineString = [String]$Line
The third line of code uses the SubString function to get rid of the excess text on the line, leaving you with only the information that you are interested in. Here is an example of this command:
$HostName=$LineString.Substring(27)
You can see these commands in action in Figure 2.
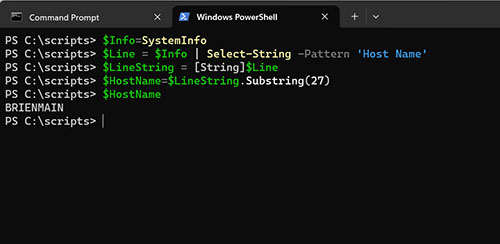 [Click on image for larger view.] Figure 2. I have extracted the PC's hostname.
Here is the code used to capture all of the elements defined in the CSV file:
$Info = SystemInfo
$Line = $Info | Select-String -Pattern ‘Host Name'

  $LineString = [String]$Line

  $HostName=$LineString.Substring(27)
$Line = $Info | Select-String -Pattern ‘Intel64'

  $LineString = [String]$Line

  $Processor=$LineString.Substring(33)
$Line = $Info | Select-String -Pattern ‘Total Physical  Memory'

  $LineString = [String]$Line

  $Memory=$LineString.Substring(27)

  $Memory = $Memory -Replace ‘,',''

  $Memory = $Memory -Replace ‘ MB',''

  $IntMemory=[Int]$Memory

  $Memory=$IntMemory/1024

  $MemoryString=[String]$Memory

  $Memory=$MemoryString.SubString(0,6) + ‘ GB'
$Line = $Info | Select-String -Pattern ‘OS Name'

  $LineString = [String]$Line

  $OS=$LineString.Substring(27)
$Line = $Info | Select-String -Pattern ‘Original Install  Date'

  $LineString = [String]$Line

  $Date=$LineString.Substring(27)

  $Date = $Date -Replace ‘,',''
As you look at the code above, you will notice that I took a few liberties with regard to retrieving the processor information. That's because the SysInfo utility displays the CPU information on a blank line. There are ways of retrieving just this line, but given the complexity of doing so, I simply performed a pattern match on Intel64.
I also had to add a line of code to reformat the date. The date provided by the SysInfo command includes a comma, which would have caused problems for the CSV file. As such, I had to filter out the comma.
Similarly, I had to strip a comma from the reported memory, as well. While I was at it, I added a few lines of code to convert the memory from MB to GB.
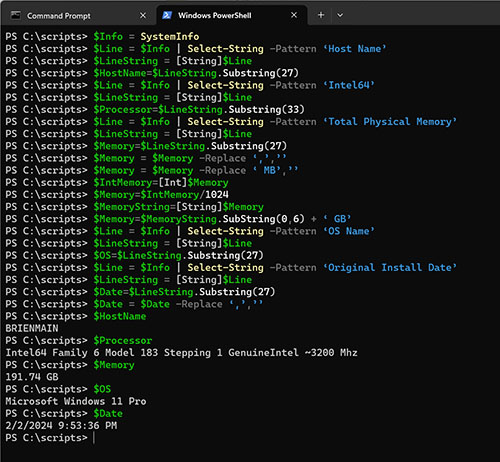 [Click on image for larger view.] Figure 3. I have extracted basic system inventory information.
Writing the Data to the Spreadsheet
[Click on image for larger view.] Figure 3. I have extracted basic system inventory information.
Writing the Data to the Spreadsheet
Now that we have captured inventory data to a series of variables, the last step in the process is to append the CSV file. You can do so by using these commands:
$CSVFile = “C:\Scripts\PCInventory.csv”

  $CSV=Import-CSV $CSVFile

  $CSV.Name = $HostName

  $CSV.Processor = $Processor

  $CSV.Memory = $Memory

  $CSV.OS = $OS

  $CSV.Date = $Date

  $CSV | Export-CSV $CSVFile
You can view the CSV file by typing this command:
Import-CSV $CSVFile
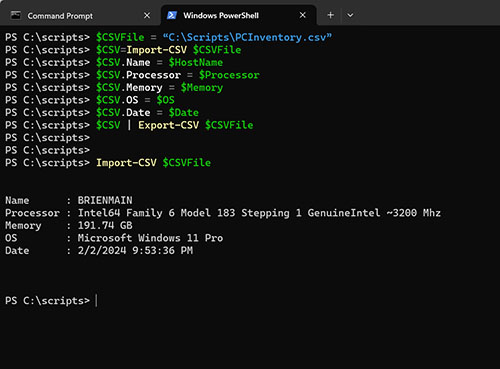 [Click on image for larger view.]
Figure 4. This is the CSV file.
[Click on image for larger view.]
Figure 4. This is the CSV file.
It is worth noting that when you create the CSV file, PowerShell creates a blank record within the file. The export command shown above overwrites this blank record with a record containing data. For subsequent write operations, you will need to add the Append parameter to the Exper-CSV cmdlet. Otherwise, your existing data will be overwritten. The actual command is:
$CSV | Export-CSV $CSVFile -Append
So now that I have shown you some strategies for using PowerShell to create a PC inventory spreadsheet, I want to move forward with a discussion of how to use Visio to create a network diagram based on the data within the spreadsheet. I will show you how in Part 3 of this series.
About the Author
Brien Posey is a 22-time Microsoft MVP with decades of IT experience. As a freelance writer, Posey has written thousands of articles and contributed to several dozen books on a wide variety of IT topics. Prior to going freelance, Posey was a CIO for a national chain of hospitals and health care facilities. He has also served as a network administrator for some of the country's largest insurance companies and for the Department of Defense at Fort Knox. In addition to his continued work in IT, Posey has spent the last several years actively training as a commercial scientist-astronaut candidate in preparation to fly on a mission to study polar mesospheric clouds from space. You can follow his spaceflight training on his Web site.