Posey's Tips & Tricks
Planning for an Unusually Difficult PC Backup
Old PC with more than a decade of never-backed-up data on it? No problem.
I usually tend to think of data backups as being really straightforward. After all, backups have been around in one form or another for almost as long as computers have existed. Every once in a while though, a situation comes along that makes you really have to stop and think about the best way to handle a data backup.
As I write this, I find myself facing one of these situations. Without saying too much, I am currently preparing to help an elderly family member with a long-distance move. This particular family member owns an extremely old PC. It's an old Dell machine with one of those "Designed for Windows 7" stickers on it. Some way, somehow, somebody managed to install Windows 10 on the machine, though Windows runs painfully slow.
As you might expect, this machine contains data -- lots of data. It probably contains data from at least the last 10 years, maybe more, and as far as anybody can remember, the machine has never once been backed up.
So obviously, the machine needs to be backed up in order to avoid any data loss. The fact that the computer is about to endure a long-distance move adds to the urgency. After all, the machine's age combined with the rough handling that is sure to occur during the move all point to a likely hardware failure.
Although this machine urgently needs to be backed up, I'm sure you are probably wondering why I consider this particular backup operation to be challenging. After all, why not just install some backup software, plug in an external USB hard disk, and be done with it?
The problem is that the computer's hard disk is so full that there probably isn't enough room to install any backup software. Even if I could install backup software, the machine is so low on RAM that it is primarily relying on virtual memory, thereby making the machine excruciatingly slow.
Given those particular constraints, my approach to backing up the system would ordinarily be to physically remove the hard disk, and then use an external disk caddy to attach the machine's hard disk to my laptop. I could then back up the disk's contents to an external USB hard disk.
There is still a possibility that I might end up using this tried and true backup method, but there is one more constraint that makes me want to avoid using this method if I can. That constraint has to do with the availability of physical space.
As previously noted, my family member is preparing for a long distance move. Although the movers are going to handle the bulk of the move, I am going to have to rent a large vehicle and drive two passengers, two dogs, and some essential possessions cross country. Space in the vehicle is going to be tight and I really don't want to be taking up any extra space by bringing my laptop or an external disk caddy with me.
So here is my plan for backing up the machine prior to the move. While I don't want to take up space by bringing a laptop and a disk caddy, I am going to bring two portable USB hard drives (because you should always make two backups). I am also going to bring with me a DVD containing the Windows installation media.
My plan is to boot the system from the Windows 10 installation media. One of the interesting things about the Windows installation media is that Microsoft provides a way for you to access a Command Prompt environment. After you have selected your language, you are taken to a screen containing an Install Windows button. Rather than clicking this button, you can click the Repair Computer link, shown in Figure 1.
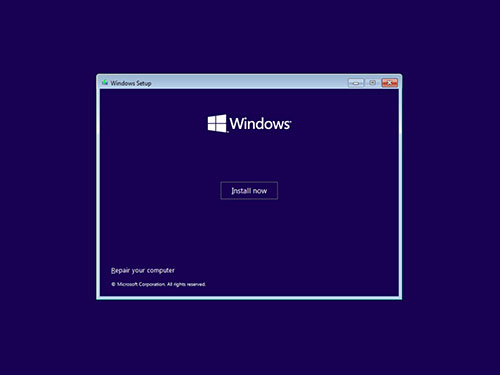 [Click on image for larger view.] Figure 1. Click the Repair Your Computer link.
After a moment, Windows takes you to the Choose an Option screen. Just click Troubleshoot, followed by Command Prompt. It is worth noting that while working in this command prompt environment, the drive mappings won't necessarily be the same as they are when Windows is running. During some tests that I ran at home for example, my external USB drive was mapped as E: when Windows was running, but the troubleshooting environment mapped this drive as D:
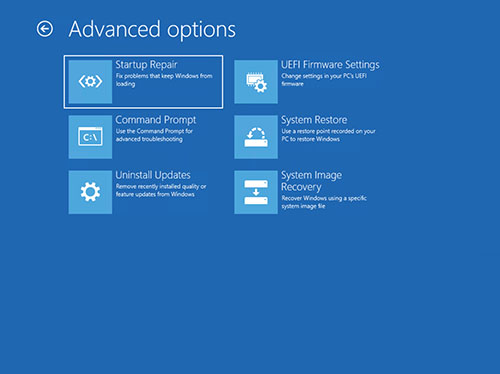 [Click on image for larger view.] Figure 2. Click the Command Prompt option.
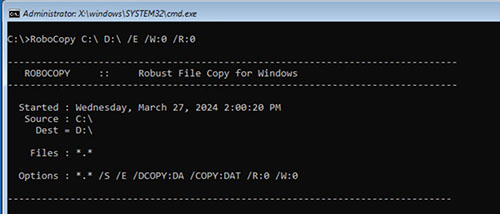
Once in the troubleshooting environment, the last step in the process is to use RoboCopy to copy all of the system's files to the backup disk. The basic command for doing so is:
Robocopy C:\ D:\ /E /W:1
IIn case you are wondering, the /E parameter tells RoboCopy to copy all of the Subfolders. The /W:0 parameter tells RoboCopy to wait 0 second between retries and the /R:0 tells Robocopy not to perform a retry. When you attempt to use RoboCopy to copy everything on a system disk, there will be several folders that will trigger a "The name of the file cannot be resolved by the system" error. If you fail to specify /W:0 and /R:0 then robocopy will wait 30 seconds and then attempt a retry. The problem with this is that Robocopy will attempt to retry the operation a million times and will wait for 30 seconds between each retry. Using /W:0 /R:0 effectively causes RoboCopy to just move on if it encounters an error.
You can see what this looks like in Figure 3.
 [Click on image for larger view.] Figure 3. Click the Repair Your Computer link.
About the Author
Brien Posey is a 22-time Microsoft MVP with decades of IT experience. As a freelance writer, Posey has written thousands of articles and contributed to several dozen books on a wide variety of IT topics. Prior to going freelance, Posey was a CIO for a national chain of hospitals and health care facilities. He has also served as a network administrator for some of the country's largest insurance companies and for the Department of Defense at Fort Knox. In addition to his continued work in IT, Posey has spent the last several years actively training as a commercial scientist-astronaut candidate in preparation to fly on a mission to study polar mesospheric clouds from space. You can follow his spaceflight training on his Web site.