Posey's Tips & Tricks
Using Hyper-V Replication to Recover from a Data Loss Event
Things sometimes go sideways. Thankfully, Microsoft's Hyper-V Replication feature can get you back up and running.
This morning I made a seriously bone headed move. I've got a project that I have been intermittently working on for the better part of a week. I wrapped the project up this morning, and while removing some folders that were no longer needed, I accidentally deleted the entire project. Thankfully, I have an automated backup in place, so didn't lose any data. Even so, I decided to use this incident as an opportunity to test my ability to recover data using a Hyper-V replica.
For those who might not be familiar with the Hyper-V replica feature, it allows you to create a standby copy of your virtual machine on another server. This is different from failover clustering in that replication creates an entirely separate copy of the virtual machine (and keeps that copy synchronized with the primary virtual machine copy), whereas failover clustering relies on shared storage.
Hyper-V replication is intended as a resiliency tool, protecting against things like host server failures or storage failures. As such, it was never intended to act as a backup replacement. Even so, you can configure Hyper-V to create hourly recovery points as a part of the replication process. These recovery points can be stored for up to 24 hours. This means that if something really bad were to happen to a virtual machine (such as a ransomware infection), you could undo the damage by rolling the virtual machine back to a previous state. Of course this assumes that you have enabled the automatic creation of recovery points. It also assumes that you catch the problem and act on it within the allotted 24 hour time frame.
In my case, I didn't suffer a catastrophic virtual machine level failure. I only lost a single folder. In my case, rolling the VM back to a previous state would have done more harm than good because it would have meant losing data stored in locations that were unaffected by the accidental deletion.
What I wanted to find out was whether it is possible to use one of these hourly recovery points to recover specific data, without having to roll back the entire virtual machine. Again, Hyper-V was never designed to perform these types of recovery operations, but it seemed as though there should be a way to get back a subset of a virtual machine's data if that data resides within an hourly restore point.
Interestingly, Hyper-V will allow you to perform a test failover. To do so, you need only to right click on the replica virtual machine (not the primary copy) and then choose the Replication | Test Failover commands from the shortcut menus. When you do, Hyper-V asks which recovery point you want to use. When you make your selection, Hyper-V creates a bootable virtual machine copy from your chosen recovery point.
 [Click on image for larger view.]
Figure 1. Right click on the VM and choose the Replication | Test Failover commands from the shortcut menus.
[Click on image for larger view.]
Figure 1. Right click on the VM and choose the Replication | Test Failover commands from the shortcut menus.
On the surface, it would seem that you should be able to log into this virtual machine copy and then use it to get your data back. However, things aren't quite that simple. The problem is that the virtual machine copy has no network support. You could theoretically attach it to your network, but even if you did, it would almost certainly conflict with your production virtual machine. As such, you need a different method for copying off the data.
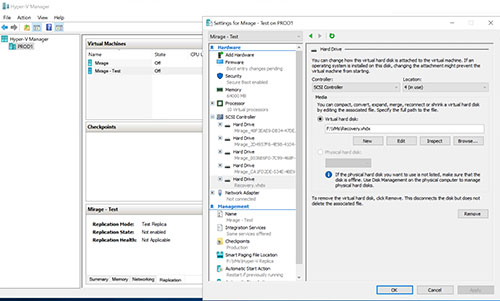
The way that I solved this problem was to use the Hyper-V Manager to create a new virtual hard disk. It's important to store this virtual hard disk in a location that is separate from the virtual machine copy. To create the virtual hard disk, just go to the test virtual machine's Settings, select the SCSI Controller and then create a new virtual hard disk in the usual way.
 [Click on image for larger view.]
Figure 2. I have added a new virtual hard disk to the test VM.
[Click on image for larger view.]
Figure 2. I have added a new virtual hard disk to the test VM.
Once you have created the new virtual hard disk, log into the test virtual machine and then use the Disk Management Console to create a volume on the new virtual disk. At this point, you can just copy the lost data from its original location to the new virtual hard disk.
When the copy process finishes, log out of the test VM and then shut it down. At that point, you will need to go into the test virtual machine's settings and removed the virtual hard disk that you recently created. It's worth noting that the goal at this point in the process is to detach the virtual hard disk, not to delete it. You can do this by going into the virtual machine's settings, selecting the virtual hard disk, and then clicking the Remove button, followed by OK.
With the virtual hard disk safely removed, you can terminate the test failover. To do so, right click on the virtual machine replica and select the Replication | Stop Test Failover command from the shortcut menus.
The last step in the process is to temporarily attach the new virtual hard disk to the production VM and copy the data from the recovery disk to the primary virtual hard disk.
As you can see, the data recovery process is a bit tedious, but by using this method, you can recover data that was accidentally deleted.
About the Author
Brien Posey is a 22-time Microsoft MVP with decades of IT experience. As a freelance writer, Posey has written thousands of articles and contributed to several dozen books on a wide variety of IT topics. Prior to going freelance, Posey was a CIO for a national chain of hospitals and health care facilities. He has also served as a network administrator for some of the country's largest insurance companies and for the Department of Defense at Fort Knox. In addition to his continued work in IT, Posey has spent the last several years actively training as a commercial scientist-astronaut candidate in preparation to fly on a mission to study polar mesospheric clouds from space. You can follow his spaceflight training on his Web site.