Posey's Tips & Tricks
Launching a PowerShell Script from Excel, Revisited
We're going to build off my previous series to show how to further the communication channel between Excel and PowerShell.
In a recent series of posts, I explained how to launch a PowerShell script from within Excel. In doing so, I even went so far as to pass a cell's value to the script as a parameter. However, the techniques that I described in that article had one major shortcoming. While I proved that I could pass a value from a worksheet cell to a PowerShell script as a parameter and take action on that parameter, I only displayed the results in a pop-up window. The technique would be far more useful if it were actually able to take a value from a spreadsheet, send it to a PowerShell script for processing and then display the result of that processing within a worksheet cell.
Although the idea of having PowerShell pass a value back to Excel sounds simple enough, it was surprisingly difficult to make it work. Even so, the script that I came up with really isn't all that complicated. Before I show you the script, I recommend that you read my previous two-part column (part one, part two).
I am going to be building on the technique that I outlined in that series. I will also be using the same spreadsheet as before.
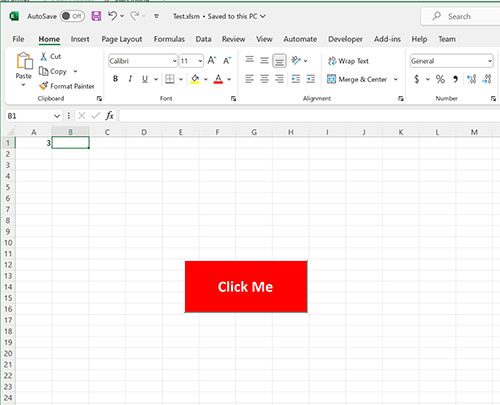
So as you may recall from my previous article series, my spreadsheet was designed so that whenever the user clicked a button, Excel took whatever value was in cell A1 and passed it as a parameter to a PowerShell script called Plus2.ps1. That script simply added 2 to whatever number had been passed to it, and then displayed the result on the screen. If you look at Figure 1, for example, you can see that cell A1 contains a value of 3. Hence, Excel would pass the number 3 to PowerShell and PowerShell would add two to it, giving a result of 5.
 [Click on image for larger view.]
Figure 1. Clicking the button passes the number 3 to a PowerShell script.
Now obviously there are much easier ways to add two to a number using nothing but Excel (no PowerShell). But that isn't the point. The idea is that you can use PowerShell to perform tasks and computations that are way beyond anything that Excel can do natively. With that in mind, I want to do the same thing as before, but this time I want to pass the result (the value of A1+2) back to Excel and display it in B1.
The script's first two lines of code are the same as before. The script accepts $OriginalValue as a parameter and then creates a variable called $NewValue, which it sets to $OriginalValue+2. Hence, $NewValue contains the calculation result (in this case, the number 5). Here is the code:
param($OriginalValue)

  $NewValue=$OriginalValue + 2
The next thing that the script needs to do is to close Excel. While I did find a way to update an open spreadsheet, the results did not appear in real time and I ended up having problems with various inconsistencies. As such, I found that it is better to simply close Excel.
Before I show you how I did it, there are two very important things that you need to know. First, this script assumes that the spreadsheet has already been saved. It does not attempt to save the workbook before closing Excel. Second, the script also assumes that no other Excel books are open. If they are, then those workbooks are also in danger of being closed. Here is the code that I used to close Excel:
Stop-Process -ProcessName Excel
As you can see, I am simply using the Stop-Process cmdlet to terminate any processes associated with Excel, effectively closing the workbook.
The next bit of code creates a variable called $Path. This variable stores the path and filename associated with the Excel document. Technically, there are other ways of providing the path and filename, but I used this method just to make the code a bit cleaner:
$Path='C:\temp\test.xlsm'
Now it's time to open the Excel document in PowerShell. Here are the lines of code that I used:
# Create COM Object

  $Excel = New-Object -ComObject Excel.Application


  # Open Excel Workbook

  $Workbook = $Excel.Workbooks.Open($Path)


  #Get the Worksheet

  $Worksheet = $Workbook.Worksheets["Sheet1"]
As you can see, I am creating a COM object of type Excel.Application. From there, I am opening the workbook and creating a variable called $Worksheet that points to Sheet1 within the workbook.
Now it's time to insert the calculated value into the spreadsheet. This can be done with a single line of code. As you may recall, the calculated value is stored in a variable called $NewValue. To insert this value into cell B1, I used this command:
$Worksheet.Cells.Item(1, 2).Value=$NewValue
When creating this script, the thing that I struggled with the most was saving my workbook and cleaning up the COM object. I based my script on a solution that I found here. Here is the code that I am using in my script:
# Save Changes, Close Excel, and Release the COM Object

  $Workbook.Save()

  $Workbook.Close($False)

  $excel.Quit()

  [System.Runtime.Interopservices.Marshal]::ReleaseComObject($excel)

  Remove-Variable excel
At this point, it's time to reopen the Excel application and load the worksheet. To do so, PowerShell needs to navigate to the folder where Excel.exe resides and then use the Invoke-Expression cmdlet to launch Excel. I am using the /T switch and the workbook's filename to load the workbook. Here are the commands:
# Open Excel

  C:

  cd\

  cd '\program files\microsoft office\root\office16\'

  Invoke-Expression ".\excel.exe /t  C:\temp\test.xlsm"
The last thing that the script does is return the command prompt back to its original path. You don't actually have to do this, but I got tired of manually navigating back to the C:\Temp folder while I was debugging the script. The commands that I used are:
# Navigate Back to the Temp Folder

  cd\

  cd temp
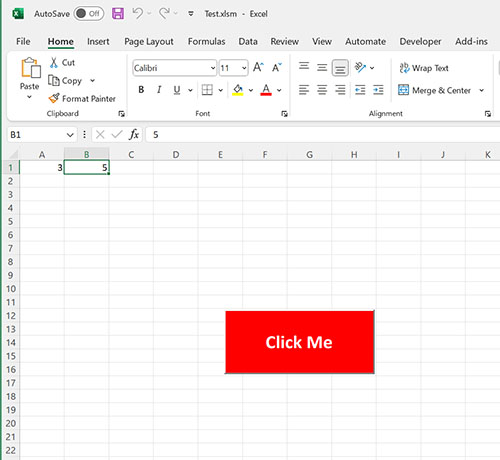
Figure 2 shows what happens when you click on the button. As you can see, cell B1 contains the value of 5, which it received from PowerShell.
 [Click on image for larger view.]
Figure 2. PowerShell has populated cell B2
Here is the script in its entirety:
#Accept a parameter value from Excel and add two to that  value

  param($OriginalValue)

  $NewValue=$OriginalValue + 2
# Close Excel

  Stop-Process -ProcessName Excel
# Specify the Path and Filename for the Workbook

  $Path='C:\temp\test.xlsm'
# Create COM Object

  $Excel = New-Object -ComObject Excel.Application


  # Open Excel Workbook

  $Workbook = $Excel.Workbooks.Open($Path)


  #Get the Worksheet

  $Worksheet = $Workbook.Worksheets["Sheet1"]


  # Insert the Calculated Value into the Spreadsheet

  $Worksheet.Cells.Item(1, 2).Value=$NewValue
# Save Changes, Close Excel, and Release the COM Object

  $Workbook.Save()

  $Workbook.Close($False)

  $excel.Quit()

  [System.Runtime.Interopservices.Marshal]::ReleaseComObject($excel)

  Remove-Variable excel
# Open Excel

  C:

  cd\

  cd '\program files\microsoft office\root\office16\'

  Invoke-Expression ".\excel.exe /t  C:\temp\test.xlsm"
# Navigate Back to the Temp Folder

  cd\

  cd temp
About the Author
Brien Posey is a 22-time Microsoft MVP with decades of IT experience. As a freelance writer, Posey has written thousands of articles and contributed to several dozen books on a wide variety of IT topics. Prior to going freelance, Posey was a CIO for a national chain of hospitals and health care facilities. He has also served as a network administrator for some of the country's largest insurance companies and for the Department of Defense at Fort Knox. In addition to his continued work in IT, Posey has spent the last several years actively training as a commercial scientist-astronaut candidate in preparation to fly on a mission to study polar mesospheric clouds from space. You can follow his spaceflight training on his Web site.