Posey's Tips & Tricks
Microsoft Improves the Windows 11 Inking Experience
With the latest batch up updates and new features, Microsoft is making it easier to ditch the keyboard, especially for those tablet users.
The Windows operating system has supported inking for quite a few years now. Even though inking has always worked relatively well, there was undeniably room for improvement. Thankfully, Microsoft has introduced several minor, yet impactful, improvements to the inking experience, making it far better than it once was. Some of these improvements are specific to Surface devices while others apply to Windows in general.
Surface Improvements
Just to be clear, you do not have to have a Microsoft Surface device in order to use inking. You can use inking on any touch screen device using your finger or a stylus. Even so, Surface devices were among the first to support inking and continue to provide one of the best experiences for those who use Windows ink.
Early Surface Pens used a removable battery. Eventually however, Microsoft eventually phased out those Surface Pens in favor of a rechargeable pen. The problem was that the pen used a USB charging cradle, which was inconvenient, especially given that Surface devices tend not to have a lot of USB ports.
I recently acquired a Surface Laptop Studio 2 device and was pleased to discover that it has a built in charger for the Surface Slim Pen. The pen magnetically attaches to the device, which not only keeps the pen charged, it also gives you a convenient place to store your pen when you aren't using it.
Shell Handwriting
One of the newest and most welcome improvements to Windows inking is a Windows 11 feature called Shell Handwriting. This feature allows you to use the pen anywhere that you would normally type. Whatever you write will be converted to typed text.
It's worth noting that Windows has long had the ability to convert hand written text into typed text. In the past however, you had to write your text into the inking pane. Now, you can ink directly into any text input field without having to use the inking pane.
In order to use the Shell Handwriting feature, there are two requirements that you will need to meet. First, you need to be using an English Windows localization. Microsoft will presumably support other regions later on, but for right now Shell Handwriting only works on English based systems.
The other requirement is that you need to be running the 23H2 (or higher) version of Windows 11.
Enabling the Shell Handwriting feature is simple. Click the Start button and go to Settings. When the Settings application opens, click on Bluetooth and Devices, followed by Pen and Windows Ink. This will take you to the screen shown in Figure 1.
 [Click on image for larger view.] Figure 1. You can find the various inking settings on the Pen and Windows Ink screen.
As you can see in the figure, enabling the Shell Handwriting feature is a simple matter of setting the toggle switch to the On position. You will likely need to reboot in order for the setting to take effect.
Once the Shell Handwriting feature is enabled, you will be able to use Windows Ink to write in any text field. In Figure 2, for example, you can see that I have entered handwritten text into a Google search. As soon as you are done writing, Windows will automatically convert your handwritten text into typed text, as shown in Figure 3.
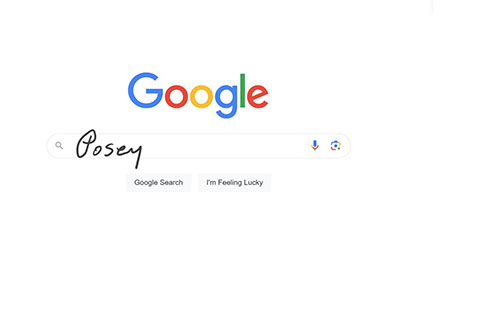 [Click on image for larger view.] Figure 2. You can now write anywhere that you would normally be able to type.
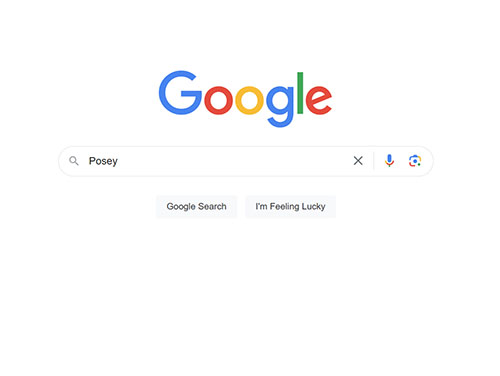 [Click on image for larger view.] Figure 3. Windows converts your handwritten text into typed text.
Incidentally, Windows seems to do a really good job of converting handwritten text into typed text. If you look back at Figure 2, you can see just how messy my handwriting is, and yet Windows had no trouble figuring out what I had written.
There are a few other settings on the Pen and Windows Ink screen that are worth mentioning. If you look back at Figure 1, you will notice that there is a Tactile Signals option that is enabled by default. This option causes the pen to provide you with haptic feedback in an effort to make the writing experience feel as though you were writing on paper. The effect is subtle to the point of being almost unnoticeable. As weird as it may sound though, "almost unnoticeable" is a huge compliment because it means that the writing experience feels so natural that you don't really even notice it. I have always said that good technology should blend seamlessly into the background so that you hardly notice it at all, and this is exactly what Microsoft has accomplished.
Another thing that you might have noticed in Figure 1 is that there is an Additional Pen Settings section. I have expanded this section in Figure 4, so that you can see these settings. The most beneficial setting in this section is Ignore Touch Input When I'm using My Pen. It keeps your hand from accidentally interacting with the desktop while you are trying to write. The setting allows for a much more natural writing experience, because you don't have to worry about making a conscious effort not to touch the screen with your hand.
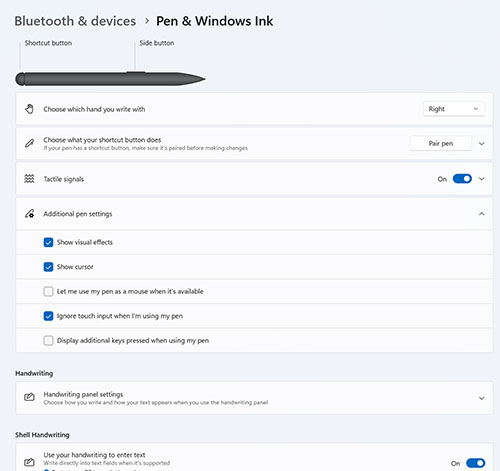 [Click on image for larger view.] Figure 4. There are several additional pen settings.
Finally, one last setting that I want to mention is the Find Your Pen option, shown at the bottom of Figure 1. I haven't really had much of a chance to experiment with this setting, but it uses the Windows Location Services to help you locate a lost pen.
About the Author
Brien Posey is a 22-time Microsoft MVP with decades of IT experience. As a freelance writer, Posey has written thousands of articles and contributed to several dozen books on a wide variety of IT topics. Prior to going freelance, Posey was a CIO for a national chain of hospitals and health care facilities. He has also served as a network administrator for some of the country's largest insurance companies and for the Department of Defense at Fort Knox. In addition to his continued work in IT, Posey has spent the last several years actively training as a commercial scientist-astronaut candidate in preparation to fly on a mission to study polar mesospheric clouds from space. You can follow his spaceflight training on his Web site.