Posey's Tips & Tricks
Take a Fresh Look at Your Microsoft 365 Tenant, Part 2: Tracking
It's time to find those tenants that slipped through your watch and get them removed.
In my previous post, I explained what happens when a user creates a new tenant in Entra ID (previously known as Azure AD). Now, I want to show you how to tell if any new tenants have already been created. I will also show you how to disable end user tenant creation.
Microsoft makes it relatively easy to see if anyone in your organization has created any tenants. To do so, open the Azure portal and then open Entra ID. Now, select the Audit Logs tab (it's on the left side of the screen, near the bottom, in the Monitoring section). This will cause the console to display all of the recent audit log entries.
In most cases, there will probably be so many audit log entries that manually sifting through the list would be wildly impractical. That being the case, I recommend setting a couple of filters. To show you what I mean, take a look at Figure 1.
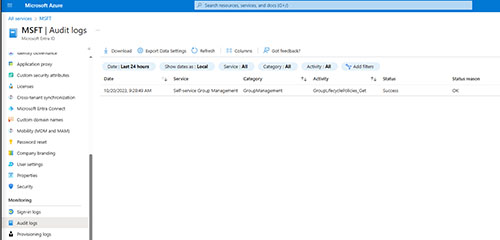 [Click on image for larger view.] Figure 1. This is what the unfiltered audit log screen looks like.
The first thing that you will probably notice about the figure above is that the screen is nearly empty. In fact, there is only one audit log entry. The reason for this is because I am using a lab account with no actual users. For our purposes though, let's assume that my audit logs were jam packed with thousands upon thousands of log entries.
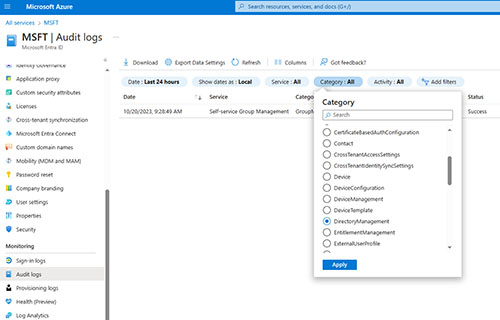
To narrow down the list, you would need to click on the Category filter, which you can see above (it's the fourth filter from the left). Set the Category to Directory Management, as shown in Figure 2, and then click Apply.
 [Click on image for larger view.]
Figure 2. Set the Category filter to Directory Management.
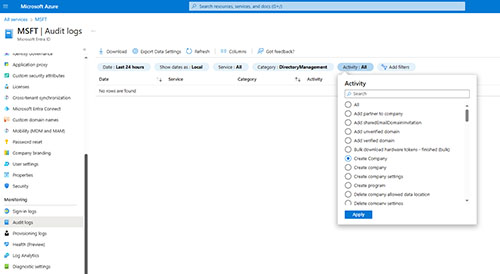
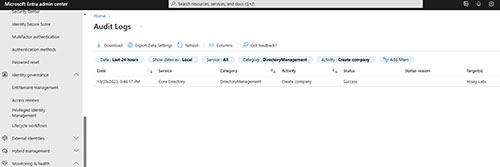
Next, click on the Activity filter and set the Activity to Create Company, and then click Apply. You can see what this filter looks like in Figure 3. For some reason, Microsoft has the Create Company activity listed twice. Even so, I'm sure that this is something that Microsoft will probably address in the future. Incidentally, one of the Create Company filters does not work, so if you don't see the expected results, try using the other Create Company filter. A valid result should look something like what you see in Figure 4.
 [Click on image for larger view.]
Figure 3. Set the Activity filter to Create Company.
 [Click on image for larger view.]
Figure 4. This is what it looks like when a new tenant has been created.
As you can see in the figure above, the Azure portal shows you the target name, which essentially the name of the company (or tenant) that was created. Clicking on the audit log entry causes the console to display a bit more information, including the name of the person who created the new tenant.
So now that I have shown you how to check for any tenants that might have been created without your knowledge, let's take a look at how to disable end user tenant creation.
To get started, open the Entra ID console if you do not already have it open. Next, select the User Settings tab from the left side of the window. If you look at Figure 5, you can see that the setting is called Restrict Non-Admin Users From Creating Tenants. By default, this setting is set to No, meaning that anyone can create a tenant.
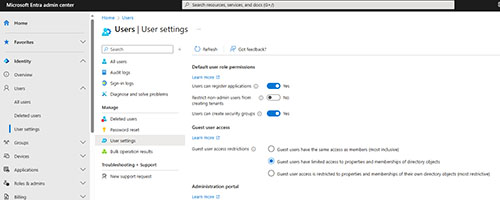 [Click on image for larger view.]
Figure 5. The setting is called Restrict Non-Admin Users from Creating Tenants.
One last thing: If you create a new tenant, you may be wondering how to access it. The easiest option is to click on the account icon in the upper right corner of the screen and then click the Switch Directory link. Now, just select the tenant that you want to work in.
About the Author
Brien Posey is a 22-time Microsoft MVP with decades of IT experience. As a freelance writer, Posey has written thousands of articles and contributed to several dozen books on a wide variety of IT topics. Prior to going freelance, Posey was a CIO for a national chain of hospitals and health care facilities. He has also served as a network administrator for some of the country's largest insurance companies and for the Department of Defense at Fort Knox. In addition to his continued work in IT, Posey has spent the last several years actively training as a commercial scientist-astronaut candidate in preparation to fly on a mission to study polar mesospheric clouds from space. You can follow his spaceflight training on his Web site.