Posey's Tips & Tricks
Creating a Safe Links Policy for Your Organization
Keep your users safe by taking advantage of this Microsoft 365 security feature.
Phishing attacks are one of the single biggest threats to any organization. One of the best defenses against phishing attacks is to create a Safe Links policy. Safe Links is a security feature that is included in some Microsoft 365 subscriptions. It is designed to protect users against malicious links. If a user receives a link to a known malicious site through email, Teams or the Office apps, then the link is automatically rewritten, making it harmless. That way, if a user does click on the link, then the consequences of that action can be avoided.
To get started with Safe Links, open the Microsoft 365 Admin Center and then click on the Security tab to open the Microsoft 365 Defender console. Next, click on the Policies and Rules tab, followed by Threat Policies and Safe Links. Now click on the Create link to begin creating your Safe Links policy.
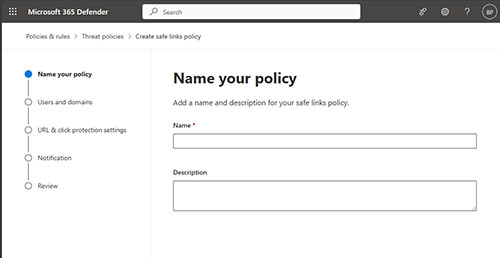
The first thing that you will need to do is to provide a name for your policy, as shown in Figure 1. Although it is optional, it is a good idea to also provide a description of the policy that you are creating. Over time, you may accumulate multiple policies, and having a description associated with those policies can help you to be able to tell them apart.
 [Click on image for larger view.]
Figure 1. Enter a name and an optional description for your Safe Links policy.
[Click on image for larger view.]
Figure 1. Enter a name and an optional description for your Safe Links policy.
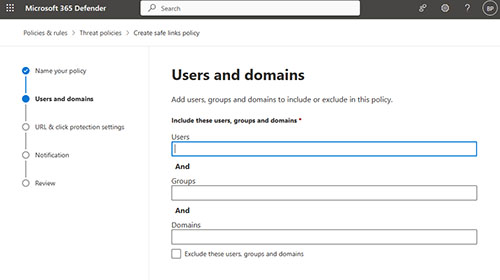
Click Next, and you will be taken to the Users and Domains screen, shown in Figure 2. As you can see in the figure, this screen allows you to specify who the policy will apply to.
 [Click on image for larger view.]
Figure 2.The Users and Domains screen allows you to specify who the policy will apply to.
[Click on image for larger view.]
Figure 2.The Users and Domains screen allows you to specify who the policy will apply to.
There are two things that you need to know about this screen. First, although you can apply a Safe Links policy to an individual user, doing so is considered to be a violation of best practices. From a manageability standpoint, it is always best to apply a policy to either a group or a domain.
The other thing that you need to know is that if you create multiple policies, then there is a chance that they might overlap with one another. For example, a user might be a member of two different groups, each of which has a different policy assigned to it. If this happens, then the policy priority (which is shown on the main Safe Links screen) will determine which Safe Links policy takes precedence.
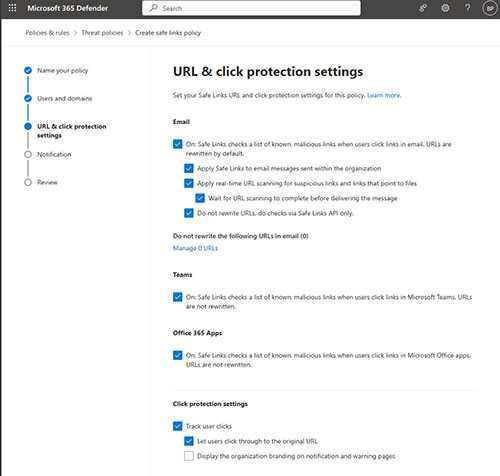
Click Next and you will see the URL and Click Protection Settings screen, shown in Figure 3. This is the screen where you can control how Safe Links will behave for anyone to whom the policy applies. As you can see in the figure, Safe Links can be enabled or disabled separately for Email, Teams, and for the Office apps. There are also several additional settings related to email.
 [Click on image for larger view.]
Figure 3.It's a good idea to deselect the check box that lets users click through to the original URL.
[Click on image for larger view.]
Figure 3.It's a good idea to deselect the check box that lets users click through to the original URL.
For the most part, I recommend selecting and deselecting the checkboxes based on your organization's own unique needs. However, there is one check box in particular that I recommend deselecting. That's the one to let users click through to the original URL. If Safe Links blocks a suspicious URL, then it is probably a bad idea to allow a user to circumvent that protection.
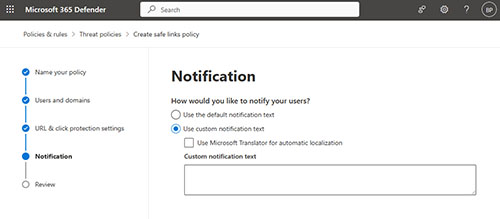
Click Next and you will arrive at the Notification screen, shown in Figure 4. You can opt to show your users the default notification text, but you can provide a custom message if you prefer. Interestingly, if you do choose to use custom notification text, you can use Microsoft Translator to automatically translate the notification based on the user's localization settings.
 [Click on image for larger view.]
Figure 4.You can use default or custom notifications.
[Click on image for larger view.]
Figure 4.You can use default or custom notifications.
Click Next one more time, and you will be taken to the Review screen. Take a moment to read through the information displayed on this screen, just to make sure that it is all correct. Assuming that everything looks good, click the Submit button to create the policy.
About the Author
Brien Posey is a 22-time Microsoft MVP with decades of IT experience. As a freelance writer, Posey has written thousands of articles and contributed to several dozen books on a wide variety of IT topics. Prior to going freelance, Posey was a CIO for a national chain of hospitals and health care facilities. He has also served as a network administrator for some of the country's largest insurance companies and for the Department of Defense at Fort Knox. In addition to his continued work in IT, Posey has spent the last several years actively training as a commercial scientist-astronaut candidate in preparation to fly on a mission to study polar mesospheric clouds from space. You can follow his spaceflight training on his Web site.