Posey's Tips & Tricks
How To Remove an Unwanted Application from Azure AD
As with many things in life, what should be simple is a bit more complicated than needs to be.
From time to time I get asked to review various applications. Most of the time I try to use a dedicated lab environment for product reviews, but sometimes the nature of the review forces me to try out the product in production. The problem with that is that I am notoriously bad about cleaning up after myself and have accumulated a list of products within Microsoft 365. If you look at Figure 1, for example, you can see that there are a handful of titles listed beneath the normal Microsoft 365 applications. So how do you get rid of these unwanted titles?
 [Click on image for larger view.] Figure 1. I have several unwanted applications appearing on my list of Microsoft 365 applications.
Unfortunately, there does not seem to be a way to simply remove these applications from the application list (similarly to removing an application from the Windows 10 Start menu). Even so, there is a way to get rid of them.
The trick is that you have to use the Azure Active Directory Admin Center. If you look at Figure 2, you will notice that the Azure Active Directory Admin Center contains several tabs on the left side of the screen. The bottom tab is called Enterprise Applications. If you click on this tab, you will see all of the non-default applications that have been installed, as shown in Figure 3.
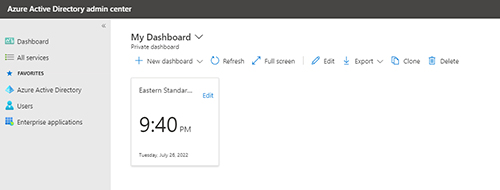 [Click on image for larger view.] Figure 2. The Azure Active Directory Admin Center contains an Enterprise Applications tab.
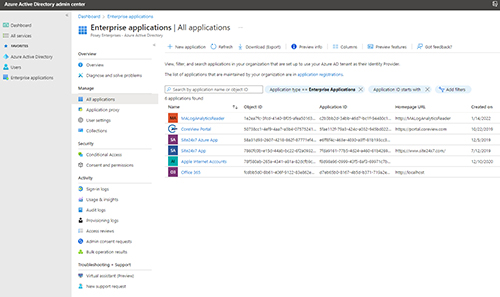 [Click on image for larger view.] Figure 3. Clicking on the Enterprise Applications tab reveals a list of the third party applications that have been installed.
As you look at the figure above, you will notice that there is no option for uninstalling an unwanted application. The trick to removing such an application is that you will need to click on the application to reveal its properties sheet. The properties sheet's contents, which you can see in Figure 4, vary from one application to the next. As a general rule however, it does not contain an Uninstall button. Instead, the Properties sheet is primarily designed to help you assign the application to the users whom you choose.
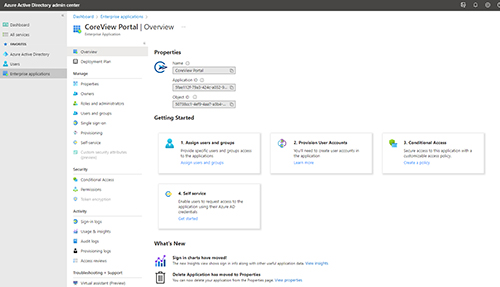 [Click on image for larger view.] Figure 4. This is what an application's properties sheet looks like.
If you look at the second row of tabs on the left side of the screen, you will notice that they are grouped into sections (Manage, Security, Activity, etc.). Locate the Manage section and then click on the Properties tab within it. This takes you to a screen, shown in Figure 5, where you can remove the application. All you have to do is click the Delete button and then click Yes. You may have to refresh the console before the application will actually be removed.
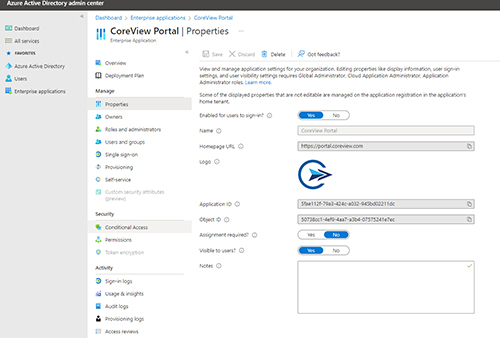 [Click on image for larger view.] Figure 5. Click Delete to remove the application.
So as you can see, it is relatively easy to uninstall an unwanted application. However, you may be wondering where those applications came from in the first place. The items on the list were installed from an app store. Yes, there is an app store built into the Azure Active Directory Admin Center, but it is at least somewhat hidden.
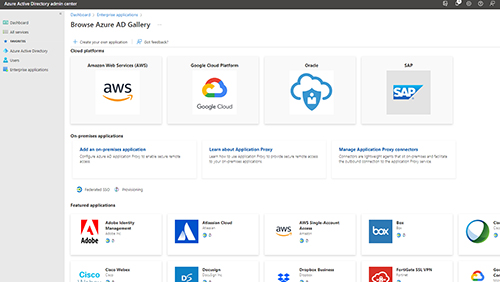
You can access the app store by clicking the Enterprise Applications tab and then clicking the Overview tab. From there, click the Add Enterprise Application button. This will cause the app store to open. You can see what the app store looks like in Figure 6. Whenever you install an application from the app store, it appears on the list of Enterprise Applications.
 [Click on image for larger view.]
Figure 6. This is the app store that is integrated into the Azure Active Directory Admin Center.
About the Author
Brien Posey is a 22-time Microsoft MVP with decades of IT experience. As a freelance writer, Posey has written thousands of articles and contributed to several dozen books on a wide variety of IT topics. Prior to going freelance, Posey was a CIO for a national chain of hospitals and health care facilities. He has also served as a network administrator for some of the country's largest insurance companies and for the Department of Defense at Fort Knox. In addition to his continued work in IT, Posey has spent the last several years actively training as a commercial scientist-astronaut candidate in preparation to fly on a mission to study polar mesospheric clouds from space. You can follow his spaceflight training on his Web site.