Posey's Tips & Tricks
How To Configure Windows 10 for Intel Optane Memory
Intel's Optane memory technology can significantly improve the performance of your Windows 10 system -- provided you enable it correctly. A single mistake can render the system unbootable. Here's how to do it the right way.
Intel's Optane memory has the potential to significantly improve the performance of a Windows 10 system. Even so, there is quite a bit of inaccurate or outdated information online about enabling Intel Optane for use. As such, I wanted to walk you through the process.
What Is Optane Memory?
Optane memory is an Intel technology designed to improve your computer's performance through caching. The Optane memory module is a high-performance SSD that fits into a designated M.2 socket on your computer's motherboard.
When properly configured, your computer will use the Optane memory as a high-speed storage tier. Frequently used applications can be launched from Optane memory rather than from your hard disk (or SSD). Doing so allows these applications to load faster. Optane memory can also store frequently used documents and files, allowing them to be accessed more quickly.
Before you begin the Optane configuration process, there is one extremely important thing you must do before you do anything else: Make a full system backup. That's because if you make a mistake while setting up Optane, you can render the system unbootable. This is especially true if you install the wrong driver (which is easy to do), or if you remove the Optane memory without first reconfiguring the software.
Installing the Optane Software
For the purposes of this column, I'll assume you have already installed the Optane module and need to configure Windows to recognize it. The first thing I recommend doing is to make sure that Windows can see the Optane hardware. To do so, enter the DiskMgmt.msc command at the Windows Run prompt. This will open the Disk Management Console.
Take a moment to browse the console and verify that Windows sees the Optane memory module as a hard disk. While doing so, however, it is important that you do not configure the Optane module for use. Typically, Windows will display a prompt saying that it has detected a new disk and asking if you want to initialize the disk. Be sure to say, "No." Remember: Your only goal at this point is to make sure that Windows sees the Optane hardware.
If you find that Windows does not see the Optane disk, you may have to enable Optane support at the BIOS level. Unfortunately, the steps involved to do this vary widely from one system board manufacturer to the next, so you will probably have to look for instructions online.
Assuming that Windows does recognize the Optane hardware, you can go ahead and install the Optane software. You can download the required software here. Once the download completes, run the Setuprst.exe file to install the Optane software.
When the installation process completes, reboot your computer and launch the Intel Optane Memory and Storage Management tool. Now, go to the tool's Management tab. Make sure the tool recognizes the Optane module, as shown in Figure 1.
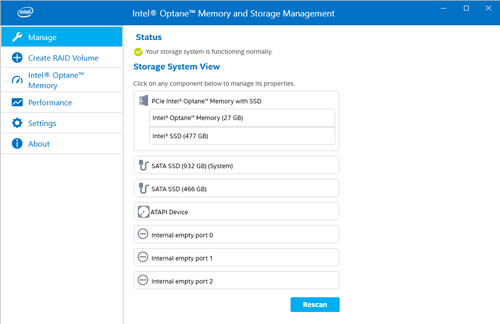 [Click on image for larger view.] Figure 1: The Optane memory module should be listed on the tool's Manage tab.
Now that you have installed the Intel Optane Memory and Storage Management tool and verified that it is able to detect your Optane memory, the next step is to enable the Optane memory. To do so, select the Intel Optane Memory tab, then select your Optane memory module from the upper drop-down list. You will then need to select the hard disk that you want to accelerate from the lower drop-down list, as shown in Figure 2.
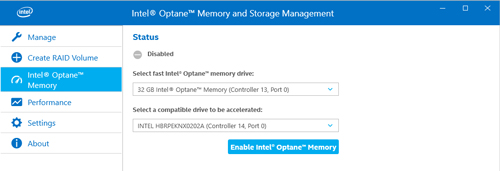 [Click on image for larger view.] Figure 2: Specify your Optane module and the hard disk that you want to accelerate.
Now, click the Enable Intel Optane Memory button. You will now be taken to the screen shown in Figure 3, asking if you want to optimize your hard disk for performance or responsiveness. Choose the Performance option and click Next.
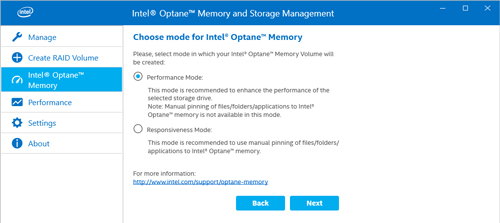 [Click on image for larger view.] Figure 3: Be sure to choose the Performance option.
At this point, you will see a rather dire warning pertaining to potential data loss. However, this only applies to any data that you might have stored on the Optane memory. Select the Erase All Data checkbox and click Enable.
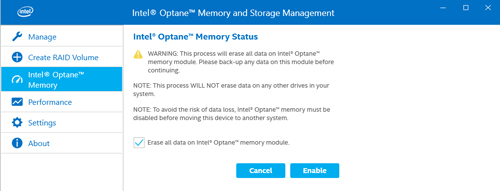 [Click on image for larger view.] Figure 4: Select the Erase All Data checkbox and click Enable.
The last step in the process is to reboot your computer one more time, as shown below. When the reboot completes, your computer will be able to use Optane memory to improve its performance.
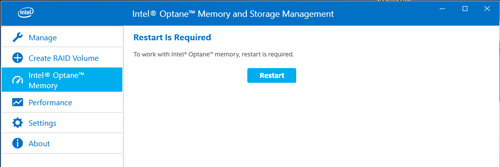 [Click on image for larger view.] Figure 5: You will need to restart the computer to complete the process.
About the Author
Brien Posey is a 22-time Microsoft MVP with decades of IT experience. As a freelance writer, Posey has written thousands of articles and contributed to several dozen books on a wide variety of IT topics. Prior to going freelance, Posey was a CIO for a national chain of hospitals and health care facilities. He has also served as a network administrator for some of the country's largest insurance companies and for the Department of Defense at Fort Knox. In addition to his continued work in IT, Posey has spent the last several years actively training as a commercial scientist-astronaut candidate in preparation to fly on a mission to study polar mesospheric clouds from space. You can follow his spaceflight training on his Web site.