Posey's Tips & Tricks
Tips for Running Hyper-V on Windows 10
Planning to run Hyper-V VMs on your Windows desktop? Here's how to ensure that you don't deplete Windows of the resources it needs to run smoothly.
One of the really nice things about Windows 10 Pro is that it includes a version of Hyper-V that is nearly identical to the one that comes with Windows Server. Windows 10 Hyper-V can be handy for any number of use cases. For instance, I sometimes use a Hyper-V virtual machine (VM) if I need to download something and want to make sure that the file does not contain a malicious payload. I have also used Windows 10 Hyper-V to try out new operating system features, or to test out a configuration change before I run it on a production system.
Regardless of the use case, though, there are a few things that you need to think about before installing Hyper-V on Windows 10.
BIOS Support
One of the first such considerations is to make sure that your computer's BIOS supports hardware-level virtualization. Virtualization has been around for so long that nearly every modern PC supports it. Even so, virtualization is often disabled by default. If virtualization is disabled, you will be unable to start your VMs and will receive the error shown in Figure 1.
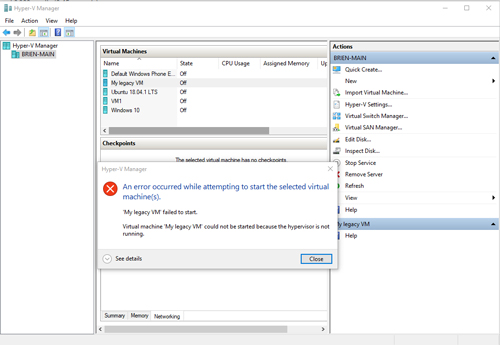 [Click on image for larger view.] Figure 1: This is what happens if you try to start a VM without first enabling virtualization at the BIOS level.
Hard Disk Contention
In a Windows Server environment, storage IOPS is often what limits the total number of VMs that can be installed on a particular host. The reason is that each VM sends read and write requests to the server's hard disk. The administrator must take care to ensure that the server's storage can keep up with the VMs' demands.
Something similar also happens in a Windows 10 environment. Not only do the VMs compete with one another for storage IOPS, they must also compete with the parent operating system (the computer's primary copy of Windows 10). If you run too many VMs or attempt to run VMs that are overly demanding, your computer can slow to a crawl.
One of the most effective things you can do to keep Windows running smoothly is install a second hard disk (preferably an SSD) that will only be used by Hyper-V VMs. Even if you confine your VMs to a dedicated SSD, it is possible for the VMs to collectively overwhelm the drive under the right circumstances. However, using a dedicated disk will keep VM IOPS from impacting your parent operating system or your other applications.
If you decide to install a dedicated hard disk, I recommend configuring Hyper-V to use it as the default location for newly created VMs. To do so, open the Hyper-V Manager and click the Hyper-V Settings link found in the Actions pane. As you can see in Figure 2, Hyper-V provides options for the default folder to be used by newly created VMs and virtual hard disks.
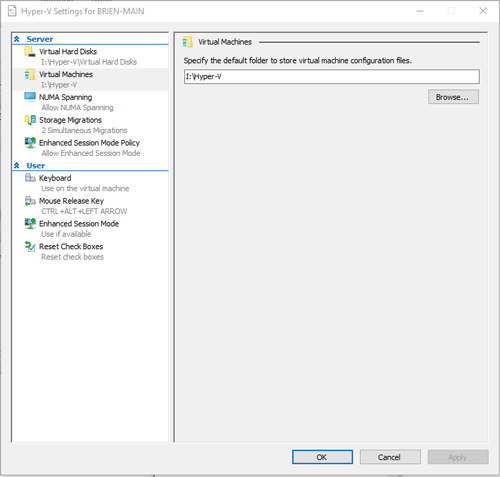 [Click on image for larger view.] Figure 2: Hyper-V lets you specify the default location for VM components.
Memory
One last bit of advice: Pay attention to how much memory your VMs are collectively using. Remember, you can't allocate all of your computer's memory to Hyper-V. The Windows 10 system requirements state that a 64-bit Windows 10 deployment requires at least 2GB of RAM. Typically, however, additional RAM is required to support applications, background services and that sort of thing.
An easy way to get a sense of how much memory your host operating system needs is to open the System Resource Monitor and look at the Memory tab, which you can see in Figure 3.
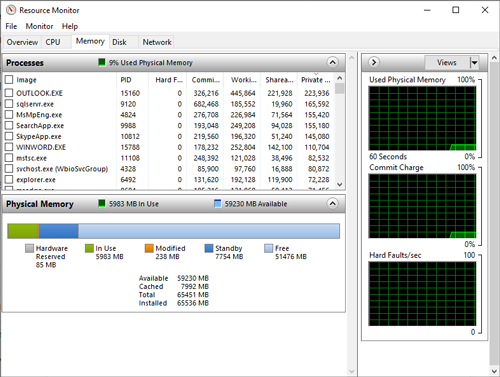 [Click on image for larger view.] Figure 3: You can check your memory requirements by looking at the Memory tab.
As you can see in the figure above, I currently have about 59GB of memory available. Keep in mind, though, that memory requirements fluctuate, and you never want to deplete your system's memory. I recommend always leaving at least a couple of gigabytes (beyond what is currently being used) just in case the parent operating system needs it. Of course, there are also instances -- which can be attributed to a variety of factors -- of Windows not allowing all of the available memory to be allocated to Hyper-V VMs.
The bottom line is that if you are planning to run Hyper-V VMs on your Windows desktop, it's important to make sure that you don't deplete Windows of the resources it needs in order to run smoothly. The main types of resources that you need to pay attention to include CPU, storage (capacity and IOPS), memory and network bandwidth.
About the Author
Brien Posey is a 22-time Microsoft MVP with decades of IT experience. As a freelance writer, Posey has written thousands of articles and contributed to several dozen books on a wide variety of IT topics. Prior to going freelance, Posey was a CIO for a national chain of hospitals and health care facilities. He has also served as a network administrator for some of the country's largest insurance companies and for the Department of Defense at Fort Knox. In addition to his continued work in IT, Posey has spent the last several years actively training as a commercial scientist-astronaut candidate in preparation to fly on a mission to study polar mesospheric clouds from space. You can follow his spaceflight training on his Web site.