Posey's Tips & Tricks
How To Use .CSV Files with PowerShell, Part 2
In the second part of this series, Brien shows how to import a .CSV file into a PowerShell array, including two methods for zooming in on just the specific data you need and filtering out the rest.
In Part 1, I showed you how to use PowerShell to create a .CSV file. Now, I want to show you how to import a .CSV file into a PowerShell array.
For the purposes of this column, I will be using a .CSV file containing a list of processes that were running on my machine, but the techniques I am about to show you should work with any .CSV file so long as it contains a header row followed by data rows.
The quick and easy way to import a .CSV file into an array is simply to map a variable to the Import-CSV cmdlet. Here is an example:
$Processes = Import-CSV C:\Temp\Process.csv
After doing so, you can type the variable name and press Enter to see its contents. You can see an example of this in Figure 1.
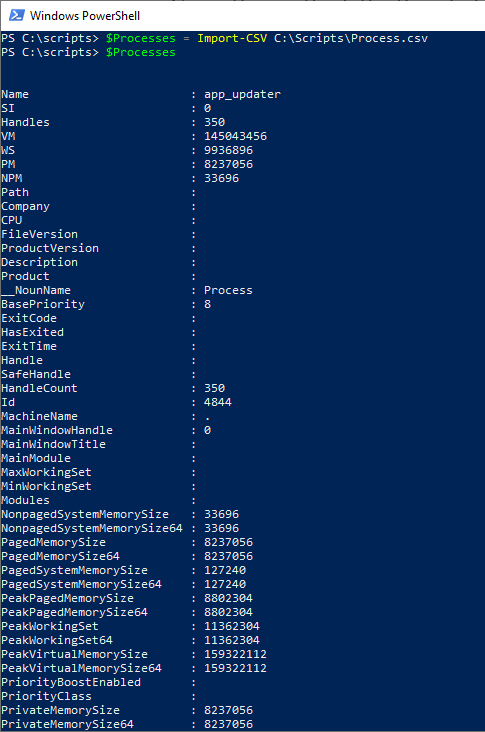 Figure 1: I have imported the contents of a .CSV file into an array.
As you look at the figure above, you will notice that when I outputted the array's contents, the output is divided into two columns. The left column contains a header and the right column contains the data. Because PowerShell respects the column headers that are built into the file, it is possible to filter and format the data just as you could if it were generated natively within PowerShell.
To give you an example, let's suppose that I wanted to create a table containing the name, description and vendor (company) associated with each process that I read in from the .CSV file. The command for doing so would look something like this:
$Processes | Select-Object Name, Description, Company | Format-Table
You can see the command's output in Figure 2.
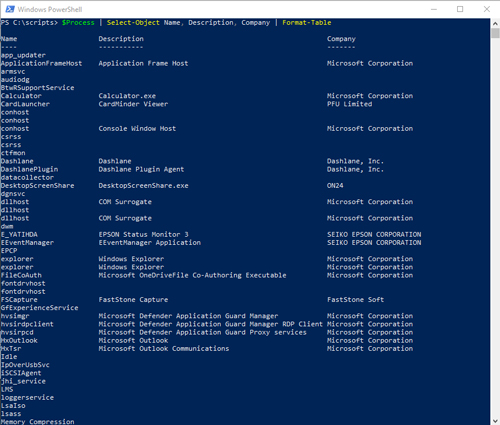 [Click on image for larger view.] Figure 2: This is an example of how you can filter and format data that was imported from a .CSV file.
The figure above illustrates that it is possible to import a large .CSV file, then filter out the data that you don't need. Conversely, however, it is also possible to simply import only the portions of the .CSV file that you are interested in.
I'm personally not a huge fan of this method because it requires a bit more coding and because you have to create a separate array for each column that you want to import. Even so, this method does have its place, especially if you are only interested in one column of the .CSV file's data.
The trick to using this method is that you have to use the Import-CSV cmdlet in conjunction with a ForEach-Object loop. The loop parses the .CSV file one line at a time and gives you the opportunity to add data to an array.
Let's suppose that I want to create an array of names that have been imported from the .CSV file. Here is what the code looks like:
$Names=@()
Import-CSV C:\Temp\Process.csv | ForEach-Object
{
$Names += $_.Name
}
As you can see, the first line of code creates an array called $Names. This line is really important. Without it, the script will treat all of the names that are imported from the file as string data. The end result will be that all of the names are mashed together in a single variable. Figure 3 shows what it looks like if you forget to declare an array.
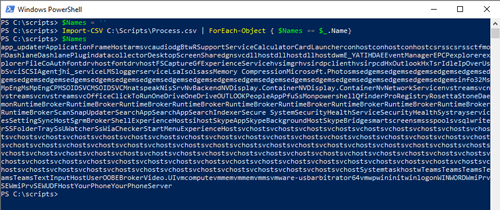 [Click on image for larger view.] Figure 3; This is what happens if you forget to set up an array.
As you can see, defining the array upfront is really important. Now, let's look at the rest of the script.
The second line of code reads the .CSV file and then sets up a ForEach-Object loop that parses the .CSV file one row at a time. The line of code that falls between the two braces is executed each time that the script examines a new row within the .CSV file. This row populates the $Names array with the contents of the Names column ($_.Names) from the .CSV file.
Notice that the operator used in this line of code is +=. If I had simply used an equals sign, then the contents of the $Name variable would be overwritten each time that the script parses a new line in the file. The += operator tells PowerShell to add the data from the current line to whatever is already in the array. You can see an example of how this works in Figure 3.
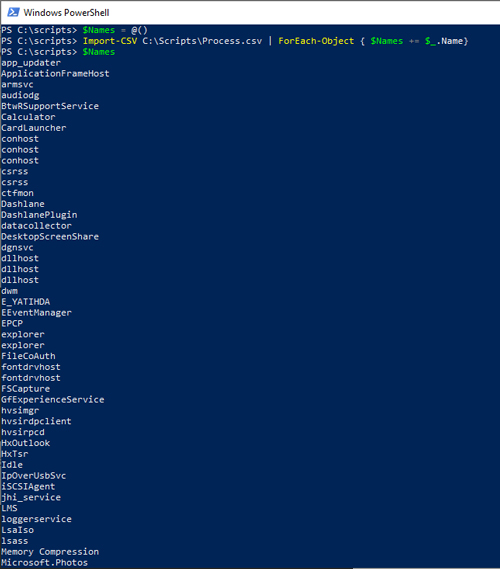 [Click on image for larger view.] Figure 4: The names are now displayed correctly.
So which technique should you be using? Either one is a viable option. Personally, I prefer to simply import the entire .CSV file and then deal with the data. But if you are only interested in a single column of data, then the second technique that I showed you will make your life a lot easier.
About the Author
Brien Posey is a 22-time Microsoft MVP with decades of IT experience. As a freelance writer, Posey has written thousands of articles and contributed to several dozen books on a wide variety of IT topics. Prior to going freelance, Posey was a CIO for a national chain of hospitals and health care facilities. He has also served as a network administrator for some of the country's largest insurance companies and for the Department of Defense at Fort Knox. In addition to his continued work in IT, Posey has spent the last several years actively training as a commercial scientist-astronaut candidate in preparation to fly on a mission to study polar mesospheric clouds from space. You can follow his spaceflight training on his Web site.