Posey's Tips & Tricks
How To Enable Guest Access to SharePoint Online Team Sites
As groups within an organization create SharePoint Online team sites, they often discover that it would be beneficial to grant site access to people outside of their organization. Thankfully, Microsoft makes it possible to grant SharePoint team site access to external users, without having to purchase an Office 365 license for those users. In this column, I will show you how this process works.
Before any of your users can grant SharePoint Online team site access to external guests, you will have to enable guest sharing from within Azure Active Directory. To do so, log into the Office 365 portal, then click on Admin. When you arrive at the Admin screen, click on the Show All link, then click on the Azure AD link found in the list of Admin Centers. You can see the list of Admin Centers in Figure 1.
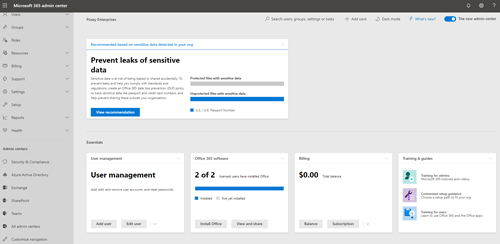 [Click on image for larger view.] Figure 1: Click on the Azure Active Directory link, found within the list of Admin Centers.
After a brief delay, your browser should open the Azure AD Admin Center. At this point, you will need to click on the Azure AD link on the left side of the screen. This will take you to an overview screen. Click on the Organizational Relationships tab that's found on this screen. When you arrive at the Organizational Relationships screen, click the Settings icon. This will take you to the settings screen that you see in Figure 2.
 [Click on image for larger view.] Figure 2: This is the Organizational Relationships Settings screen.
There are two settings that you will need to verify within the Organizational Relationships Settings screen. First, make sure that Admins and Users in the Guest Inviter Role Can Invite option is set to Yes. Second, make sure that Members Can Invite is set to Yes. If you end up having to change either of these settings, be sure to click Save before you close the browser tab.
Once you have enabled sharing at the Azure AD level, you will have to enable sharing at the SharePoint organization level. To do so, go back to the Admin Centers list and click on the SharePoint option. When the SharePoint Admin Center opens, expand the Policies tab on the left side of the screen and then click on the Sharing tab, which you can see in Figure 3.
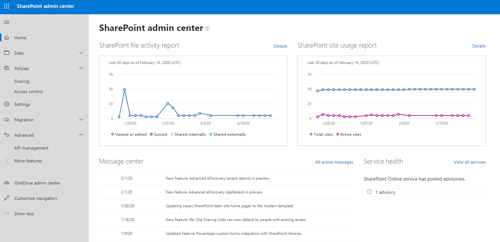 [Click on image for larger view.] Figure 3: Expand the Policies tab and then click on Sharing.
If you look at Figure 4 below, you will see two vertical slide bars just beneath the External Sharing heading. Make sure that the SharePoint slide bar is set to either Anyone or to New and Existing Guests. Be sure to click Save when you are done.
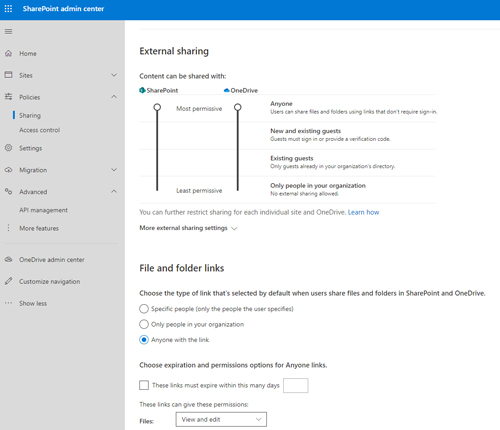 [Click on image for larger view.] Figure 4: You will need to enable external sharing for SharePoint.
For the purposes of this column, I am going to assume that you already have a team site set up and that you want to make that site available to an external user. So far we have put the necessary permissions in place at the Azure AD level and at SharePoint's organization level, but we still need to enable sharing within the site level and then invite an external user to access the site.
To enable sharing for a team site, go back to the SharePoint Admin Center and expand the Sites tab, then click on the Active Sites tab. This will take you to a list of all of the active SharePoint sites across your entire organization. This can end up being a really massive list.
The next thing you will need to do is browse the list until you locate the site for which you want to enable sharing. Select this site, then click on the Sharing icon in the toolbar. Now, set the Sharing option to either Anyone or to New and Existing Guests, as shown in Figure 5. Again, be sure to click Save when you are done.
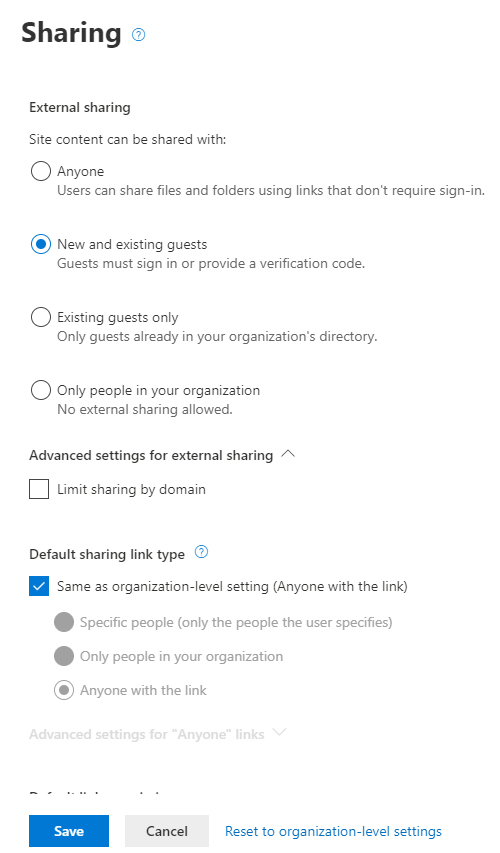 Figure 5: Set the Sharing option to either Anyone or to New and Existing Guests.
The last step in the process is to invite an external user to access the site. The trick is that there is no mechanism within the site to share it with an external user. Instead, you have to use Outlook on the Web. From within Outlook on the Web, click on Groups and then click the group that corresponds to the SharePoint team site that you want to share.
Now, click on the Member link, just beneath the group name. This link will say "1 Member," or something to that effect. This will open a membership window. Click the Add Members link. Now, just enter the e-mail address of the new group member and click the Add button.
About the Author
Brien Posey is a 22-time Microsoft MVP with decades of IT experience. As a freelance writer, Posey has written thousands of articles and contributed to several dozen books on a wide variety of IT topics. Prior to going freelance, Posey was a CIO for a national chain of hospitals and health care facilities. He has also served as a network administrator for some of the country's largest insurance companies and for the Department of Defense at Fort Knox. In addition to his continued work in IT, Posey has spent the last several years actively training as a commercial scientist-astronaut candidate in preparation to fly on a mission to study polar mesospheric clouds from space. You can follow his spaceflight training on his Web site.