Posey's Tips & Tricks
How To Disable Touch Input in Windows 10
When the touchscreen on your Windows 10 laptop goes bad, there's no reason to throw that baby out with the bath water.
This morning I received a phone call from a family member who wanted to know what sorts of features they should look for in a new laptop. As I began explaining some of the key features to watch for, they asked me if they still make laptops that do not have touchscreens. It seemed like an odd question given the way that they intended to use the laptop, so I asked why they didn't want a touchscreen.
They explained to me that their laptop actually wasn't all that old, but that they needed to replace it because its touchscreen was malfunctioning. The screen would register all sorts of random touch inputs even if they weren't touching the screen. They were hoping to avoid a repeat incident by purchasing a laptop without a touchscreen.
I said that in a situation like this, it may be easier and more cost-effective to simply disable the touch input than to buy an entirely new laptop. After doing so, the screen can still be used as the laptop's primary display, but touch inputs (including those stemming from damage) will be ignored.
Disabling touchscreen input is surprisingly easy to do. To disable the touch interface, click on the Start button, then click on the Settings icon. When Windows opens the Settings screen, click on the System icon, then click on the About tab. Now, click on the System Info link located in the upper-right portion of the screen. You can see what this link looks like in Figure 1.
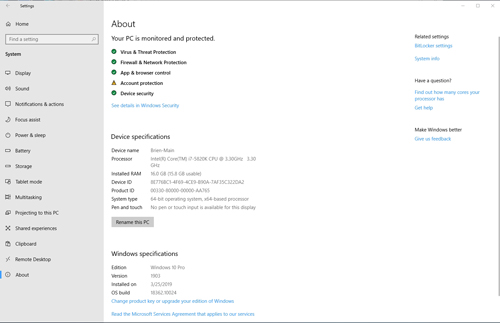 [Click on image for larger view.] Figure 1: Click on the System Info link, located in the upper-right portion of the About screen.
At this point, Windows will open the legacy Control Panel interface, as shown in Figure 2. Click on the Device Manager link found in the upper-left portion of the window.
 [Click on image for larger view.] Figure 2: Click on the Device Manager link.
This will open the Device Manager, which is shown in Figure 3.
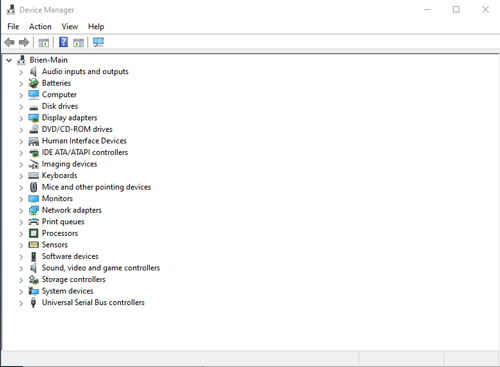 [Click on image for larger view.] Figure 3: This is the Windows Device Manager.
In case you are not familiar with the Device Manager, it is a legacy Windows feature that is used to manage devices and drivers. The Device Manager lists all of your computer's hardware devices. You can use the device manager to update the driver for a particular device, or to enable or disable devices.
Now, locate the Human Interface Devices option and click on the corresponding arrow icon to expand it. This will reveal all of the human interface hardware that is present on the system. One of the items on the list should be HID-Compliant Touch Screen. Right-click on the HID-Compliant Touch Screen option, then choose the Disable Device option from the resulting shortcut menu, as shown in Figure 4.
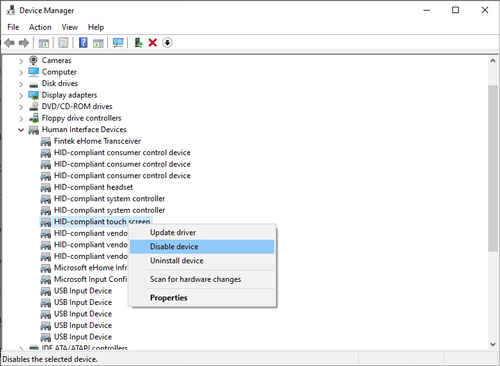 [Click on image for larger view.] Figure 4: Right-click on the HID-Compliant Touch Screen option and choose the Disable Device option from the resulting shortcut menu.
In the situation that I described earlier, the touchscreen really was damaged and was responsible for the unwanted touch input. However, similar symptoms can be caused by a damaged touchpad. Thankfully, the touchpad can also be disabled if necessary. If you do disable the touchpad, though, you will have to resort to using an alternate input device, such as a USB mouse.
The procedure for disabling a laptop's touchpad is very similar to that of disabling the touchscreen. As before, the procedure starts with opening the Device Manager. Rather than expanding the Human Interface Devices container, however, expand instead the Mice and Other Pointing Devices container.
When you do, you will typically see at least two listings for HID-Compliant Mouse. In most cases, one of these listings controls your mouse, while the other controls the touchpad. Simply right-click on one of the listings for HID-Compliant Mouse and then choose the Disable option from the shortcut menu. If you find that doing so does not disable the touchpad, then re-enable the device by right-clicking on it and choosing the Enable option. Repeat the process until you find the device that corresponds to your touchpad.
About the Author
Brien Posey is a 22-time Microsoft MVP with decades of IT experience. As a freelance writer, Posey has written thousands of articles and contributed to several dozen books on a wide variety of IT topics. Prior to going freelance, Posey was a CIO for a national chain of hospitals and health care facilities. He has also served as a network administrator for some of the country's largest insurance companies and for the Department of Defense at Fort Knox. In addition to his continued work in IT, Posey has spent the last several years actively training as a commercial scientist-astronaut candidate in preparation to fly on a mission to study polar mesospheric clouds from space. You can follow his spaceflight training on his Web site.