Posey's Tips & Tricks
Dealing with Broken Dependencies in SCVMM
One of the most useful features in Microsoft's System Center Virtual Machine Manager (SCVMM) is its ability to create fully provisioned virtual machines from templates. Recently, however, I had to deal with some broken, template-related dependencies. Let me show you how I fixed the problem.
The issue began when I wanted to delete some outdated templates that I no longer needed. In doing so, I opened the SCVMM management console and deleted the template. After that, I tried to delete the virtual hard disk object that had previously been used by the template. However, I received an error message stating that the virtual hard disk could not be removed because a dependency existed. So what's going on here?
There are three main possibilities that explain this problem. One possibility is that SCVMM hasn't quite caught up yet and still thinks that the template exists. I've actually seen this happen a few times; in my experience, waiting for a few minutes will usually fix the problem. That wasn't what was going on this time, though.
A second possibility is that there really is a dependency that is still in place. It is possible to create multiple templates from a single virtual hard disk file. If you look at Figure 1, for example, you will see two templates: Generic Template and Generic Template 2. Both of these templates point to the same virtual hard disk. If such a dependency exists and you force a deletion of the virtual hard disk, then you will break any templates that depend on that virtual disk.
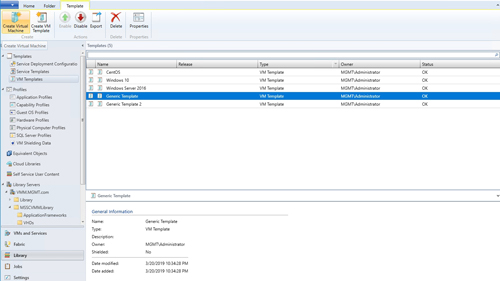 [Click on image for larger view.] Figure 1: Two SCVMM templates are based on the same virtual hard disk.
If you want to see which virtual hard disk a template is bound to, then the easiest thing to do is right-click on the template and choose the Properties command from the shortcut menu. When the template's properties sheet appears, go to the Dependencies tab. As you can see in Figure 2, this tab lists the underlying virtual hard disk.
 [Click on image for larger view.] Figure 2: The Dependencies tab shows which virtual hard disk the template is linked to.
You can also check the dependencies at the virtual hard disk level in exactly the same way. If you look at Figure 3, you can see that I have located the virtual hard disk from within the SCVMM library and then opened its properties sheet. The Dependencies tab shows the templates that depend on the virtual hard disk file.
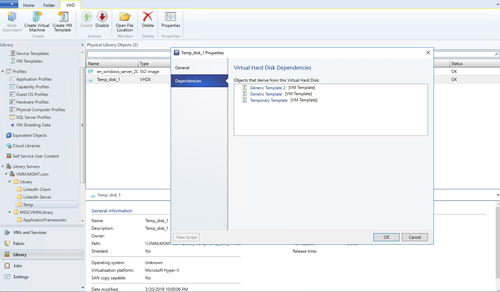 [Click on image for larger view.] Figure 3: This virtual hard disk has three dependencies.
If I were to try to delete the virtual hard disk without first addressing the dependencies, I would receive an error message similar to the one that is shown in Figure 4.
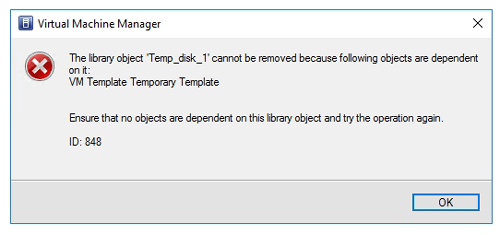 Figure 4: You will get an error if you attempt to delete a virtual hard disk from the library without first removing its dependencies.
So what about that third possibility? Well, the third possibility is that the list of dependencies has become damaged in some way. Let me show you what I mean.
I have deleted Generic Template 1 and 2. You will notice in Figure 4, however, that I still get an error message when I try to delete the virtual hard disk. The error indicates that a template called Temporary Template is still using the file. As you can see in Figure 5, though, this template doesn't exist. So let's fix the problem.
 [Click on image for larger view.] Figure 5: The template named Temporary Template really does not exist.
In these types of situations, you can use PowerShell to break the dependency and delete the virtual hard disk. However, I would urge you to create a backup before doing this.
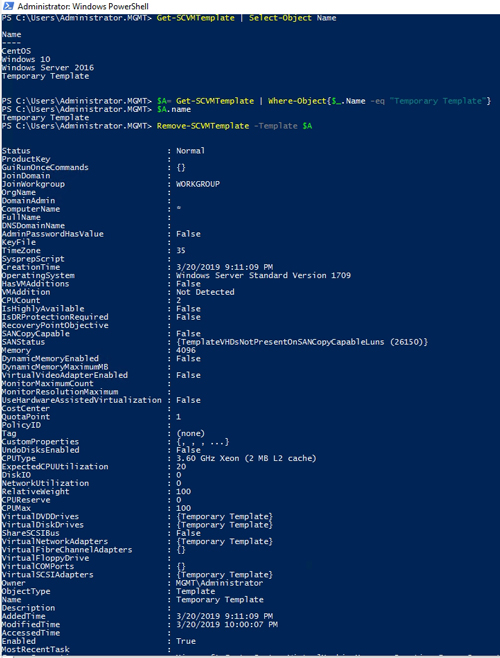
The first step in this process is to remove the template object that SCVMM thinks still exists. To do so, I use the following three commands:
Get-SCVMTemplate | Select-Object Name
$A=Get-SCVMTemplate | Where-Object {$_.Name -eq "Temporary Template"}
Remove-SCVMTemplate -Template $A
The first retrieves the name of all my templates. The second command maps a variable to the template that I want to remove and the third command actually deletes the template. You can see what these commands look like in Figure 6.
 [Click on image for larger view.] Figure 6: This is how you remove the template.
If I repeat the first command, you can see that the damaged template has been removed, as shown in Figure 7.
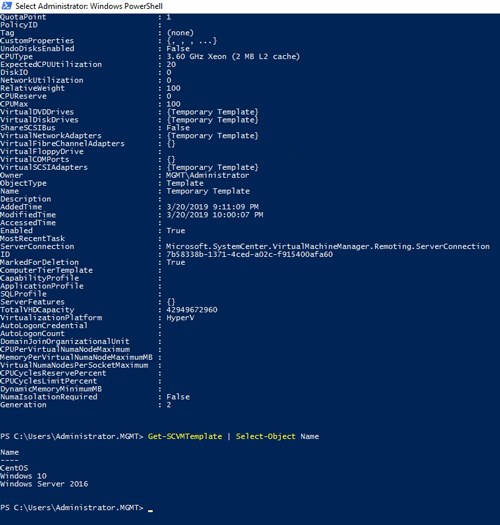 [Click on image for larger view.] Figure 7: The damaged template is gone.
I can use a very similar procedure to remove the virtual hard disk. Here are some commands that can be used:
Get-SCVirtualHardDisk | Select-Object Name
$A=Get-SCVirtualHardDisk | Where-Object {$_.Name -eq "Temp_Disk_1"}
Remove-SCVirtualHardDisk $A
You can see the removal process in Figure 8.
 [Click on image for larger view.] Figure 8: The virtual disk has been removed.
About the Author
Brien Posey is a 22-time Microsoft MVP with decades of IT experience. As a freelance writer, Posey has written thousands of articles and contributed to several dozen books on a wide variety of IT topics. Prior to going freelance, Posey was a CIO for a national chain of hospitals and health care facilities. He has also served as a network administrator for some of the country's largest insurance companies and for the Department of Defense at Fort Knox. In addition to his continued work in IT, Posey has spent the last several years actively training as a commercial scientist-astronaut candidate in preparation to fly on a mission to study polar mesospheric clouds from space. You can follow his spaceflight training on his Web site.