Posey's Tips & Tricks
How To Create Office 365 User Accounts in Bulk
Manual account creation can be tedious, time-consuming and prone to human error, especially if you have more than a handful of Office 365 users to set up. Brien shows you a better way.
For organizations that have an on-premises Active Directory (AD) environment, the preferred method for creating user accounts is usually to create those accounts locally. Once those accounts have been created, Azure AD Connect can synchronize the accounts to the Office 365 cloud.
But what if you don't have an on-premises AD environment and you need to set up some users for Office 365?
While you could create the user accounts manually using the Office 365 Admin Center, manual account creation is probably going to be impractical if you have more than half a dozen users to set up. After all, manual account creation can be tedious, time-consuming and prone to human error. A better solution is to perform a bulk account creation.
To create Office 365 user accounts in bulk, all you have to do is populate a spreadsheet (or more precisely, a .CSV file) with information about your users. Once the required information has been entered, you can upload the spreadsheet to Office 365 and Office will do the rest.
As you have probably already guessed, you can't just upload a .CSV file containing a list of names. Office 365 expects the file that you upload to adhere to a specific format. If the file deviates from that format, then Office 365 won't be able to create the user accounts. Thankfully, there is some help available.
Office 365 allows you to download an empty .CSV file that you can use as a template. You can get this file by logging into Office 365 and opening the Office 365 Admin Center. Once in the Admin Center, select the Users container and then click on the Active Users container. This container will show you all of the user accounts that currently exist within your Office 365 subscription. The next step is to click on More, followed by Import Multiple Users. You can see what this option looks like in Figure 1.
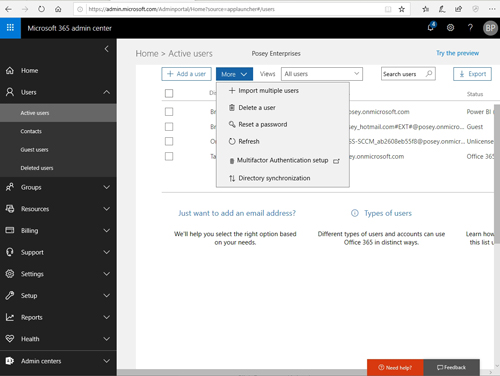 [Click on image for larger view.] Figure 1: Choose the option to create multiple users.
At this point, you will be taken to the Import Multiple Users screen, which you can see in Figure 2. Although this screen is primarily used by the import process, it also contains an option to either download a .CSV file with the required headers or to download a .CSV file that contains the headers and some sample users.
The file containing headers only is pretty self-explanatory. As you can see in Figure 2, this file contains headers for things such as the user's name, address, phone number and department. You would simply enter the information for each user on a separate row within the spreadsheet.
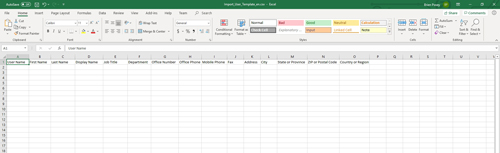 [Click on image for larger view.] Figure 2: This is what the headers-only spreadsheet looks like.
The spreadsheet containing the headers and sample information is useful for those who need a little bit of extra help, or who want to create user accounts for lab-based testing without the hassle of trying to populate a spreadsheet with fake data. You can see the sample data in Figure 3.
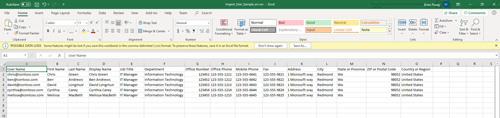 [Click on image for larger view.] Figure 3: This is what the spreadsheet with the sample data looks like.
The process of creating user accounts from the .CSV file is really easy. From the screen shown in Figure 2, click the Browse button and then select the spreadsheet containing your user information. Once you have done that, click the Verify button. The verification process checks your file to make sure that it does not contain any mistakes that could derail the account creation process. For example, if you were to try to upload the sample spreadsheet without replacing the existing domain with your own domain, you will receive an error message stating that the domain is incorrect.
Once you have verified the file, click Next and you will be taken to a screen that allows you to choose how you want your new users to be licensed (and whether you want to allow the users to sign in). You can see what this looks like in Figure 4.
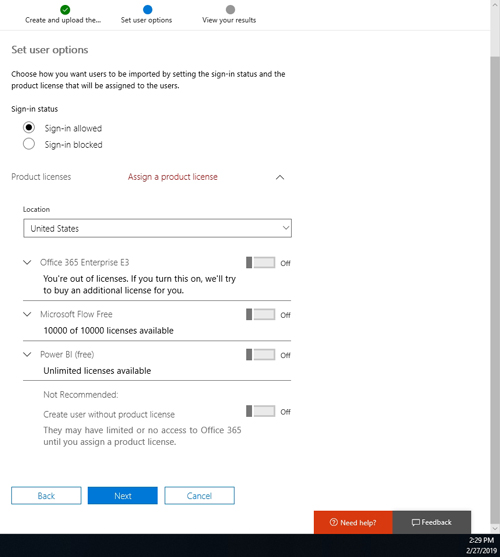 [Click on image for larger view.] Figure 4: Choose the licensing options for the new users.
Once you have finished setting the licensing options for the users, click Next and the user accounts will be created.
About the Author
Brien Posey is a 22-time Microsoft MVP with decades of IT experience. As a freelance writer, Posey has written thousands of articles and contributed to several dozen books on a wide variety of IT topics. Prior to going freelance, Posey was a CIO for a national chain of hospitals and health care facilities. He has also served as a network administrator for some of the country's largest insurance companies and for the Department of Defense at Fort Knox. In addition to his continued work in IT, Posey has spent the last several years actively training as a commercial scientist-astronaut candidate in preparation to fly on a mission to study polar mesospheric clouds from space. You can follow his spaceflight training on his Web site.