Posey's Tips & Tricks
Performing a Storage Refresh on Windows Server 2016, Part 2
In the first part of this series, I talked about the procedures that I used to prepare a physical Windows Server 2016 machine for a storage refresh. In this installment, I want to continue the discussion by showing you how I finished the process.
After I performed the procedures described in Part 1, I pulled all of the hard disks from my server and replaced them with an equivalent number of solid state drives (SSDs). The next step in the process was to restore my operating system.
As you may recall, I used Windows Server Backup to create an image backup that could be used for bare-metal restoration. I restored this backup by booting the server from a Windows Server 2016 installation DVD. Rather than actually installing the operating system, I clicked Next to accept the language and keyboard selections, and then clicked on the Repair Your Computer link. From there, I clicked on Troubleshoot, followed by System Image Recovery.
At that point, the operating system recovery process was just a matter of choosing the image that I wanted to restore and answering a few simple prompts.
Once the Windows Server operating system had been restored, the next thing that I had to do was create a storage pool and a virtual disk similar to the ones that I had previously removed. The SSDs that I had installed were only 1TB in size, whereas the hard disks that I replaced were 2TB each. Even so, I had not even come close to using my server's previous capacity, so the reduced capacity should not cause any issues.
To create the storage pool, I opened Server Manager and clicked on the File and Storage Services container, and then clicked on the Storage Pools container. In Windows Server, any hard disks that are not already in use by the system are listed within the Primordial storage pool. You can see what this looks like in Figure 1.
 [Click on image for larger view.] Figure 1: Available disks are listed within the Primordial storage pool.
To create a storage pool, I selected the New Storage Pool option from the Tasks menu within the Physical Disks section. This causes Windows to launch the New Storage Pool Wizard. I clicked Next to skip the wizard's Welcome screen, and was taken to a screen that asks you to enter a name for your storage pool. After doing so, I clicked Next and Windows displayed a screen that asks you to choose which disks you want to include in the storage pool. You can see what this looks like in Figure 2.
 [Click on image for larger view.] Figure 2: Choose the disks that you want to add to the storage pool.
As you look at the figure above, you will notice that I set the Allocation to Automatic for each disk. You can use the Allocation column to designate a disk as a hot spare if you want. That way, the disk can take over for any disk that happens to fail. In my case, though, I am leaving all of the allocations set to Automatic.
I clicked Next, and the wizard displayed a summary screen. I took a moment to make sure that all of the information that was displayed on this screen was correct, and then clicked the Create button to create the storage pool.
Once the storage pool was created, I selected the storage pool and chose the New Virtual Disk command from the Tasks drop-down list found in the Virtual Disks section. This causes Windows to display a prompt asking you to choose which storage pool you wish to create the virtual disk from. I made my selection, causing Windows to launch the New Virtual Disk Wizard.
I clicked Next, bypassing the wizard's Welcome screen. Upon doing so, there was a prompt to enter a name for the virtual disk that I was creating. As you can see in Figure 3, there is also an option to configure the virtual disk to use tiered storage. I did not use storage tiering because my virtual disk is be based entirely on SSD storage.
 [Click on image for larger view.] Figure 3: Enter a name for your virtual disk.
I clicked Next and was taken to the Enclosure Resiliency screen. This screen is useful if your disks are spread across multiple storage arrays. In my case, all of the disks are internal, so I did not do anything on this screen.
The next screen that I encountered was the wizard's Storage Layout screen. This screen allows you to choose between Simple (striped), Mirror or Parity storage. As you can see in Figure 4, I am using parity storage. This option reduces performance a bit, and also reduces the available capacity, but it protects you against a disk failure.
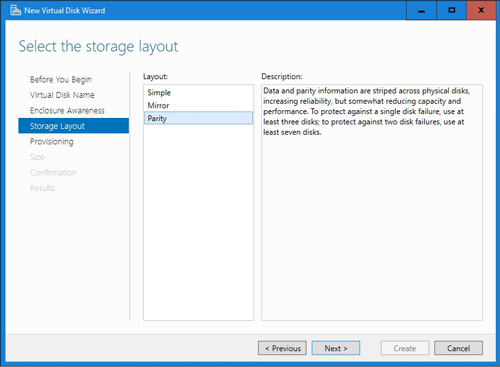 [Click on image for larger view.] Figure 4: I am using parity storage for my virtual disk.
I clicked Next, and was taken to a screen asking if I wanted to use thin or thick provisioning for the virtual disk. Thinly provisioned disks only consume space as data is added. Thick provisioning reserves space up front, but often provides better performance. I am using thick provisioning on my system.
I clicked Next again, and was asked to specify the size of the virtual disk that I was creating. After clicking Next one more time, I was taken to a summary screen. Everything on the summary screen appeared to be correct, so I clicked the Create button to create the virtual disk.
As soon as the virtual disk creation wizard completed, Windows immediately launched the New Volume wizard. I am not going to go through this wizard click by click because it is pretty self-explanatory. The important thing (at least in my case) was to be sure to map the new volume to the same drive letter as what was used previously. As you can see in Figure 5, my virtual disk now contains a volume that is mapped as F:.
 [Click on image for larger view.] Figure 5: The new volume has been created.
At this point, the new disk was ready for use. The final step, therefore, was to copy the previously existing data (in my case, the Hyper-V virtual machines) from the backup to new volume. Once that was done, the upgrade process was complete.
About the Author
Brien Posey is a 22-time Microsoft MVP with decades of IT experience. As a freelance writer, Posey has written thousands of articles and contributed to several dozen books on a wide variety of IT topics. Prior to going freelance, Posey was a CIO for a national chain of hospitals and health care facilities. He has also served as a network administrator for some of the country's largest insurance companies and for the Department of Defense at Fort Knox. In addition to his continued work in IT, Posey has spent the last several years actively training as a commercial scientist-astronaut candidate in preparation to fly on a mission to study polar mesospheric clouds from space. You can follow his spaceflight training on his Web site.