Posey's Tips & Tricks
Performing a Storage Refresh on Windows Server 2016, Part 1
To spruce up some aging lab hardware, Brien decided to make the jump to all-flash storage. Here's a walk-through of the first half of the process.
As someone who writes about a wide variety of technical subjects, I maintain a fairly extensive lab environment so I can experiment with the techniques that I write about. Unfortunately, my lab hardware is getting really old. I am ashamed to admit it, but I built my lab servers seven years ago. The lab machines were high-end at the time, but as you can imagine, they really aren't getting the job done anymore.
Although I thought about replacing all of the lab machines, doing so would be an expensive undertaking. Besides, the servers still have enough memory and processing power to meet my needs (at least for lab purposes). It's the storage that is really bogging those machines down.
As such, I decided to upgrade the machines to use all-flash storage, and I thought that it might be fun to share the procedure that I used.
The servers that I am upgrading are configured to act as Hyper-V hosts. Currently, the machines have a magnetic boot drive containing the parent operating system. Four additional drives in each machine are pooled together using Windows Storage Spaces. A virtual disk within the pool stores all of the Hyper-V virtual machines (VMs).
The first thing that I needed to do was back up the server's existing configuration and the Hyper-V VMs. Since this is just a lab environment, I decided to use Windows Server Backup rather than using a third-party backup solution (although I didn't actually end up using Windows Server Backup until the last step in the process). Windows Server Backup is not installed by default, but you can install it through the Server Manager's Add Roles and Features Wizard, as shown in Figure 1.
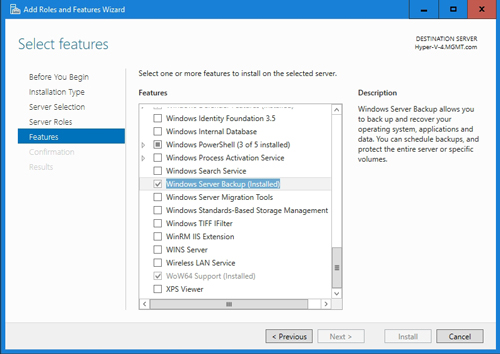 [Click on image for larger view.] Figure 1: You can install Windows Server Backup through Server Manager.
The next step in the process was creating a backup. Although this probably sounds really straightforward, there was actually a bit more to the process than might initially be assumed.
Because I was replacing the server's storage hardware, it meant that I would be restoring my backup to dissimilar hardware. The easiest way to make this work is to create an image backup, replace the hard drives and then restore the backup. The thing that complicated this particular operation was the fact that all of my VMs resided on a virtual disk that had been built on top of Windows Storage Spaces. If I were to simply back up my server, replace the drives and then restore the backup, the newly restored server would be configured incorrectly because the disks that make up the storage pool would no longer exist.
I decided to break the backup process into three separate tasks. The first task was to back up the volumes containing all of the VMs. Since this is not a production environment, I took the easy way out by shutting down all of the VMs, and then performing a file-level copy of all the VM files (VHDX files, configuration files, et cetera) to a USB hard disk.
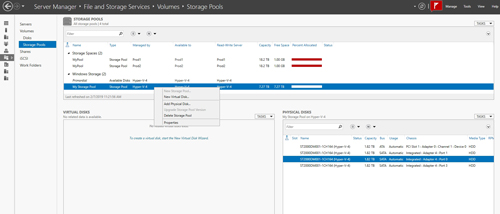
The next step -- and this one was crucial -- was to delete my storage pool and the virtual disk that is hosted on it. This can be done in Server Manager by going into the File and Storage Services container and then clicking on the Storage Pools option. If you look at Figure 2, you can see that I have selected my storage pool, and that the physical disks and the virtual disks within the storage pool appear beneath it.
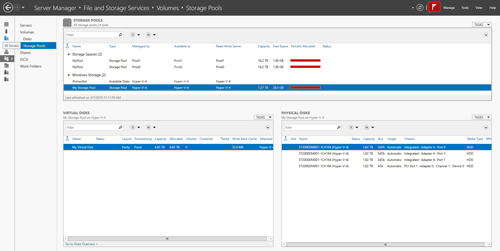 [Click on image for larger view.] Figure 2: This is how the storage pool looked prior to the storage refresh.
If you try to simply delete a virtual disk, you will get an error message stating that all volumes must be deleted before you can delete a virtual disk. To remove a volume, click on the Disks container in the console tree, right-click on the volume that you want to remove, and select the Delete Volume command from the shortcut menu, as shown in Figure 3.
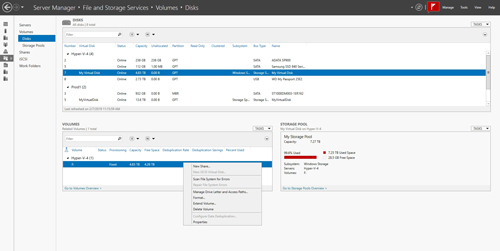 [Click on image for larger view.] Figure 3: This is how you delete a volume.
With the volume deleted, it is now possible to delete the virtual disk. I deleted the virtual disk by going back to the Storage Pools container, right-clicking on the virtual disk and choosing the Delete Virtual Disk command from the shortcut menu, as shown in Figure 4.
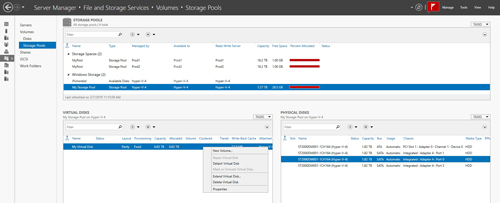 [Click on image for larger view.] Figure 4: Right-click on the virtual disk and choose the Delete command from the shortcut menu.
With the virtual disk deleted, the last step in this process is to delete the storage pool. This returns the disks to the server's primordial storage pool. Simply right-click on the storage pool and choose the Delete Storage Pool command from the shortcut menu, as shown in Figure 5.
 [Click on image for larger view.] Figure 5: Right-click on the storage pool and choose the Delete Storage Pool command from the shortcut menu.
The last of the three tasks that must be completed prior to the storage refresh is that of backing up the server's operating system. This is where Windows Server Backup comes into play. As you can see in Figure 6, I opted for a bare-metal recovery. I also manually selected the Hyper-V option since it does not get selected by default.
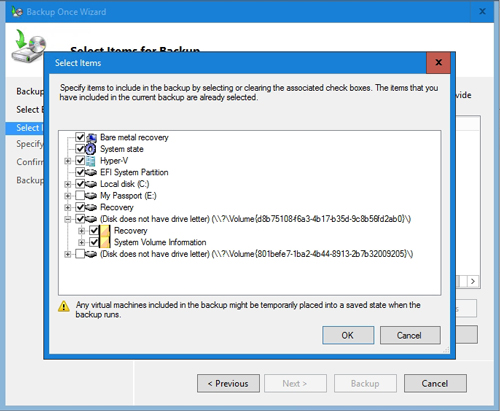 [Click on image for larger view.] Figure 6: I choose to do a bare-metal recovery.
Once the operating system was backed up, it was time to replace the hard disks and return the server to a functional state. I will show you how I did it in Part 2 here.
About the Author
Brien Posey is a 22-time Microsoft MVP with decades of IT experience. As a freelance writer, Posey has written thousands of articles and contributed to several dozen books on a wide variety of IT topics. Prior to going freelance, Posey was a CIO for a national chain of hospitals and health care facilities. He has also served as a network administrator for some of the country's largest insurance companies and for the Department of Defense at Fort Knox. In addition to his continued work in IT, Posey has spent the last several years actively training as a commercial scientist-astronaut candidate in preparation to fly on a mission to study polar mesospheric clouds from space. You can follow his spaceflight training on his Web site.