Posey's Tips & Tricks
Getting a Handle on Hyper-V Virtual NICs
In most cases, Hyper-V makes it really easy to configure virtual network adapters within virtual machines (VMs). For simple VMs, setting up and managing virtual NICs isn't a big deal.
However, things can quickly become confusing when you need to create a VM containing multiple virtual NICs.
Suppose for a moment that you needed to create a VM that would act as a gateway router. Such a VM would need at least two virtual NICs (although additional virtual NICs might also be used for management and high-availability functions). In a situation like this, the administrator would need to keep track of which NIC connects to which network.
In the past, when I had to create VMs with multiple virtual NICs, I resorted to creating the virtual NICs one at a time. My basic approach has been to create and connect the first virtual NIC, and then rename the virtual NIC within the guest OS so that I can keep track of that NIC's purpose. I then create, configure and rename the second virtual NIC, and then repeat the process for any additional virtual NICs that may be required.
This method works like a charm, but it isn't perfect. For one thing, creating and configuring virtual NICs one at a time is a tedious and time-consuming process. I don't know about you, but I have better things to do with my time than to spend all afternoon tinkering with virtual NICs.
The other problem with this approach is that it is a manual process. That's fine if you occasionally need to create a VM or two, but what happens if you need to create a few dozen VMs that all depend on multiple virtual NICs?
In Windows Server 2016, Microsoft has made it possible to name virtual NICs as they are created, and to pass that name to the guest operating system.
Before I show you how this works, let me show you what normally happens when you create a virtual NIC.
Hyper-V VMs connect to a network by way of a virtual switch. In the case of an external virtual switch, the virtual switch is bound directly to either a physical network adapter or to a NIC team. If you look at Figure 1, you can see the Hyper-V Virtual Switch Manager. I have created a virtual switch named My Virtual Switch, and it is bound to a physical Intel network adapter.
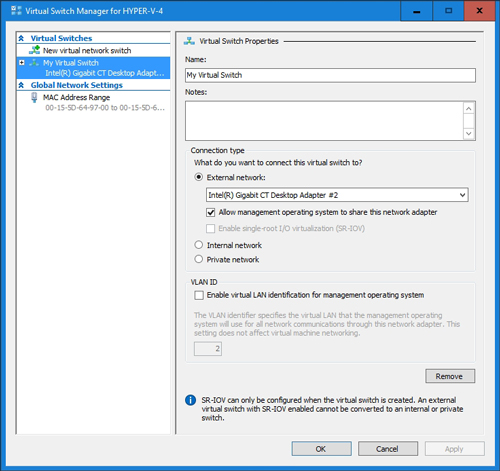 [Click on image for larger view.] Figure 1: This external virtual switch is bound to a physical NIC.
Similarly, VMs commonly include one or more virtual NICs. As you can see in Figure 2, the virtual NIC is tied to the virtual switch that I showed you in the previous figure.
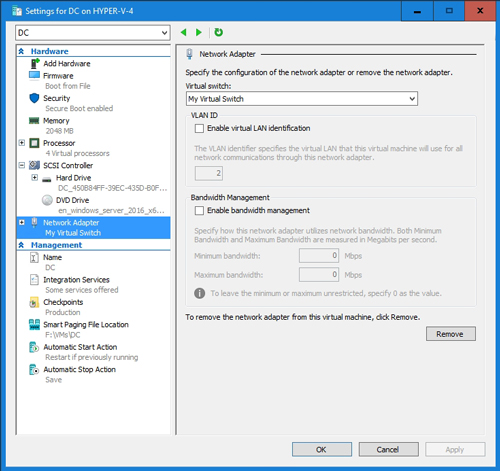 [Click on image for larger view.] Figure 2: The virtual NIC is connected to a virtual switch.
If you look at Figure 3, you can see that the guest OS simply refers to the virtual NIC as "Ethernet."
 Figure 3: The guest OS identifies the virtual NIC as Ethernet.
So now let's add another NIC to the VM by using Hyper-V Manager. If you look at Figure 4, you can see that the new NIC is identical to the old one. It is difficult to differentiate between the two virtual NICs since they are both connected to the same virtual switch.
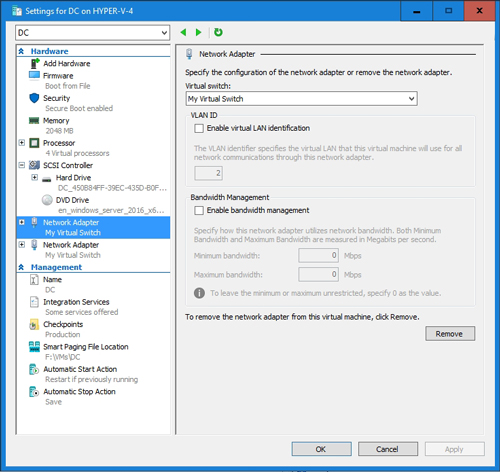 [Click on image for larger view.] Figure 4: The two NICs are identical to one another.
The guest OS also makes it tough to differentiate between the NICs, as shown in Figure 5. It's not a big deal if you create the NICs one at a time, but if you install the guest OS with multiple NICs already present, it can be tough to figure out which is which. Sure, you can rename the virtual NICs, but first you have to figure out which one is which.
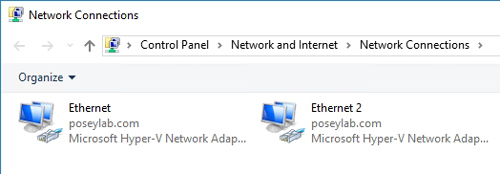 Figure 5: The guest OS identifies the NICs as Ethernet and Ethernet 2.
With that in mind, I want to show you a different and better way of creating a new virtual NIC. Let's suppose that I wanted to create an additional virtual NIC and for whatever reason I wanted to call the NIC "Posey." Being that my VM is named "DC" and my virtual switch is named "My Virtual Switch," the command would look like this:
Add-VMNetworkAdapter -VMName "DC" -SwitchName "My Virtual Switch" -Name "Posey" -DeviceNaming On
You can see what the command looks like in Figure 6.
 [Click on image for larger view.] Figure 6: I have used PowerShell to create a new virtual NIC named "Posey."
The Hyper-V Manager shows my new NIC with the custom name, as shown in Figure 7.
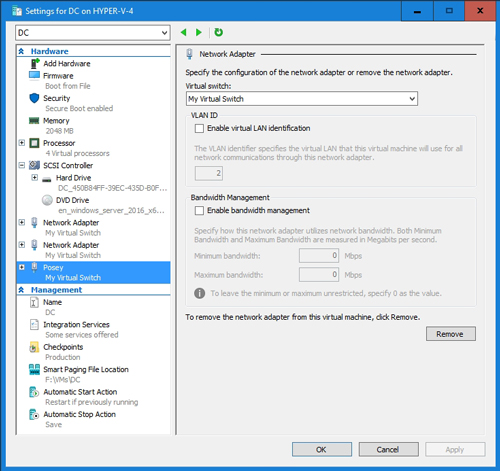 [Click on image for larger view.] Figure 7: The Hyper-V Manager displays my newly created virtual NIC.
If you look at Figure 8, you can see that the guest OS recognizes the new virtual NIC, but has given it the name "Ethernet 4." However, the new virtual NIC has been tagged with the Posey name.
 [Click on image for larger view.] Figure 8: The virtual NIC still has a generic name.
To see the tag, right-click on the virtual NIC and select the Properties command from the shortcut menu. When the virtual network adapter's properties sheet appears, click on the Configure button. Now go to the resulting dialog box's Advanced tab and click on the Hyper-V Network Adapter Name option.
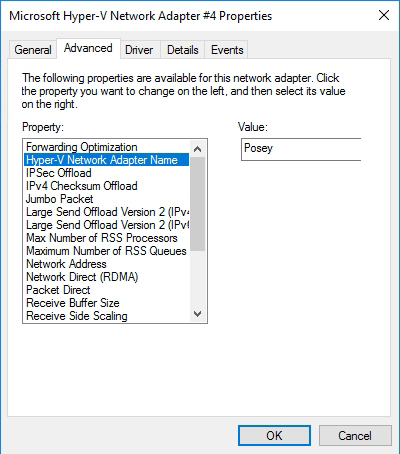 Figure 9: The virtual NIC has been tagged with the name that I specified within PowerShell.
As you can see in Figure 9, the tag is displayed. You can therefore reference this tag when you rename the virtual NIC.
About the Author
Brien Posey is a 22-time Microsoft MVP with decades of IT experience. As a freelance writer, Posey has written thousands of articles and contributed to several dozen books on a wide variety of IT topics. Prior to going freelance, Posey was a CIO for a national chain of hospitals and health care facilities. He has also served as a network administrator for some of the country's largest insurance companies and for the Department of Defense at Fort Knox. In addition to his continued work in IT, Posey has spent the last several years actively training as a commercial scientist-astronaut candidate in preparation to fly on a mission to study polar mesospheric clouds from space. You can follow his spaceflight training on his Web site.