Posey's Tips & Tricks
Working with Hyper-V Virtual Disks in PowerShell
A common way to attach a virtual hard disk to a virtual machine is via the Hyper-V Manager. But, as Brien shows, you can use PowerShell instead.
Recently, I have been spending some time coming up with various ways to use PowerShell scripts to automate the creation and deletion of Hyper-V virtual machines (VMs). I have probably been having way too much fun using PowerShell for VM lifecycle management, but that's another story for another day.
In this column, I wanted to show you how to use PowerShell to create and attach a virtual hard disk. After all, with only a few oddball exceptions, nearly every Hyper-V VM uses one or more virtual hard disks.
Before I get too far into this discussion, I want to alleviate a point of potential confusion. Microsoft actually has two different cmdlets that are used to create virtual disks, but these cmdlets serve two very different purposes.
The first of these cmdlets is New-VirtualDisk. This cmdlet actually has nothing to do with Hyper-V (at least not directly). It is the cmdlet that is used to create virtual disks within Windows Storage Spaces. The cmdlet that is used to create Hyper-V virtual hard disks is New-VHD. The New-VHD cmdlet can be used regardless of whether you are creating a CHD- or a VHDX-based virtual hard disk.
The New-VHD cmdlet is one of the more complex PowerShell cmdlets that you are likely to encounter thanks to the sheer number of optional parameters that you can specify. Even so, the basics of creating a virtual hard disk are quite simple.
Let's suppose that you wanted to create a new virtual hard disk called MyDisk.VHDX, and you wanted to place that disk in the D:\Storage folder. Let's also assume that you wanted the new virtual hard disk to be 20GB in size. The command that you would use to create the virtual disk is:
New-VHD -Path C:\Storage\MyDisk.vhdx -SizeBytes 20GB
So as you can see, this command is really simple. The only things that I had to specify were a path, a filename and the desired size. As previously noted, however, you can add any number of optional parameters to the New-VHD cmdlet. If you would like to see the full syntax for this cmdlet, Microsoft lists it here.
Now that I have shown you how to create a new virtual hard disk using PowerShell, you may be curious as to how to attach the virtual hard disk to a VM. The easiest option is to use the Hyper-V Manager to attach the disk, but you can use PowerShell instead. Keep in mind that the technique that you will have to use varies considerably depending on your VM's generation. For the purposes of this column, I will be using a Generation 2 VM.
If you look at Figure 1, you can see that the first cmdlet that I used was Get-VM. I used this cmdlet to retrieve the names of my VMs. As you can see in the figure, I have a VM named New Virtual Machine.
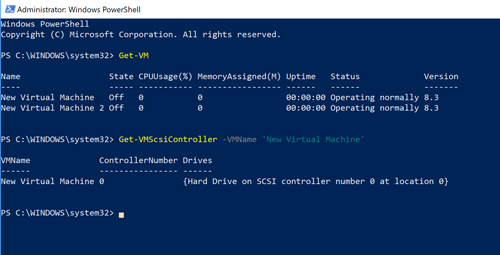 [Click on image for larger view.] Figure 1: I have a Hyper-V VM named New Virtual Machine.
Once I confirm the name of the VM, I need to find out the VM's disk controller number and which locations on that controller are being used. In the case of a Generation 1 VM, the controller will normally be IDE. In the case of a Generation 2 VM, however, the controller is SCSI. Therefore, the cmdlet that I have to use is Get-VMScsiController.
As you can see in the figure, I also appended the VM name. This returned a message indicating that the VM is using SCSI controller 0 and that there is a virtual hard disk attached to location 0. That being the case, let's attach the new virtual disk to controller 0 location 1. The command used for doing so is Add-VMHardDisk.
When we use the Add-VMHardDisk command, we have to provide some information that is specific to both the VM and to the virtual hard disk. Namely, we have to specify the VM name, the disk controller type, and the controller and location. We also have to supply the name and path of the virtual hard disk that we want to attach. So assuming that we are using the same VM and virtual disk that I already referenced, here is what the command would look like:
Add-VMHardDiskDrive -VMName 'New Virtual Machine' -ControllerType SCSI -ControllerNumber 0 -ControllerLocation 1 -Path 'C:\Storage\MyDisk.VHDX'
That's all there is to it. With just a couple of commands you can create a new virtual disk and attach it to a VM.
About the Author
Brien Posey is a 22-time Microsoft MVP with decades of IT experience. As a freelance writer, Posey has written thousands of articles and contributed to several dozen books on a wide variety of IT topics. Prior to going freelance, Posey was a CIO for a national chain of hospitals and health care facilities. He has also served as a network administrator for some of the country's largest insurance companies and for the Department of Defense at Fort Knox. In addition to his continued work in IT, Posey has spent the last several years actively training as a commercial scientist-astronaut candidate in preparation to fly on a mission to study polar mesospheric clouds from space. You can follow his spaceflight training on his Web site.