Posey's Tips & Tricks
Installing the Hyper-V Module for PowerShell
If you're getting error messages while trying to manage a remote Hyper-V host from a Windows 10 desktop, here's one possible reason -- and a solution.
I recently received an e-mail from someone who was trying to manage a remote Hyper-V host from their Windows 10 desktop, but was receiving all kinds of error messages because the required PowerShell module was not installed.
In this column, I thought that I might take the opportunity to show you why this happens and what you can do to fix the problem.
For those of you who may not have all that much experience with PowerShell, a PowerShell module is really nothing more than just a collection of PowerShell cmdlets. As I'm sure you know, both Windows 10 and Windows Server include a huge number of optional features. Microsoft attempts to keep PowerShell's size reasonable by not automatically installing cmdlets that are related to features that have not been installed.
Many of the major Windows features have a corresponding PowerShell module. For example, there is a Hyper-V PowerShell module that includes all of the Hyper-V-related cmdlets. The problem with this architecture is that you can occasionally find yourself in a situation in which your local system lacks the cmdlets that are necessary to manage a role or feature that is running on a remote system.
Before I show you how to install the Hyper-V module for PowerShell, I want to show you what the module actually does. The PowerShell cmdlet that is used to retrieve information about a virtual machine (VM) is Get-VM. If I try to run the Get-VM cmdlet on a system that does not have the Hyper-V module installed, I get an error message, as shown in Figure 1.
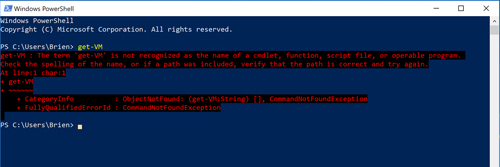 [Click on image for larger view.] Figure 1: The Get-VM cmdlet generates an error message because the required PowerShell module is not installed.
So, now that I have shown you the consequences of not having the Hyper-V module installed, the question becomes, "How do you install the module?" The easiest way to get the job done is to just install Hyper-V. If you are on a Windows 10 machine, enter the Control command at the Run prompt to open the machine's Control Panel. From there, just go to Programs and then pick the option to turn Windows Features on or off. Select Hyper-V, click OK, perform the required reboot and you're done. Hyper-V will be installed along with its PowerShell module.
Now, before I go on, I would be remiss in my duties if I did not point out that not every edition of Windows 10 includes Hyper-V. If you are working from a consumer-oriented edition of Windows 10, you won't have an option to install Hyper-V.
But what if you do have a Windows 10 edition that supports Hyper-V, but you only want to install the Hyper-V PowerShell module without actually installing Hyper-V? Well, in that situation, you have a few options.
If the Hyper-V PowerShell module is really the only thing that you want to install, then you can do so easily enough. Just open an administrative PowerShell window and enter this command:
Enable-WindowsOptionalFeature -Online -FeatureName Microsoft-Hyper-V-Management-PowerShell
While that command will certainly get the job done, I would actually recommend using a slightly different command:
Enable-WindowsOptionalFeature -Online -FeatureName Microsoft-Hyper-V-Tools-All
Like the previous command, this one installs the Hyper-V PowerShell module. What makes this command different from the other command, however, is that it also installs the Hyper-V Manager. The Hyper-V Manager is the GUI tool that is used to manage Hyper-V VMs. You can connect the Hyper-V Manager to a remote Hyper-V host and manage that host and its VMs through the GUI tool without having to delve into PowerShell (unless you just want to).
Keep in mind that this technique does not actually install Hyper-V onto your machine. It only installs the Hyper-V Manager and the Hyper-V PowerShell Module.
If you decide that you want to install the full-blown Hyper-V service, then that can also be accomplished by using PowerShell. Here is the command:
Enable-WindowsOptionalFeature -Online -FeatureName Microsoft-Hyper-V-All
This command installs the Hyper-V service, the Hyper-V Manager and the Hyper-V PowerShell module. You can see the command in action in Figure 2.
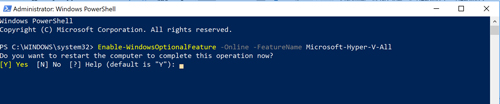 [Click on image for larger view.] Figure 2: This is how you install Hyper-V using PowerShell.
All three of the techniques that I have shown you will install the Hyper-V PowerShell module. In fact, if you look at Figure 3, you can see that the Get-VM cmdlet that I showed you earlier now works the way that it is supposed to, because the required module has been installed.
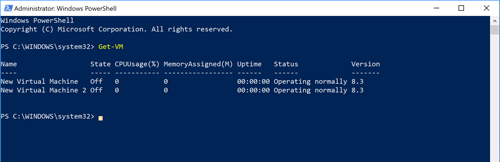 [Click on image for larger view.] Figure 3: The Get-VM cmdlet now works as it should.
About the Author
Brien Posey is a 22-time Microsoft MVP with decades of IT experience. As a freelance writer, Posey has written thousands of articles and contributed to several dozen books on a wide variety of IT topics. Prior to going freelance, Posey was a CIO for a national chain of hospitals and health care facilities. He has also served as a network administrator for some of the country's largest insurance companies and for the Department of Defense at Fort Knox. In addition to his continued work in IT, Posey has spent the last several years actively training as a commercial scientist-astronaut candidate in preparation to fly on a mission to study polar mesospheric clouds from space. You can follow his spaceflight training on his Web site.