Posey's Tips & Tricks
How To Replace the Hard Drive on a Windows 10 PC, Part 2
The next step is to delete the OEM partition between the C: volume and your unallocated space. You'll need to use an old command-line tool for that.
In Part 1, I showed you how to replace a hard drive on a Windows 10 machine and how to restore everything so that the system looks and feels exactly as it did before the drive was swapped.
The problem is that the method that I used does not take advantage of the new drive's extra capacity. If you look at Figure 1, for example, you can see that I have lots of extra space available, but there is no option to extend the C: volume to use that extra space.
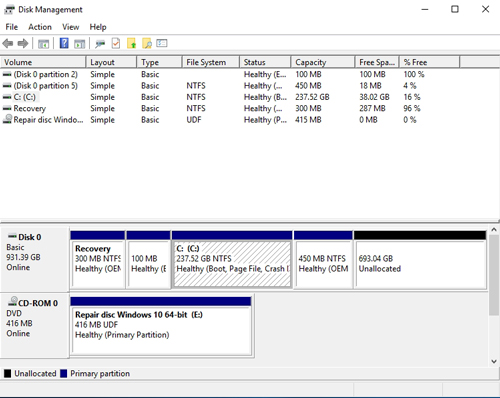 [Click on image for larger view.] Figure 1: There is lots of extra space available.
The reason why I cannot extend C: is because the drive is configured as a basic disk, and there is an OEM partition between the C: volume and the unallocated space. In my case, I really don't need the OEM partition, but the Disk Management Console does not provide an option for deleting it. That being the case, the trick is to use an old command-line tool called DiskPart.
Now before I go on, I want to clarify that you may not have to delete your OEM partitions. It is only necessary to do so if the OEM partition is physically located between the C: volume and your free space. Volumes on basic disks can only take advantage of contiguous space, so a partition located between the C: volume and the free space effectively cuts off the free space from being used.
Enter the DiskPart command at the Run prompt, and you will be taken to the DiskPart screen. The first thing that you will need to do is enter the list disk command. This will list all of the disks within your computer, as shown in Figure 2.
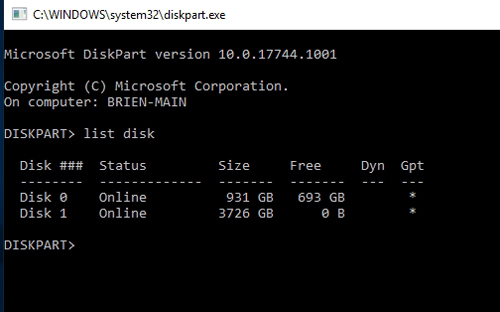 Figure 2: Enter the List Disk command.
So in this case, DiskPart shows two disks. The 3726GB disk is the external hard drive that I used for the backup in Part 1 of this series. Disk 0, the 931GB disk, is the disk that contains my C: volume. Since I now know that Disk 0 is the disk that I need to work with, I have to select it. I can do that by typing Select Disk 0. You can see what this looks like in Figure 3. As you can see in the figure, DiskPart displays a message indicating that Disk 0 is now the selected disk.
 Figure 3: I have selected Disk 0.
The next step in the process is to list the partitions. This is done with the List Partition command. The partition that I want to delete is Partition 5 (at least, in my case), so I need to select it by typing Select Partition 5. As you can see in Figure 4, Partition 5 is now selected.
 Figure 4: I have selected the partition that I want to delete.
Now it's time to remove the partition. The command for doing so is Delete Partition Override. Before you enter this command, make absolutely sure that you have selected the correct partition. As you can see in Figure 5, DiskPart does not give you an "are you sure" prompt.
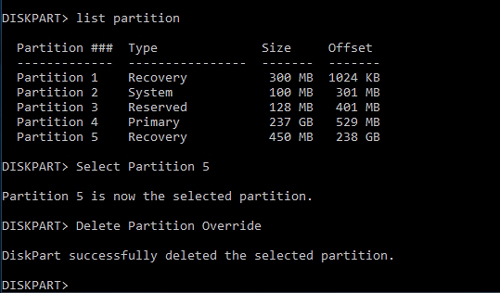 Figure 5: The partition has been deleted.
Now, go ahead and close DiskPart and relaunch the Disk Management Console. With the OEM partition removed, it is now possible to extend the C: volume. To do so, just right-click on the volume and choose the Extend Volume command from the shortcut menu. This causes Windows to launch the Extend Volume Wizard, which you can see in Figure 6.
 [Click on image for larger view.] Figure 6: We can now extend the volume.
Click Next, and you will be taken to a screen asking you which disk you want to use to extend the volume. Make sure that you select the correct disk and that you specify the desired amount of space to use, and then click Next. Click Finish to complete the process.
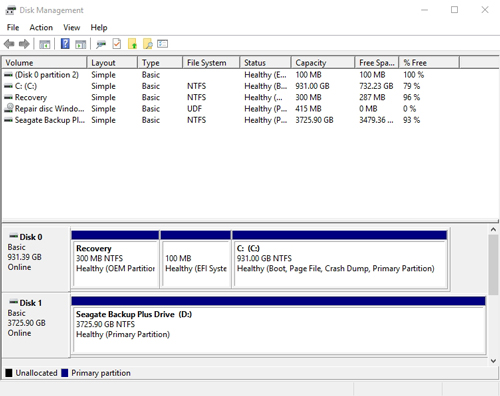 [Click on image for larger view.] Figure 7: The Disk Management Console shows my C: volume as being 931GB in size.
As you can see in Figures 7 and 8, my C: drive is now 931GB in size.
 Figure 8: Windows Explorer now shows 732GB of free space.
About the Author
Brien Posey is a 22-time Microsoft MVP with decades of IT experience. As a freelance writer, Posey has written thousands of articles and contributed to several dozen books on a wide variety of IT topics. Prior to going freelance, Posey was a CIO for a national chain of hospitals and health care facilities. He has also served as a network administrator for some of the country's largest insurance companies and for the Department of Defense at Fort Knox. In addition to his continued work in IT, Posey has spent the last several years actively training as a commercial scientist-astronaut candidate in preparation to fly on a mission to study polar mesospheric clouds from space. You can follow his spaceflight training on his Web site.