Posey's Tips & Tricks
How To Configure a File History Backup for Windows 10
As far as set-it-and-forget-it backup solutions go, there are few more convenient than the File History feature that's built natively into Windows 10.
We've probably all been lectured at some point on the importance of backing up our data, but what is the best way to do it?
If you are looking for an easy, lightweight backup solution, then it may be worth your time to check out the File History backup feature that is built natively into Windows 10. File History can be used to automatically back up your data in a non-disruptive way.
The catch, however, is that File History is somewhat limited in its capabilities.
The option to create a File History backup is buried within the Windows Control Panel. As you have probably noticed, Microsoft hides the Control Panel in Windows 10. To access it, right-click on the Start button, click Run, and then enter the word "Control" at the run prompt.
Once the Control Panel opens, click on System and Security, followed by File History. You can see what the File History screen looks like in Figure 1.
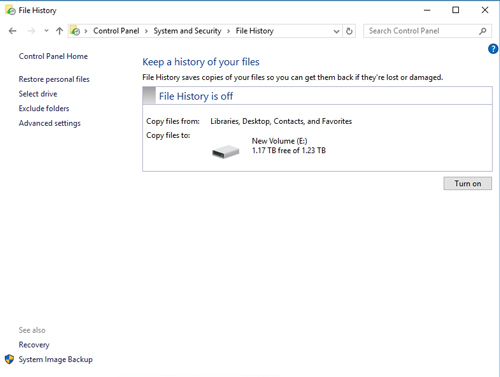 [Click on image for larger view.] Figure 1: This is the File History screen.
I recommend taking a moment to review the File History screen before you do anything else, because the screen contains some good information. In the figure above, for example, we can see that File History is off, and that if we were to turn it on, it would copy files from libraries, the desktop, contacts and favorites to the E: drive. If this information reflects the way that you want to use the File History feature, then you can simply click Turn On to begin using File History.
But what if you want to make a few changes?
One of the most common changes that people often make when using File History is the location of the backup files. In this case, File History is being automatically pointed to a spare hard disk on my PC, but it is possible to back data up to an alternate location. To do so, just click the Select Drive link. Upon doing so, you will be taken to a screen that allows you to pick from all of the hard drives that are suitable for use as a backup target.
If you look at Figure 2, you can see that only a single hard drive is shown, but that's because drive E: is the only hard disk attached to my PC that does not contain data. If there were other hard disks, they would be listed here, too.
 [Click on image for larger view.] Figure 2: You can choose the backup location.
One more thing that you will notice about Figure 2 is that it provides you with the option of adding a network location. This means that it is possible to write a File History backup to a network location.
There are two other options that you can configure for File History backups. One option is to exclude specific folders from backup. If there is a particular folder that you don't wish to back up for some reason, just click on the Exclude Folders link (shown earlier in Figure 1), and then pick the folder.
The other thing that you should definitely take a look at is the advanced settings. When you click on the Advanced Settings link, you will be taken to the screen that is shown in Figure 3.
 [Click on image for larger view.] Figure 3: These are the advanced settings.
As you can see in the figure above, the Versions section contains an option to control how frequently files are saved. By default, backups are created hourly, but you can configure backups to occur as frequently as every 10 minutes or as infrequently as once per day.
The other setting in the Versions section is the Keep Saved Versions setting. By default, this is set to Forever. If you've got sufficient disk space, then I recommend leaving this option set to Forever. Maybe it's just me, but I don't like the idea of an automated process erasing my older backups.
If you do want to perform some sort of automated cleanup, however, you can opt to remove old backups after a month, after two years or at various points in between. There is also an option to keep old backups until Windows needs the disk space.
As I have gone through the various File History settings, you might have noticed that there wasn't an option to choose what gets backed up. File History is only able to back up your library folders, your desktop, your contacts and your favorites. If you need more granularity than that, then you are going to be better off using a third-party backup solution.
In case you are wondering, File History essentially just copies individual files to the backup location and places them in a folder called FileHistory. You can see what the file structure looks like in Figure 4.
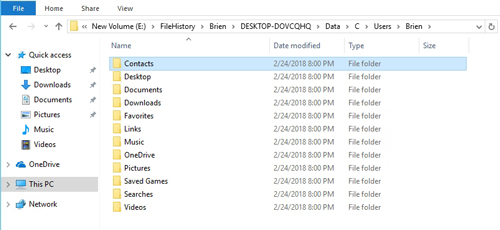 [Click on image for larger view.] Figure 4: This is the File History file structure.
File History isn't a good option for those who need granular control over the backup process. Even so, File History can be ideal for anyone who needs set-it-and-forget-it backups of a few key folders.
About the Author
Brien Posey is a 22-time Microsoft MVP with decades of IT experience. As a freelance writer, Posey has written thousands of articles and contributed to several dozen books on a wide variety of IT topics. Prior to going freelance, Posey was a CIO for a national chain of hospitals and health care facilities. He has also served as a network administrator for some of the country's largest insurance companies and for the Department of Defense at Fort Knox. In addition to his continued work in IT, Posey has spent the last several years actively training as a commercial scientist-astronaut candidate in preparation to fly on a mission to study polar mesospheric clouds from space. You can follow his spaceflight training on his Web site.