Posey's Tips & Tricks
Building Workflows with Flow for Office 365
With the introduction of the Flow tool in Office 365, workflows can be created just as easily as it was in SharePoint.
Workflows have long been one of the more useful features in Microsoft SharePoint (and SharePoint Online), but Microsoft has begun allowing some Office 365 subscribers to create workflows outside of SharePoint by using a new tool called Flow.
As you can see in Figure 1, Flow is based around the use of templates. Templates give Flow a way of communicating with the applications that you use. The screen capture shows the E-mail and Notification templates, but there are many other templates available.
 [Click on image for larger view.] Figure 1. Flow makes use of application templates.
If you click on the Templates menu, shown in the previous menu, you will be taken to a screen that allows you to download a huge variety of additional templates. As you would probably expect, there are many templates that revolve around Microsoft products such as Outlook, SharePoint and OneDrive. However, there are also templates for building workflows that leverage non-Microsoft apps or services. For example, there are templates for managing your tweets, or for automatically adding items to your Google calendar.
So with that said, let's take a look at what is involved in creating a flow. Obviously, the exact steps are going to vary depending on the type of workflow that you are creating, but the general technique remains somewhat consistent.
To create a flow, the first thing that you will need to do is to click on the template that you want to use. This will open a Web page that tells you more about the template. For example, this page tells you which apps or services are required in order for you to use the template. For example, the flow template that generates a push notification when you get an e-mail from your boss requires an Office 365 e-mail address and the Flow app, as shown in Figure 2.
 [Click on image for larger view.] Figure 2. Be sure to check the requirements for your selected template.
In the case of creating a push notification when you receive an e-mail message from your boss, creating a flow is as simple as clicking the Create Flow button. It takes several seconds after clicking the button before anything happens, but soon the flow is created, and you are taken to a screen like the one that is shown in Figure 3, that allows you to manage the flow.
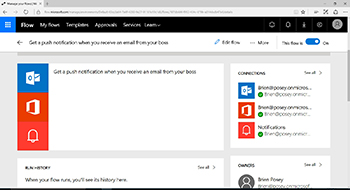 [Click on image for larger view.] Figure 3.You can use this screen to manage your newly created flow.
As you look at the screen capture above, you will notice that there is an Edit Flow link at the top of the screen. Clicking on this link takes you to a screen that gives you your first real taste of what the flow actually does. As you can see in Figure 4, the Edit Flow screen guides you step by step through the workflow. It also gives you the opportunity to add workflow steps, or to add missing information to the workflow. In this case for example, the workflow is designed to send me a push notification when I receive an e-mail message from my manager. The problem is that because I work for myself, I don't have a manager, and so Flow doesn't know which e-mail address to scan for. As such, this screen gives me the opportunity to put in an e-mail address of my choosing. For instance, maybe I want to receive a push notification when I get an E-mail message from my wife.
 [Click on image for larger view.] Figure 4. You can edit or modify your flows on an as needed basis.
If you look back at Figure 3, you will see that editing the flow is only one of the options that are listed on the screen. There is also an option to turn the flow on or off, and there is an option to download the Flows app for iOS or Android. Sadly, there is no Windows Phone app, although I may very well be the world's last Windows Phone user.
You might also have noticed the menu bar along the top of some of the earlier screen captures. One of the options on this menu bar is Flows. Clicking on Flows takes you to a screen that allows you to manage your flows. As you can see in Figure 5, flows can be applied to a user or to a team. What may be even more interesting, however, is that you do not absolutely have to use a template to create a flow. The Flows screen gives you the option of creating a flow from a template, or building a new flow from scratch.
 [Click on image for larger view.] Figure 5. The flows screen allows you to manage your flows.
Although I have not yet had a chance to fully explore all of the flow capabilities, my guess is that flows are going to be super useful for automating the mundane tasks that knowledge workers (and IT pros) engage in every day.
About the Author
Brien Posey is a 22-time Microsoft MVP with decades of IT experience. As a freelance writer, Posey has written thousands of articles and contributed to several dozen books on a wide variety of IT topics. Prior to going freelance, Posey was a CIO for a national chain of hospitals and health care facilities. He has also served as a network administrator for some of the country's largest insurance companies and for the Department of Defense at Fort Knox. In addition to his continued work in IT, Posey has spent the last several years actively training as a commercial scientist-astronaut candidate in preparation to fly on a mission to study polar mesospheric clouds from space. You can follow his spaceflight training on his Web site.