Posey's Tips & Tricks
How To Set Up Windows To Go
Microsoft's s secure option for accessing your desktop when working remotely only takes a few minutes (and a 32GB flash drive) to get up and running.
Over the last few years, the so called Bring Your Own Device (BYOD) trend has resulted in many organizations being allowed to work from personal devices. Even so, personal device use is not without its risks. A user's personal PC, for example, may be infected with a keylogger that records every keystroke that the user makes, including their corporate username and password.
One way that some organizations have mitigated the risks of allowing users to work from personal PCs is through the use of Windows to Go. The idea behind this is that it is possible to take a fully provisioned desktop operating system and place it onto a USB flash drive. When the user needs to do something for work, they can boot their PC from the USB flash drive rather than booting from the PC's hard disk. This allows the user to boot into a tightly controlled environment that complies with all of the organization's security policies. Better still, because the user is booting from a USB flash drive rather than from their computer's native OS, the user does not have to worry about accidentally exposing personal data to their employer.
There isn't anything overly difficult about setting up Windows To Go, but you will need a Windows 10 Enterprise Edition ISO file. You are also going to need a USB flash drive that can handle Windows To Go. Technically, the USB flash drive needs about 25GB of free space, but since 25GB flash drives do not seem to exist, the practical minimum size of the flash drive is 32 GB. Furthermore, Microsoft requires that the USB flash drive be certified for use with Windows To Go. Even so, I have seen non-certified USB flash drives work. In any case, the faster the USB flash drive, the better the user's experience will be.
One more thing that I want to mention before I show you how to set up Windows To Go is that the USB flash drive that you use will be completely erased. As such, it is a good idea to double check the drive to make sure that it does not contain anything that you need before moving forward.
So with that said, the first step in setting up Windows To Go is to right click on the Windows 10 Enterprise Edition ISO file and select the Mount command from the resulting shortcut menu. This will cause the ISO file to be mounted as if it were a DVD in a DVD drive.
Now, go ahead and insert the USB flash drive that you want to use as a Windows To Go device. Next, open the Windows Control Panel and enter Windows to Go into the Search box. This should cause Windows to display a Windows To Go option, which you can use to launch Windows To Go.
If for whatever reason, Windows To Go does not recognize your USB flash drive, remove it and then reinsert it. I have seen several instances in which the drive was not initially recognized. Now, select the USB device from the list of devices, shown in Figure 1, and click Next.
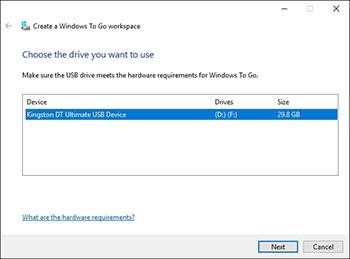 [Click on image for larger view.] Figure 1. Select your Windows To Go device and click Next.
Windows should now do a quick search for a suitable image file. Assuming that you have mounted a Windows 10 Enterprise Edition ISO file, Windows should have no trouble finding the image, as shown in Figure 2. If you do run into problems however, you can use the Add Search Location button to specify the image's location. If you still have trouble, then make sure that your image is based on Windows 10 Enterprise Edition. Other editions of Windows are not supported.
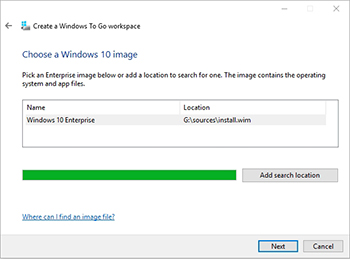 [Click on image for larger view.] Figure 2. Windows should find your installation image.
Click Next, and you will see a screen that gives you the option to enable BitLocker for the USB flash drive. Using BitLocker is optional, so if you don't want to use BitLocker, you can always click the Skip button.
You should now see a warning message telling you that the USB flash drive is about to be formatted. Assuming that you have already made sure that the drive does not contain anything that you need, go ahead and click Create.
When you are done, you will see a message asking if you want to automatically boot from Windows To Go when you restart your PC. Assuming that the Windows To Go device is meant to be used on other PCs, choose No. Otherwise, Windows To Go will reboot your system. You can see the Boot Options screen in Figure 3.
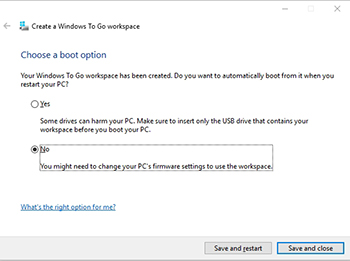 [Click on image for larger view.] Figure 3. In most cases, you will probably want to use the No option.
About the Author
Brien Posey is a 22-time Microsoft MVP with decades of IT experience. As a freelance writer, Posey has written thousands of articles and contributed to several dozen books on a wide variety of IT topics. Prior to going freelance, Posey was a CIO for a national chain of hospitals and health care facilities. He has also served as a network administrator for some of the country's largest insurance companies and for the Department of Defense at Fort Knox. In addition to his continued work in IT, Posey has spent the last several years actively training as a commercial scientist-astronaut candidate in preparation to fly on a mission to study polar mesospheric clouds from space. You can follow his spaceflight training on his Web site.