In-Depth
Connect Active Directory and Azure AD
How to link Active Directory on-premises with Microsoft Azure AD using Redmond's new connector.
- By John O'Neill Sr.
- 10/02/2015
As the number of Microsoft Azure services and users expand, the need for a foundational, shared identity platform is clear. Microsoft is putting significant emphasis on Azure Active Directory (Azure AD) as that shared identity platform.
The challenge for countless IT pros implementing Azure is rooted in the fact migration isn't an instantaneous event. Most organizations won't move 100 percent to the cloud anytime soon. Transitions of this scope occur over many months and often years. In many organizations, computing architectures will always consist of a combination of on-premises and cloud compute and storage resources. The challenge that has emerged is integrating the local, on-premises Active Directory with Azure AD running in the cloud.
Microsoft has supported federation between local Active Directory and Azure AD since the release of the cloud-based version more than two years ago. Unfortunately, Azure AD is complex to implement, fraught with problems and limited in functionality. With the recent release of Azure AD Connect, linking the two is now easier. For most implementations, connecting on-premises Active Directory with Azure AD is now a simple, wizard-based process. With just a handful of clicks, local Active Directory accounts and passwords are synchronized into Azure AD for use by all Azure services. These accounts can then be used for signing into Office 365, Azure Site Recovery and even Azure RemoteApp.
Don't let the Azure AD Connect Express Wizard fool you. The tool is still performing many product installations and configuration tasks. Products installed by Azure AD Connect include:
- Azure AD Connector
- SQL Server 2012 CLI Utilities
- SQL Server 2012 Native Client
- SQL Server 2012 Express LocalDB
- Azure AD Module for Windows PowerShell
- Online Services Sign-in Assistant for IT Pros
- Visual C++ 2013 Redistribution Package
In addition to installing these products, the Express Wizard automatically configures password synchronization from the local Active Directory server to Azure AD, defines synchronizing all local AD object attributes and kicks off an initial synchronization (see Figure 1). The Express Wizard can only be used to synchronize a single local AD Forest with Azure AD.
 [Click on image for larger view.]
Figure 1. The Azure AD Connect Express Wizard is ready to run.
[Click on image for larger view.]
Figure 1. The Azure AD Connect Express Wizard is ready to run.
Azure AD Connect, like any software, does have a few prerequisites. First, Azure AD Connect must be installed on Windows Server 2008 or later. Unlike previous versions of the DirSync tool, Azure AD Connect is supported when installed on a domain controller. Still, I recommend running the tool on a member server and leaving the DC to focus on being a DC.
Additionally, the Azure AD Connect Express Wizard supports 100,000 local AD objects using SQL Express. More than 100,000 objects requires using a full version of SQL Server. Finally, the local AD domain and forest functional levels must be Windows Server 2003 or later.
After the Azure AD Connect Express Wizard completes an initial synchronization, a scheduled task is created to synchronize the directories every three hours. Running an on-demand synchronization isn't a problem, though. The scheduled task can be kicked off manually. Another option is to run the Azure AD Connect tool again, select the Customize synchronization options task when prompted, Click Next, enter the Azure AD admin credentials, click Next, enter the local AD enterprise admin credentials, click Next, leave the default Optional Features checked, click Next, ensure the box for Start the synchronization process as soon as the initial configuration completes is checked, and click Install (see Figure 2). The tool will quickly prompt that configuration to complete so the synchronization process will be initiated.
 [Click on image for larger view.]
Figure 2. Manual synchronization in Azure AD Connect.
[Click on image for larger view.]
Figure 2. Manual synchronization in Azure AD Connect.
An Azure account is an obvious prerequisite for setting up directory synchronization. If needed, sign up for a 30-day trial using a valid Microsoft Account. Use any valid Microsoft Account including an Office365 account. The process for signing up for an Azure account is simple:
- Click Try It Now
- Sign in using the Microsoft Account
- Enter name, e-mail, phone and company name
- Select Region
- Verify the account by text or phone call
- Verify by credit card (annoying, I know)
- Agree to licensing terms
- Watch paint dry or water boil for 5 minutes or so
- Click Start Managing My Service
- Sign in using the Microsoft Account again, if prompted
Complete the next steps using the Azure Management Portal:
- Click Active Directory from the list on the left
- Click New
- Click Directory
- Click Custom Create
- Enter a friendly display name for the directory
- Enter the domain name that will preface .onmicrosoft.com; for instance, AWSTM2015RD1 becomes AWSTM2015RD1.onmicrosoft.com
- Select the appropriate Country or Region
- Click the checkmark to create the directory in Azure
Azure accounts use a default domain name of onmicrosoft.com. This domain is appended to the user-specified domain resulting in something like TM2015RD1.onmicrosoft.com. Usernames are then of the sort [email protected]. Add a custom domain, for example AWSTM2015RD1.com, so that users can sign in with familiar user names such as [email protected]. The process isn't difficult, but there are some hoops to jump through to verify proper domain ownership. This prevents cyber squatters and the like from hijacking someone else's domain in Azure. As usual, begin by signing into the Azure Management Portal:
- In the left-side column, scroll down to Active Directory
- Click the name of the directory created earlier
- Click Domains
- Click Add a Domain
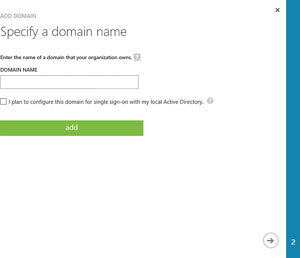
- Specify the already registered Internet domain name (see Figure 3); AWSTM2501RD1.com in this instance
- Clear the checkbox for I plan to configure this domain for single sign-on with my local Active Directory; this option requires deploying full AD FS servers on-premises
- Click Add
- Click Next
- Record the DNS information necessary to verify domain ownership
- On the external Internet-accessible DNS server open DNS Manager
- Expand the forward lookup zone for the domain
- The next steps vary, depending on the Windows Server version in use on the DNS server
 [Click on image for larger view.]
Figure 3. Adding a Domain.
[Click on image for larger view.]
Figure 3. Adding a Domain.
If using Windows Server 2003 on the DNS server:
- Right-click the domain folder to which you want to add the SPF record
- Click Other New Records
- In the Select a resource record type list, click Text (TXT), and then click Create Record
- A parent domain record is being added so leave the Record name box blank (do not use @)
- In the Text box, type MS={TXT record details recorded from Azure Management Portal}. For instance, type MS=ms71067285
- Click OK
- Click Done
If using Windows Server 2008/2012 on the DNS server:
- On the DNS Manager page for the domain, go to Action, then Text (TXT)
- In the New Resource Record dialog box, make sure that the fields are set to precisely the values displayed in the Azure Management Portal wizard
- Choose OK
In cases where multiple DNS servers exist, ensure replication occurs before moving forward.
If hosted DNS is used, Microsoft offers a resource on how to manage those records at various providers.
Once the DNS changes have been made and replicated to all DNS servers, return to the Azure Management Portal and Click Verify. If all is well, "Successfully verified the domain" will display and then click the checkmark to continue.
From the local server where Azure AD Connect will be installed, sign in to the Azure Management Portal:
- Click Active Directory from the list on the left
- From the displayed list click the Azure AD Directory name created earlier
- Step two of the Quick Start wizard is "Integrate with your local directory," under this click Download Azure AD Connect
- A new tab opens, which is the download link for Azure AD Connect
- Click the Download button
- Click the arrow next to save, then click Save and Run
- Azure AD Connect will download and automatically run setup
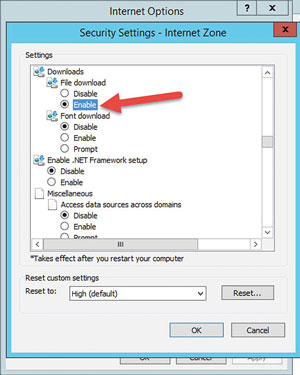
Quick tip: When using Internet Explorer in Windows Server 2012 R2, the message, "Your current security settings do not allow this file to be downloaded," may appear when trying to download a file such as the Azure AD Connect Installer. Here's how to enable downloading in Internet Explorer:
- Click the gear icon
- Click Internet Options
- Click the Security tab, then click Custom Level
- Scroll down to Downloads, File Download, and click the Enable radio button, as shown in Figure 4
- Click OK
- Click Yes to confirm
- Click OK
- Retry the download; it should work fine
 [Click on image for larger view.]
Figure 4. Enabling downloads in Internet Explorer.
[Click on image for larger view.]
Figure 4. Enabling downloads in Internet Explorer.
Once the Azure AD Connect setup starts, it's only a few clicks to have it running!
- Click the checkbox to agree to the license terms, then click Continue
- Click Use Express Settings
- Wait briefly while necessary components are installed
- Enter the Azure AD Global Administrator credentials, then click Next. The Azure AD Global Administrator is the Microsoft Account used when creating the Azure account
- Wait while a connection to Azure is made and the credentials verified
- Enter the local Active Directory Enterprise Administrator credentials, then click Next
- Wait briefly while the local AD account is verified
- Ensure the checkbox is selected to "start the synchronization process as soon as the configuration is complete," then click Install; this doesn't take long, but now is a great time to grab a fresh energy drink from the fridge
- Once configuration is complete, click Exit
Bingo! Local AD and Azure AD are now synchronizing accounts. Verify local accounts are present in Azure AD by signing in to the Azure Management Portal:
- Click Active Directory from the list on the left
- Click the Azure AD Directory name in the displayed list
- Click Users
- Verify the on-premises AD user accounts are listed (see Figure 5)
 [Click on image for larger view.]
Figure 5. Local AD users in Azure AD.
[Click on image for larger view.]
Figure 5. Local AD users in Azure AD.
Some features, such as specific reports and the AD Connect Health tool, require an Azure AD Premium license. Sign up for an Azure AD Premium trial through the Azure Management Portal:
- Click Active Directory from the list on the left
- Click the Azure AD Directory name in the displayed list
- Step three of the Quick Start wizard is "Get Azure AD Premium," under this click Try it now
- Click the Try Azure Active Directory Premium now link
- Click the Checkmark
- The Web page will display "Activating your Azure Active Directory Premium trial;" wait a couple moments, then click the link to refresh
- The Azure AD Premium licenses are displayed with 100 Active and none assigned
- Click Azure Active Directory Premium
- Click Assign users
- In the Show dropdown list select All Users, then click the checkmark
- Select the users to assign premium licenses; multiple users can be selected using Ctrl+Click
- Click the Assign button
- When completed, click the previous arrow to go back to the domain management page
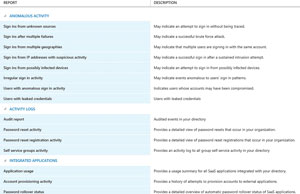
- Click reports and notice that all premium reports are now available (see Figure 6)
 [Click on image for larger view.]
Figure 6. The Premium Reports available in Azure AD Premium.
[Click on image for larger view.]
Figure 6. The Premium Reports available in Azure AD Premium.
 John O'Neill Sr. will demonstrate how to link Active Directory and Azure AD with Azure AD Connector at TechMentor/Live! 360 next month in Orlando, Fla.
It's taken Microsoft a few iterations, but connecting local AD and Azure AD is now a simple point-and-click affair. As Azure services are in the plans for more and more organizations, connecting these directories early on makes perfect sense. If you're using Office 365, Azure Site Recovery or any other Azure service, give Azure AD Connect a go. Odds are, you won't regret it.