Posey's Tips & Tricks
Enhance Your Windows Server Security
There are a variety of features and settings for securing your Microsoft Windows Server infrastructure, so be sure you make the right choice.
There are many techniques for getting the most out of the various security features of Windows Server 2008 R2. With so many choices, it can be difficult to know which individual security features and settings you should use to adequately secure your servers.
When it comes to securing Windows Server 2008 R2, there are two phases you need to consider: pre-deployment and post-deployment security. You can best think of pre-deployment security as security planning. If you're going to be setting up a new server, there are certain security considerations you should take into account before you even begin the installation process.
Server Role Isolation
One of the primary tasks involved in pre-deployment security planning is taking measures to reduce your server's attack surface. Attack surface reduction is based on the concept that the more code that's running on a system, the greater the likelihood that code contains a vulnerability that could be exploited. So to reduce the attack surface on your servers, you need to ensure those servers aren't running any unnecessary code.
It's recommended you take things one step further, though, to maximize the effectiveness of your security posture. As a general best practice, you should configure each server to perform one specific task. For example, rather than running DNS services and Dynamic Host Configuration Protocol (DHCP) services on a server already configured to act as a file server, it's better from a security standpoint to run each role on a dedicated server. Not only does this help reduce the attack surface, it can also make any required troubleshooting easier because each server is running a less-complex configuration.
It's understandable that sometimes using a separate server for each role isn't practical, either because of cost or because of functionality requirements. Even so, it's a good idea to isolate server roles whenever you can.
Server virtualization can help to further bring down costs. For example, Windows Server 2008 R2 Enterprise Edition is licensed for use within up to four virtual machines (VMs), as long as the underlying physical server is running Hyper-V and nothing else.
Use Server Core
Another tactic for reducing a server's attack surface is to configure it to run Server Core. Server Core is a bare-bones Windows Server 2008 R2 installation that doesn't include the full graphical UI.
Because Server Core deployments run a minimal set of system services, they have a much smaller attack surface than a traditional Windows Server deployment. Server Core installations also tend to perform better than full Windows Server installations. The server has to deal with less overhead, which makes it ideal for use within VMs.
Unfortunately, you can't use Server Core for all Windows Server 2008 R2 deployments, because only certain system services and relatively few server applications can run on Server Core deployments. As such, it's best to deploy Server Core where you can, but accept the fact that you won't be able to use it on all of your servers—at least for now.
Group Policy Planning
Pre-deployment security planning is important, but once things are up and running, your security best practices should include ongoing Group Policy management and planning. It's advisable to take Group Policy settings into account prior to Windows deployment. You'll also need to adjust policy settings over time as your security requirements evolve.
Although you can fully manage Group Policy settings using the tools included with Windows Server 2008 R2, Microsoft offers a free utility called Security Compliance Manager (SCM) that can simplify the process. Download SCM here. The installation process is straightforward and uses a simple wizard. Just make sure you select the check box that tells the setup wizard to check for updates.
Once you've installed SCM, you can launch it through the server's Start menu. When you run it for the first time, the software will have to import a number of different security baseline packages. This process can take several minutes to complete.
Once you've imported the security baselines, you'll see a list of baseline categories within the console tree. Expand the Windows Server 2008 R2 SP1 container to view the available Windows Server 2008 R2 baselines. Microsoft provides security baselines for a number of different server roles (see Figure 1).
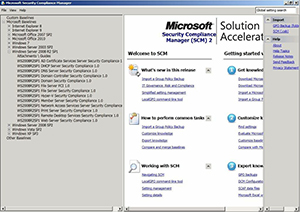 |
Figure 1. Security Compliance Manager provides a number of different security baselines for Windows Server 2008 R2. (Click image to view larger version.) |
The baselines Microsoft provides each represent a collection of Group Policy settings considered optimal for that individual server role. Although the baselines adhere to Microsoft's security best practices, blindly accepting a security baseline is considered a bad practice. Your organization will have its own unique security needs. Microsoft generally recommends you augment the default security baselines to fit those needs.
The first step in doing so is to choose a security baseline that matches the server role you want to configure. Next, click the Duplicate link found in the Actions pane. This lets you make a copy of the security baseline. That way you can modify the copy without having to worry about making irreversible changes to the original security baseline.
When prompted, enter a name for your custom security baseline and then click Save. When you do, you'll see your newly created security baseline displayed in the Custom Baselines section at the top of the console tree.
When you select your custom security baseline, you'll see all the security settings displayed in the console's center column. The console lists the default setting, Microsoft's recommended setting and your custom setting (see Figure 2). Initially, the custom settings will match the Microsoft settings. As you make modifications, those will be reflected in the Customized column.
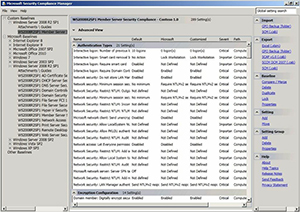 |
Figure 2. Select a custom baseline and you'll see all of its settings. (Click image to view larger version.) |
You can modify individual policy settings by double-clicking on a setting and then choosing a new value (see Figure 3). After modifying any setting, click the Collapse link to save your changes. When you do, the policy setting will be displayed within the console in a bold font to indicate settings have been modified.
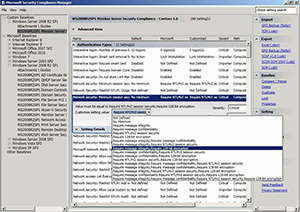 |
Figure 3. You can double-click on a security policy setting to modify its properties.(Click image to view larger version.) |
When you finish reviewing the various settings and making any necessary modifications to the security baselines, export your security baseline. The Actions pane contains a number of different export options.
You should initially export the security baseline to an Excel spreadsheet. That way, you can store a documented copy of your security baseline settings independent of SCM. You should also export the settings into a Group Policy Object (GPO) Backup. You can use the GPO Backup to import the security baseline settings into the Group Policy Editor.
You can import a baseline into the Group Policy Editor by opening the security policy you want to modify, right-clicking on the Security Settings container and choosing the Import Policy option (see Figure 4).
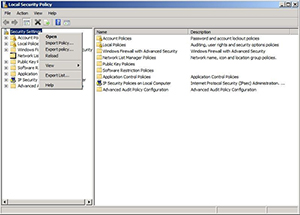 |
Figure 4. You can import your security settings into the Group Policy Editor.(Click image to view larger version.) |
The Security Configuration Wizard
The Security Configuration Wizard is an equally handy tool you can use to secure your Windows 2008 R2 servers. This is installed by default in Windows Server 2008 R2, and is accessible through the server's Administrative Tools menu. Like SCM, the Security Configuration Wizard is designed to help you create server-role-specific security policies you can export to the servers on your network.
When you launch the wizard, you'll see an introductory screen. Click Next to clear this screen and you'll be taken to a screen that asks you what action you want to perform. You can create, edit or apply a security policy, or you can roll back the most recent security policy.
Assuming you decide to create a new policy, the Security Configuration Wizard will prompt you to provide the name or IP address of a server to use as a security baseline. This should be a server upon which you'd like to model the policy you're about to create.
Click Next a couple of times, and you'll come to a screen asking you what roles the server will perform (see Figure 5). The list of roles is automatically populated based on the roles installed on the server from which you're modeling the new policy. You can then manually modify the list of roles.
It's important for the role list to accurately reflect the roles you plan to install on the servers that receive the policy. The Group Policy settings, registry settings and firewall configuration will all be based on the roles you've chosen.
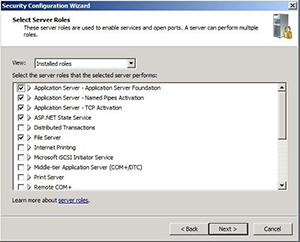 |
Figure 5. Choose the roles that will be installed on target servers.(Click image to view larger version.) |
Click Next, and you'll see a similar list referring to the features you'll install on the server. Once again, it's important for the feature list to be accurate. It's also worth noting that the Security Configuration Wizard doesn't actually install roles and features. It only creates policies based on the roles and features you indicate are installed.
The next two screens follow the same basic format as the Roles and Features screens. One screen asks you about Installed Options. These are things like such as Remote Desktop or Remote Volume Management. The next screen asks you about any additional installed services such as the Disk Defragmenter or the Adobe Acrobat Update Service. You might see some non-Microsoft services displayed on this list, depending on what software is installed on the model server.
The next screen asks you what should happen when startup encounters an unspecified service. You can leave the service startup type unchanged, or you can block the service. At the next screen, you'll see a list of the services whose startup types will be changed so you can make sure that you're not about to disable something critical.
The wizard now takes you to the Network Security section. You can skip this section, if you so choose. It's designed to configure the Windows Firewall based on how you'll use the server. This section lets you review existing firewall rules and add or delete rules based on your needs.
The Registry section is next. The Registry portion of the wizard asks if all computers that will be connecting to the server meet certain minimal OS requirements. It also verifies whether or not the server has surplus processing power. These configuration settings determine whether or not to enable Server Message Block security signatures.
Other screens ask you about the types of accounts you're using, and the types of domain controllers on your network. Once you finish answering the wizard's questions, it will show you the all registry modifications it's about to make.
The last section you'll encounter before you're asked to save your security policy is the Audit Policy section. This section asks you one question about your general auditing philosophy. Essentially, it wants to know if you want to audit successful events, successful and unsuccessful events, or nothing at all. The audit policy settings will be based on your choice.
When you reach the end of the wizard, you're asked to save the new policy as an XML file. You then have the option of applying the new security policy now or later. If you choose to apply the security setting later, you can do so by rerunning the Security Configuration Wizard and choosing the Apply an Existing Security Policy setting (see Figure 6).
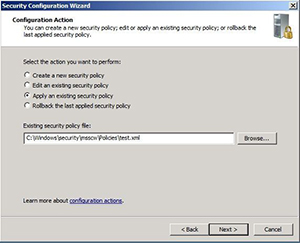 |
Figure 6. You can apply a previously created security policy through the Security Configuration Wizard. (Click image to view larger version.) |
There are far too many Windows Server security features to discuss within a single article, but these are some of the highlights. The major tools such as the Security Configuration Wizard and the Security Compliance Manager can help you secure your servers without having to configure each security setting individually.