Windows Server How-To
How To Create Reports in PowerShell
In the first of a new column featuring in-depth advice on Windows Servers, Brien Posey breaks down how you can create custom information dumps in PowerShell.
Welcome to my new Windows Server How To column. This column will be different from my Posey's Tips & Tricks column in that while my other contribution consists primarily of opinion posts, this one will provide hands-on instructions for performing various tasks in Windows Server 2012.
As it stands right now, the plan is for me to write two posts each month related to a variety of Windows Server 2012 subjects. Many of the posts will likely focus on PowerShell because being able to operate efficiently in PowerShell is essential for any Windows Server administrator. Of course I will be discussing plenty of other topics as time goes on.
For this first column post, I want to discuss some options for creating reports in PowerShell. You can use PowerShell to retrieve a wealth of information about a server's configuration, usage, or performance and it is often useful to be able to write that information out to a file so that you can view it again later on.
PowerShell can create a variety of file types, but the most useful file types for reporting purposes are text files, CSV files, and HTML files.
With that said, suppose that you were interested in knowing which services were installed on a given server. You could view a list of services by using the Get-Services cmdlet, but it is also possible to redirect the output to a text, CSV, or HTML file.
If you want to redirect a cmdlet's output to a text file, you can do so by appending the Out-File cmdlet and the path and filename of the output file. For example, if you wanted to redirect the output of the Get-Services cmdlet to a file named C:\Data\Services.txt, you could do so by entering this command:
Get-Service | Out-File C:\Data\Services.txt
As you can see in the example above, you don't have to supply any additional parameters other than the path and filename. However, it is sometimes beneficial to use the –Width parameter. If you look at Figure 1, you will notice that some of the items in the display name column end in … This indicates that the column is not wide enough to display the full text. The same thing will happen if the output is sent to a text file. The Width parameter can widen the output, thereby making it possible to display some or all of the missing text. For example, if you wanted to use a width of 120 characters, the command would look like this:
Get-Service | Out-File C:\Data\Services.txt –Width 120
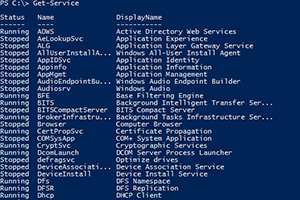 [Click on image for larger view.] Figure 1. The output is sometimes cut off.
If you want to write the output to a CSV file (which can be imported into an Excel spreadsheet or into a database), you will need to use the Export-CSV cmdlet rather than the Out-File cmdlet. If you wanted to export the services list to a CSV file, the full command would look something like this:
Get-Service | Export-CSV C:\Data\Services.csv
When you create a CSV file in this way, the first line of the file is usually a .NET object type definition. If you want to get rid of this line, then you can do so by appending the –NoType parameter to the command like this:
Get-Service | Export-CSV C:\Data\Services.csv –NoType
If you want to output the Get-Service's cmdlet to an HTML file, you will have to use a series of cmdlets including Select-Object, ConvertTo-HTML, and Out-File. You must specify the attributes that you want to include in the HTML file, convert the output to HTML, and then use the Out-File cmdlet to create the file. The actual command string might look something like this:
Get-Service | Select-Object DisplayName, Status | ConvertTo-HTML | Out-file C:\Data\Services.htm
You can see examples of all three file type creation methods in Figure 2
 [Click on image for larger view.] Figure 2. You can use these commands to create text, CSV, or HTML files.
I'm sure that some of you might be wondering how dumping a list of system services to a text, CSV, or HTML file is useful. The truth is that it probably isn't all that useful. However, it is important to keep in mind that I only used the Get-Services cmdlet because it is easy to work with and made for a relatively simple demonstration. The file creation techniques that I showed you earlier can be used with almost any other PowerShell cmdlet. Pretty much any information that PowerShell can display on screen can be written to a file.
There are a number of ways in which you can build onto the techniques that I have just discussed. In fact, one of my contacts at Dell, James Stephan, recently created a PowerShell script for creating a detailed report of the virtual machines running on a Hyper-V server. You can find the script here. As this column series progresses, I plan to show you how some of the techniques used within this script work and I will build on the various techniques. For now however, the script serves as a nice illustration of what is possible through PowerShell.
About the Author
Brien Posey is a 22-time Microsoft MVP with decades of IT experience. As a freelance writer, Posey has written thousands of articles and contributed to several dozen books on a wide variety of IT topics. Prior to going freelance, Posey was a CIO for a national chain of hospitals and health care facilities. He has also served as a network administrator for some of the country's largest insurance companies and for the Department of Defense at Fort Knox. In addition to his continued work in IT, Posey has spent the last several years actively training as a commercial scientist-astronaut candidate in preparation to fly on a mission to study polar mesospheric clouds from space. You can follow his spaceflight training on his Web site.