In-Depth
Synchronize Directories with Azure AD Connect
Learn how to deploy Azure AD Connect, the best way to synchronize on-premises Active Directory instances with the cloud-based Azure AD.
Ever since the release of Windows 2000, Active Directory has functioned as the primary authentication and access control mechanism for enterprise networks and key business-based systems, including Microsoft Exchange Server. While almost all organizations still rely on AD for authenticating into their networks, its role has evolved over the years. After nearly two decades, AD is starting to show its age.
Microsoft's strategy to keep AD relevant, if not critical, is Azure Active Directory (Azure AD), which brings the core properties of AD to the Azure public cloud. Azure AD has grown significantly thanks to the fact that every time an Azure or Office 365 user identity is created, it goes into Azure AD.
But bridging Azure AD to AD on-premises is the bane of many administrators, despite several solutions offered by Microsoft and third-party providers. Microsoft is emphasizing Azure AD Connect, first rolled out two years ago, as the best way to synchronize on-premises AD instances with Azure AD.
There's a sense of urgency for those who still use Microsoft's Windows Active Directory Sync (DirSync) or Azure AD Synchronization Services tools. Microsoft warned customers last year it will deprecate those tools and the company has recommended organizations migrate both tools, which will no longer be supported after April 13, to Azure AD Connect.
Azure AD Connect is a much better solution. It synchronizes local AD instances with Azure, Office 365 and other cloud-based services. By implementing Azure AD Connect, administrators can give users a single identity to access both on-premises and cloud resources.
Same Problem, New Solution
In addition to DirSync, Microsoft has offered Azure Forefront Identity Manager 2010 R2 (FIM2010) and, more recently, Microsoft Identity Manager 2016 (MIM2016), which also provide synchronization between AD and Azure AD.
All of these tools fall short when it comes to holistically synchronizing on-premises domain controllers with the cloud, as well as providing cloud-based directory-directory integration and authentication services, and filtering and configuring AD attributes.
For example, in the case of DirSync, if group objects are created or modified within the cloud-based copy of the directory, the tool is unable to write those changes to the on-premises copy of the directory. DirSync also has problems synchronizing self-service password resets. Keep in mind that there are just a couple of examples of the types of limitations that exist within Microsoft's directory synchronization tools, but given it's about to be deprecated, that speaks for itself.
Azure AD Connect has far fewer limitations than Microsoft's other directory synchronization tools. Although Azure AD Connect doesn't solve every directory synchronization issue, Microsoft has indicated it intends to fill in key functionality gaps. For example, Azure AD Connect doesn't yet support the ability to connect to an on-premises LDAP directory, but Microsoft has indicated that this capability will be added in a future release. Microsoft created a comparison of its various directory synchronization tools that you can access here.
Microsoft has also added alerting capabilities to Azure AD Connect with its new Azure AD Connect Health service.
The Synchronization Server
Azure AD Connect makes use of a synchronization server that must run within your on-premises environment. The process of configuring the server varies depending on which features you plan to use, but there are some important setup requirements that apply to all server and on-premises environments.
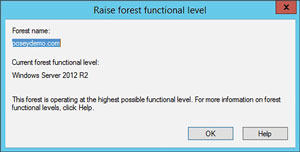
Before you begin deploying the Azure AD Connect server, you must check some attributes within your local AD. For starters, you must verify your forest functional level. To do so, open the Active Directory Domains and Trusts console, right-click on the Active Directory Domains and Trusts container, and choose the Raise Forest Functional Level command from the shortcut menu.
The resulting dialog box will display the current forest functional level (see Figure 1). Azure AD Connect requires a forest functional level of Windows Server 2003 or higher.
 [Click on image for larger view.]
Figure 1. Azure AD Connect requires a forest functional level of Windows Server 2003 or higher.
[Click on image for larger view.]
Figure 1. Azure AD Connect requires a forest functional level of Windows Server 2003 or higher.
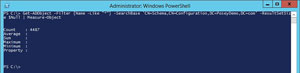
Next, it's advisable to see how many objects exist in AD. The total directory object count will impact some decisions you'll have to make later on. The easiest way to get an object count is to open a Windows PowerShell window on a DC, and enter the command shown in Figure 2.
 [Click on image for larger view.]
Figure 2. The Windows PowerShell window shows there are 4,487 objects in this instance of Active Directory.
[Click on image for larger view.]
Figure 2. The Windows PowerShell window shows there are 4,487 objects in this instance of Active Directory.
The Azure AD Connect Server
Having outlined the requirements, let's evaluate the Azure AD Connect server. This server must be running a full GUI deployment of Windows Server. The Azure AD Connect server can run OSes as old as Windows Server 2008. If you do choose to use Windows Server 2008, however, then password synchronization will not work. For that, you'll need at least Windows Server 2008 R2 SP1. It's also worth noting that you cannot use Small Business Server or Windows Server Essentials to install Azure AD Connect.
The reason why it's important to check the number of objects in AD is because the number of AD objects will determine both the hardware requirements for the Azure AD Connect server, and the database requirements.
Azure AD Connect includes a copy of SQL Server 2012 Express. SQL Server Express is a light version of SQL Server with a 10GB database size limit. This limit means the database can grow to be large enough to handle roughly 100,000 AD objects. If your AD is approaching 100,000 objects (or has already exceeded 100,000 objects), then you'll probably want to think about using SQL Server instead of SQL Server Express.
Regardless of the number of objects in your AD, the Azure AD Connect server will need at least a 1.6GHz CPU. The server's memory and storage requirements vary depending on the number of objects in AD. In this case, the lab server shown in Figure 2 had 4,487 objects, so my Azure AD Connect server is going to require 4GB of memory and 70GB of hard disk space. This hardware configuration will support up to about 50,000 AD objects. Instances with fewer than 50,000 objects require 4GB of RAM and 70GB of storage. If you have up to 100,000 objects, you'll need 16GB of RAM and 100GB of storage. Larger instances will require 32GB and incrementally more storage.
When preparing your Azure AD Connect server, you'll also need to install version 4.5.1 of the Microsoft .NET Framework, and you'll also need to install PowerShell 3.0. Depending on your environment, you may need additional components, or may have to do some additional prep work depending on how the server is going to be used. For example, some additional configuration tasks are required if you plan to use Active Directory Federation Services (AD FS).
Deploying Azure AD Connect
Before you begin deploying Azure AD Connect, you must add your domain to Azure, and then verify domain ownership. If you omit this step, Setup won't stop you from deploying Azure AD Connect, but you'll end up receiving a warning message telling you that users will not be able to sign into Azure AD with their on-premises AD credentials. If you want to have single sign-on capabilities, then adding your domain to Azure and working through the domain verification process is a must.
Just as you must perform varying preparation steps depending on how Azure AD Connect is going to be used, the installation steps for Azure AD Connect also vary. For the purposes of this introduction to Azure AD Connect, I'll explain how to setup an express installation using express settings. An express installation can be used if you have fewer than 100,000 objects in your AD, and is applicable only if you have a single AD forest. In order to perform an express installation, you'll also need an AD account with enterprise admin permissions.
The first step is to download Azure AD Connect. When prompted, choose the Run option, and the Setup wizard will begin.
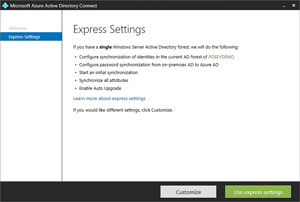
The setup process is pretty straightforward. The initial screen requires you to select the software's license agreement. The next screen provides a choice between using express settings and custom settings. Once you choose Express Settings, the welcome screen (see Figure 3) lists the individual tasks that Azure AD Connect will perform and offers the option of switching to Custom settings.
 [Click on image for larger view.]
Figure 3. The Express Settings screen outlines the setup and offers the option of switching to a custom deployment.
[Click on image for larger view.]
Figure 3. The Express Settings screen outlines the setup and offers the option of switching to a custom deployment.
Once you choose Use express settings, the setup will deploy the required components. After a few moments, the Setup will prompt you to enter your Azure AD credentials to connect with Azure AD. Upon entering these credentials, Setup will check to ensure they're valid, and will then display a screen prompting you to enter the credentials for an account that has enterprise admin permissions within your local AD.
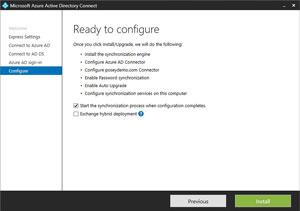
At this point, Azure AD Connect is finally ready to be installed. The Configure screen (see Figure 4) lists the individual steps that Setup will perform. More important, however, there are two checkboxes that require diligent attention.
 [Click on image for larger view.]
Figure 4. Be sure to select the appropriate checkboxes.
[Click on image for larger view.]
Figure 4. Be sure to select the appropriate checkboxes.
The first of these checkboxes is to Start the synchronization process when configuration completes. This checkbox is selected by default, and you would typically want to leave this checkbox selected. That way, the synchronization process will start immediately upon completion of the installation process.
Next is the Exchange hybrid deployment checkbox, which isn't selected by default, and with good reason. Normally, hybrid Exchange Server deployments refer to configurations in which Exchange Server is used both on-premises and in the Office 365 cloud. In this case, however, Setup is referring to a deployment in which Exchange Server resides both on-premises and in Azure. Hence, you should only select this checkbox if you're running Exchange Server within Azure.
At this point, you can click the Install button to install Azure AD. Upon doing so, Setup will automatically install the synchronization engine and the necessary connectors, and will configure the synchronization process.
Recommendations
Although I've walked you through a basic deployment of Azure AD Connect, the process can be much more involved in larger environments. As such, there are two TechNet documents that will provide further guidance. The first contains the prerequisites for Azure AD Connect and the other explains how to deploy it with custom settings, how to upgrade from DirSync and how to Migrate from FIM2010 or MIM2016.
About the Author
Brien Posey is a 22-time Microsoft MVP with decades of IT experience. As a freelance writer, Posey has written thousands of articles and contributed to several dozen books on a wide variety of IT topics. Prior to going freelance, Posey was a CIO for a national chain of hospitals and health care facilities. He has also served as a network administrator for some of the country's largest insurance companies and for the Department of Defense at Fort Knox. In addition to his continued work in IT, Posey has spent the last several years actively training as a commercial scientist-astronaut candidate in preparation to fly on a mission to study polar mesospheric clouds from space. You can follow his spaceflight training on his Web site.