Spike on SharePoint
Create a File Share as a Search Content Source in SharePoint 2013
This step-by-step visual guide will get you up and running in no time.
- By Spike Xavier
- 10/07/2014
In this article I will configure the SharePoint 2013 Search Service Application to include a File Share in its search results.
I will first create a file share using Server Manager and will call the file share "resumes." It will be stored in a folder named resumes which is located on the C: drive of the SP SQL machine. I have several simple word documents inside the folder with simple resumes that contain some information about a few fake employees.
For my development topology I have two Hyper-V virtual machines on the same private network, both using Windows Server 2012 SP1 as the Operating System. One is the domain controller and the other is a member server (with SharePoint 2013 running all roles and SQL Server 2012 installed on it).
The process for planning and configuring file shares is not the focus of this article. That process alone is worthy of at least a very long book chapter. The procedures I use will work in my development environment but may not be suitable for production environments. I would perform the same procedures in my production's SharePoint environment as far as adding content sources that I do in this article. The file share stuff is normally in the hands of the network administrator.
The trickiest part for me always seems to be the permissions of the share or the SMB profile of the share.
Content access accounts can be specific to crawled sources if needed. If a specific content access account is not specified, the default content access account is used. That is what I'll do here. The default content access account is a domain account called SPService for this article.
The steps I will take:
- Create a file share for a folder named "resumes"
- Try a search for a string in one of the resumes
- Create a content source using the file share
- Perform a full crawl of the content source
- Try a search again
- Validate success
In my development SharePoint environment, I have a SPWebApplication mapped to the host header: sharepoint.local on port 80. It is using the default service application proxy group which contains a search service application, and I have a few site collections.
One of them has the top-level site of template based on the enterprise search center located at http://sharepoint.local/sites/search, which I will use to enter my queries.
Please note, I am a member of the farm administrators group and a site collection administrator on all the site collections. Let's get started.
The first step is to create a file share:
 [Click on image for larger view.]
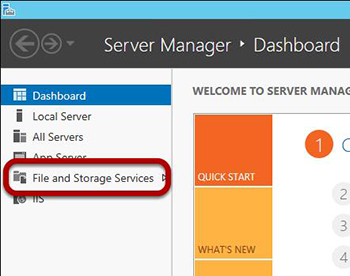
I have a folder on the C: drive of the SP SQL Hyper-V machine named resumes which contains a few resumes from imaginary employees. In order to create a file share that I can use, I go to Server Manager on my SP SQL Hyper-V machine and click on the File and Storage Services link.
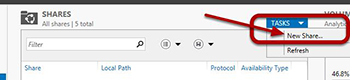
I then click the Tasks Menu and choose New Share:
 [Click on image for larger view.]
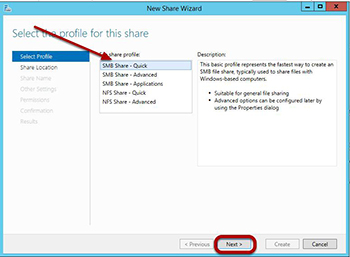
It's now time to set the SMB profile:
 [Click on image for larger view.]
I go with the default SMB - Quick profile. In production, this might or might not be the profile of a share that I was configuring as a content source with SharePoint.
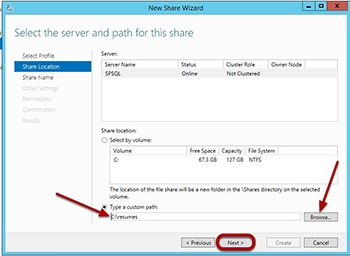
If I get something weird going on, I might look to this to see if there was something in the profile of the share that wasn't working with my environment. Quick should be fine for this example. I click Next and set the share to the folder:
 [Click on image for larger view.]
Using the Browse button, I choose the folder I want to share. In this case it's a resumes folder located at the C: drive of the SP SQL Hyper-V machine. After its set, I click next.
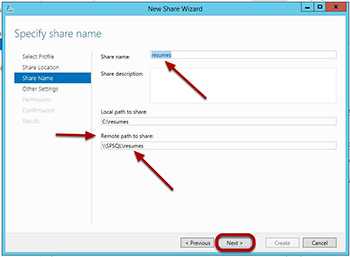
I name the Share resumes and click Next. (In production I would add a Share description but for this example I don't):
 [Click on image for larger view.]
I copy the Remote path to share. Sometimes I put this in Notepad because I will need this later when I configure my new content source in central administration.
Now it's time to configure the share settings:
 [Click on image for larger view.]
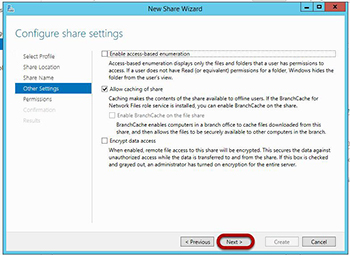
For this example I will use the default which is Allow caching of share. You can read the text to understand the other settings. The settings as shown are the default at the time of this writing. I click Next and specify permission to control access:
 [Click on image for larger view.]
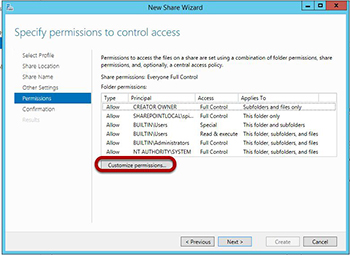
The Default permissions are to give everyone full control, according to this screen. I am going to choose to customize permissions so I click the button.
By clicking Customize permissions I am taken to this page:
 [Click on image for larger view.]
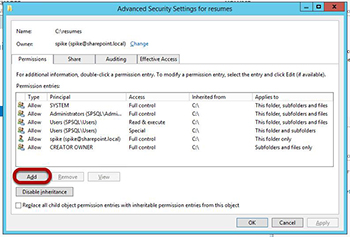
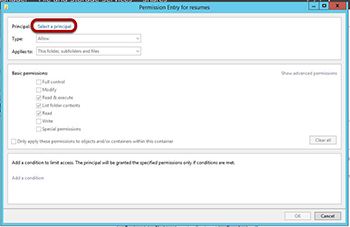
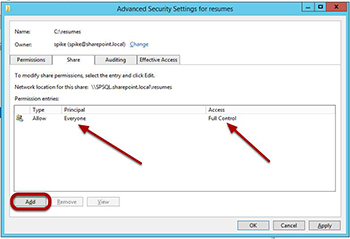
There are several tabs above. The first one (Permissions) is on the folder. I want to make sure that the content access account has what it needs. Granting everyone full control (as indicated in the previous image) should be fine but this might change at some point so I am going to click Add here.
 [Click on image for larger view.]
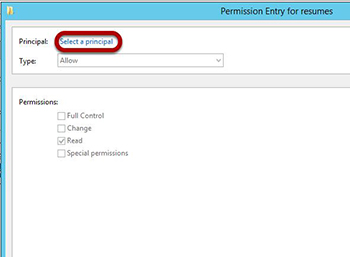
In the image above, I can select a principle to choose the content access account and set its permissions directly.
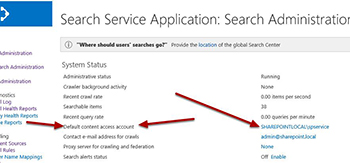
The next image is not part of this sequence of events. I just want to jump over to central administration and make sure the content access account is correct:
 [Click on image for larger view.]
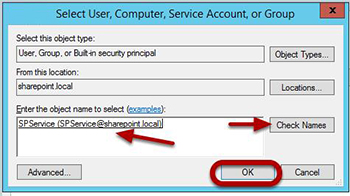
You'll want to make sure that you're doing this for the correct account. I do this by jumping back to central administration for a second to take a look at the settings of my search service application and check the Default content access account, which is currently SHAREPOINTLOCAL\SPService. This account needs to have the correct permissions to crawl the content. I will give it the same permissions on the share as the contents within the share.
Back to the wizard again I add the SPService Account which is my Content Access account:
 [Click on image for larger view.]
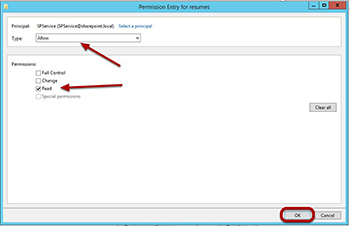
The default settings are as shown in the next image. This should be fine for my development environment, but for production I might have something different depending on requirements. I click OK:
 [Click on image for larger view.]
Now it's time to set permissions on share for SPService. I click on the Share tab:
 [Click on image for larger view.]
I click Add:
 [Click on image for larger view.]
I click the Select a principal link:
 [Click on image for larger view.]
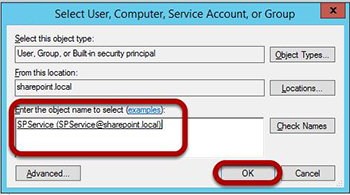
I select SPService again:
 [Click on image for larger view.]
The default of Read is fine so I click OK:
 [Click on image for larger view.]
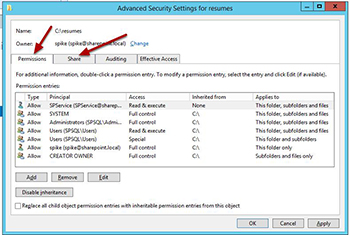
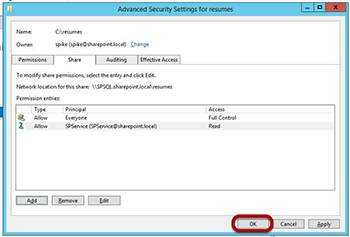
I then verify that the settings took and click OK:
 [Click on image for larger view.]
I verify that the settings took and click OK.
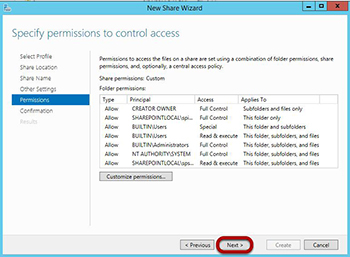
I'm done configuring things here so I click Next:
 [Click on image for larger view.]
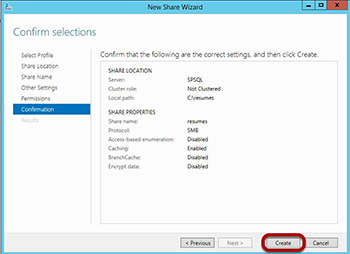
I take a look at my handy work. And since everything appears to be what I set, I click Create:
 [Click on image for larger view.]
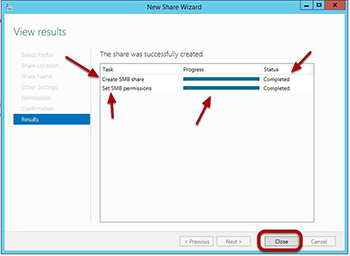
I wait until the two bars say Completed and then click Close:
 [Click on image for larger view.]
Now it's back to central administration, where I click on Manage service applications:
 [Click on image for larger view.]
I then click the Search Service Application (the top option):
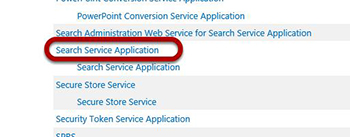 [Click on image for larger view.]
I want to create a content source so I click Content Sources:
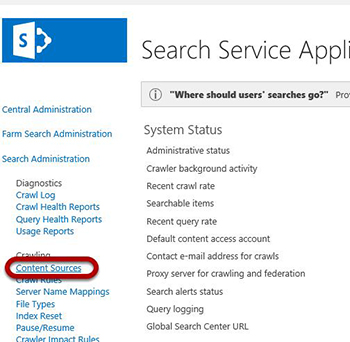 [Click on image for larger view.]
And I click New Content Source:
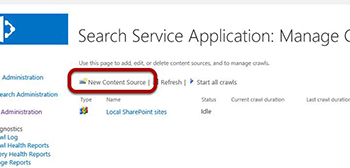 [Click on image for larger view.]
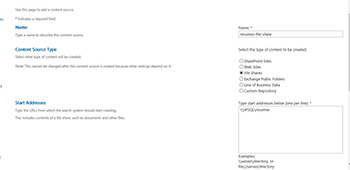
I fill out the form including the path to the file share that I noted earlier and choose File Shares as the type of content to be crawled. The path for me is \\SPSQL\resumes:
 [Click on image for larger view.]
I scroll down the page and make sure that the setting Crawl the folder and all subfolders of each start address is chosen. I call this the Depth of Crawl Settings (I made that up) then I scroll down and click OK (not shown):
 [Click on image for larger view.]
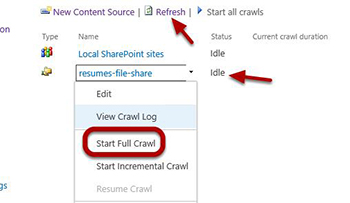
I can set the full and incremental crawl schedules at a later time.I mouse over my new content source and when the drop down menu comes up I choose Start Full Crawl:
 [Click on image for larger view.]
I click OK when the prompt comes up to validate my choice to start a full crawl. In a moment, the status will change to "starting." I can click Refresh to watch it change from "starting" to "crawling full" and then "completing" (before returning back to "idle").
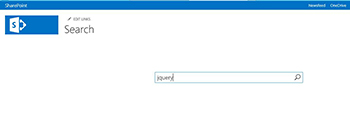
I go back to my search center and enter the query which had no results earlier:
 [Click on image for larger view.]
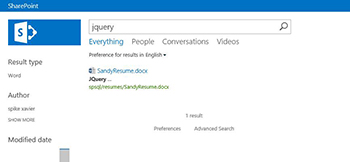
I see that in Sandy's resume she has apparently listed JQuery as one of her skills and it's showing in the search results page:
 [Click on image for larger view.]
Success!
About the Author
Spike is a full-time trainer and consultant with Transmission I.T. He began his career in computers in the early 1980s with Fortran IV. Sometime in 2007, he found SharePoint and has been working with it ever since. His interests are SharePoint, HTML 5, JavaScript and ASP.NET. He was the head of the Arizona SharePoint Pros user group for the last few years and speaks at conferences and user groups.