Windows Server How-To
Using Windows Server 2012's SSD Write-Back Cache
Brien runs down how you can get the most out of Windows Server 2012 R2's newest tiered storage functionality.
One of the most welcome new features in Windows Server 2012 R2 is the ability to create native tiered storage. In case you are unfamiliar with the feature, a storage pool can contain a mixture of traditional hard disks and solid-state disks. When a virtual hard disk is created on top of the storage pool, the administrator is given the option of providing the new virtual hard disk with tiered storage. If the administrator chooses to enable this option then the most frequently read blocks (which are known as hot blocks) will be automatically copied to solid state storage so that they can be accessed with the greatest possible efficiency.
When you create a virtual hard disk with tiered storage, Windows allows you to specify the amount of traditional hard-disk space and the amount of solid-state storage space that you want to use for the new virtual hard disk. What you might not realize however, is that your fast storage tier might not end up being quite as large as you specify.
If you create a fast tier that is more than 1 GB in size Windows will use 1 GB of SSD space as a write-back cache. This write back cache improves performance by intercepting and smoothing out write operations. The disadvantage, of course, is that the fast storage tier is actually 1 GB smaller than you specify because of the space lost to the write-back cache.
With that being the case, it is a good idea to account for the lost space up front by making your fast storage tier 1 GB larger than you otherwise would. Of course this raises another question. Is it possible to disable or resize the write-back cache?
The first thing that you need to understand is that write-back caching isn't unique to volumes that use storage tiers. Even non-tiered virtual hard disks include write-back caches by default. One important difference however, is that virtual disks made up entirely of standard hard disks have a much smaller write-back cache than those that use tiered storage. A non-tiered virtual hard disk uses a 32 MB cache, whereas a tiered virtual hard disk has a 1 GB cache.
That being the case, it is handy to be able to verify the cache size. One way of doing so is through PowerShell. You can use the Get-VirtualDisk cmdlet to retrieve a list of all of the virtual disks. When the list is displayed, pay attention to the FriendlyName. This name is used to identify the virtual disk. Once you know the friendly name, you can use the following command to retrieve the cache size:
Get-VirtualDisk –FriendlyName "<friendly name>" | Select-Object WriteCacheSize
You can see how this works in Figure 1.
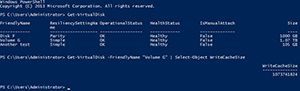 [Click on image for larger view.] Figure 1. You can retrieve the size of a virtual disk's write back cache.
If you want to see the write back cache for every virtual disk on the server then you could use this command instead:
Get-VirtualDisk | Select-Object FriendlyName, Size, WriteCacheSize
You can see this command at work in Figure 2.
 [Click on image for larger view.] Figure 2. You can list the cache size for all of your virtual hard disks.
So what about changing the cache size? Well, you can't modify the cache size, but you can specify it at the time that you create a new virtual hard disk. In order to do so, you have to use Windows PowerShell.
New-VirtualDisk –StoragePoolFriendlyName "<storage pool name>" –FriendlyName "<virtual disk friendly name>" –StorageTiers @($ssd_tier, $hdd_tier) –StorageTierSizes @(5GB, 100GB) –ResiliencySettingName Simple –WriteCacheSize 2GB
In the command above, you would provide the name of your storage pool and the friendly name for the virtual hard disk that you want to create. The command creates a 100 GB virtual hard disk with a 5 GB SSD tier and a 2 GB write back cache. You can of course substitute your own values.
So as you can see, it's relatively easy to specify the size of the write-back cache. The catch is that it must be done when the virtual hard disk is created, and it can only be done through PowerShell.
About the Author
Brien Posey is a 22-time Microsoft MVP with decades of IT experience. As a freelance writer, Posey has written thousands of articles and contributed to several dozen books on a wide variety of IT topics. Prior to going freelance, Posey was a CIO for a national chain of hospitals and health care facilities. He has also served as a network administrator for some of the country's largest insurance companies and for the Department of Defense at Fort Knox. In addition to his continued work in IT, Posey has spent the last several years actively training as a commercial scientist-astronaut candidate in preparation to fly on a mission to study polar mesospheric clouds from space. You can follow his spaceflight training on his Web site.