Under the Hood of the SQL Server PowerShell Provider
The nodes know. Use SQLPS.exe and a few cmdlets to find out what the nodes know.
- By Joshua Jones
- 01/11/2010
Throughout this series of posts there have been a number of examples of how to use the SQL Server PowerShell provider. However, these were always in context with a specific task (i.e. automating backups, exploring policies, etc.). In this post, let's take a brief look at all of the nodes in the PowerShell provider for SQL Server. Along the way, I'll highlight particularly useful areas.
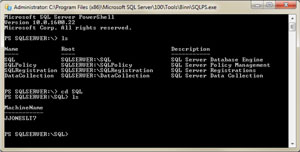
To explore the provider, simply open SQLPS.exe. By default, this places you at the top level of the hierarchy of the provider. In order to see what options you have, simply type ls at the command prompt (see Fig. 1).
 |
| Figure 1. Starting SQLPS.exe. (Click image to view larger version.) |
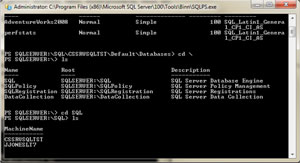
What you'll get is four high-level nodes; SQL, SQLPolicy, SQLRegistration, and DataCollection. We can drill into each of these using the familiar "drive/path" method. To go to a specific directory, simply type cd Directory. We can then list the contents of that directory (see Fig. 2).
 |
| Figure 2. Listing the directory contents. (Click image to view larger version.) |
To back out, you can use the old cd.. command, or simply change directories explicitly (if you know the target directory off the top of your head).
Now, for SQL, SQLPolicy, and DataCollection, the next two levels down are machine name and instance name, in order. This gives you the ability to explore different machines/instances. SQLRegistration lists registered objects, so the hierarchy isn't based on a SQL instance.
Now that you know how traverse the provider, let's look at the various directories:
- SQLSERVER:\SQL This provider houses all of the basic objects: databases, tables, stored procedures, views, etc.
- SQLSERVER:\SQLPolicy This exposes all of the SQL Server Policy Based Management objects.
- SQLSERVER:\SQLRegistration This directory holds all of the server registrations on the system, including groups and management server settings.
- SQLSERVER:\DataCollection All of the objects related to the Performance Data Warehouse functionality, known as the Data Collector, are located here.
All of these folders represent access into SQL Server Management Objects, or SMO. As such, the real power here is that you can access any server (that you have permissions to) directly from the SQLPS.EXE command line. For example, if I want to see the list of databases on my test server, simply type:
PS SQLSERVER:\>cd SQL\CSSRVSQLTST\Default\Databases
PS SQLSERVER:\SQL\CSSRVSQLTST\Default\Databases>ls
The result is what you see in Fig. 3.
 |
| Figure 3. Using the code above, I get a list of databases on my server. (Click image to view larger version.) |
As you can see, I have two user databases on this system, AdventureWorks2008 and perfstats. A side effect of this is that if you now go back to your SQL directory and list contents, you'll see your local machine (if you have a local instance installed) as well as any remote instances you've accessed (see Fig. 4).
 |
| Figure 4. It's all there now, for you to explore. (Click image to view larger version.) |
Now you can easily navigate the remote system.
If you find that there are specific paths you reference frequently, you can use PowerShell's built-in ability to define virtual drives to shorten the path used. For example, if I find myself frequently accessing my perfstats database on my test server, I can define a virtual drive that takes me straight to the database by using the New-PSDrive cmdlet (see Fig. 5).
|
| Figure 5. Use New-PSDrive to steer to your virtual database directly. (Click image to view larger version.) |
The parameters are fairly simple: –Name is the name you're giving the drive, –PSProvider tells PowerShell what provider to use (in this case SqlServer), and –Root is the path you are mapping. You now have a virtual drive mapped that you can access quickly.
Here's the catch: The drive is initially only available to the session it is defined in. Therefore, if you'd like to be able to persist the drive, you need to add the drive to your PowerShell profile (which I'll talk about some other time).
Now, when using this provider in a script, you can combine this knowledge with various cmdlets and coding actions to perform nearly any operation on a SQL Server, from inserting data to renaming objects. Have fun!
About the Author
Joshua Jones is co-author of A Developer's Guide to Data Modeling for SQL Server: Covering SQL Server 2005 and 2008 (Addison-Wesley Professional, 2008) and is a principal with Denver-based Consortio Services LLC.