In-Depth
Manage Group Projects with Microsoft Planner
Microsoft has added a planning application for Office 365 business and enterprise subscriptions that's useful for managing group projects and tasks.
As Microsoft continues to build on the applications offered in Office 365, the company has also accelerated the pace of new ones offered with its subscriptions. The latest new application added to Office 365 is Planner and it promises to be a hit with anyone who manages or participates in group projects.
Planner essentially is a project management tool. It's designed to help teams carve up large projects into tasks, and then assign and track the progress of those tasks. Although some critics believe Planner isn't as comprehensive as some of the third-party project management tools, it seems to be more than adequate for anyone who doesn't need a high-end project management solution. Furthermore, Planner is included with Office 365 subscriptions, so it's a free add-on for users with business and enterprise licenses.
Specifically, Microsoft is providing Planner to organizations with Office 365 Enterprise subscriptions (E1, E3, E4 and E5), as well as Business Essentials and Business Premium subscriptions.
Arguably, the most important concept for administrators to understand with regard to Planner is Office 365 groups. Groups have long been a part of the Windows OS, and Microsoft server products such as SharePoint. Security groups, for instance, allow administrators to assign access controls based on group membership. Distribution groups (sometimes called distribution lists) are collections of e-mail addresses. Office 365 groups have similarities to other group types, but are fundamentally different.
An Office 365 group is essentially a collection of users. When a user joins an Office 365 group, the user's e-mail address is added to a group distribution list. However, an Office 365 group also has its own inbox for group messaging. A group also includes collaborative resources such as a group calendar, a library for storing files and folders, and a OneNote notebook.
Planner is tightly interwoven into Office 365 groups. If an organization already uses Office 365 groups, then a plan will be automatically added to the group. Likewise, when using Planner to create a new plan, it creates a matching Office 365 group. More important, if a user deletes a plan, the associated group is also deleted. Consequently, some organizations have chosen to disable Planner (Microsoft posted instructions on how to do this). Because you're reading this, presumably you're considering the use of Planner in your organization, so here's how to get you set up.
Setting Up Planner
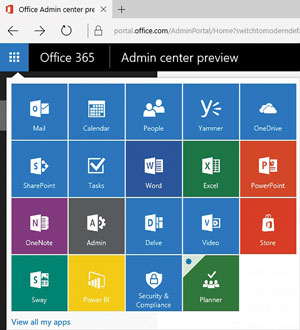
As is the case for other Office 365 apps, Planner is accessible through a tile in the Office Admin center preview (Figure 1). Although Microsoft officially released Planner earlier this summer, the company is still in the process of making Planner available to all of its eligible customers. As such, Planner might not appear on your list of Office 365 apps right away.
 [Click on image for larger view.]
Figure 1. Click on the Planner tile to launch Planner.
[Click on image for larger view.]
Figure 1. Click on the Planner tile to launch Planner.
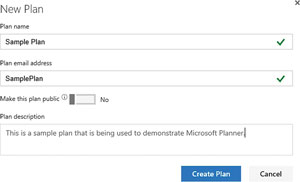
To get started with Planner, click on the Planner tile, and when prompted, click on New Plan. Upon doing so, you'll be prompted to assign a name, e-mail address and an optional description to the plan. You'll also be asked whether you wish to make the plan public (see Figure 2). Click the Create Plan button to create a plan.
 [Click on image for larger view.]
Figure 2. Enter a name, e-mail address, and an optional description of the plan you're creating.
[Click on image for larger view.]
Figure 2. Enter a name, e-mail address, and an optional description of the plan you're creating.
The basic concepts used by Planner can take a little bit of getting used to, but are relatively simple. Planner is based on the hierarchal concepts of plans, tasks and buckets.
A plan generally refers to some sort of project. It's important, however, to differentiate between a plan and a task. To give better context, consider one of my own upcoming projects -- giving my boat a tune up. If I were to try to organize this through Planner, the job would be a plan, not a task because the tune up involves multiple individual tasks such as replacing spark plugs, changing the oil, changing fuel filters and so on.
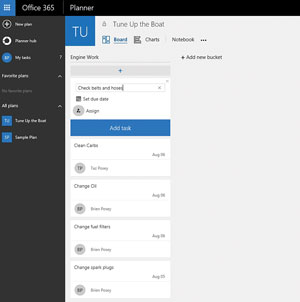
In reality, you would probably never use Planner to organize a marine tune up, but let's take a look at what it might look like if you did. The plan I created is called Tune Up the Boat (see Figure 3). I also created a series of tasks, which are now a part of the plan. For each of these tasks, I have set a due date and assigned the task to myself.
 [Click on image for larger view.]
Figure 3. A plan consisting of a few tasks.
[Click on image for larger view.]
Figure 3. A plan consisting of a few tasks.
Planner is designed to be a collaborative tool, and there's nothing collaborative about assigning tasks to yourself. Everything I've done so far could just as easily have been accomplished by using a calendar or a list. But what if I decided I needed help with some of the tasks? In that situation, I could click on Add Members, and add other users to the plan. By doing so, Planner makes it possible to assign tasks to those users, and it begins to act more like a collaborative tool. In fact, the user will receive a notification of the task assigned.
Tasks in a Bucket
Even after assigning tasks to multiple users, the Planner interface looks very much like a list. This is fine for small projects, but often times, projects are made up of big tasks, which are in turn made up of smaller tasks. This is where the concept of buckets comes into play. Buckets allow users to group tasks in a more logical manner. Tasks might be grouped by category, by assignment or by just about any other criteria.
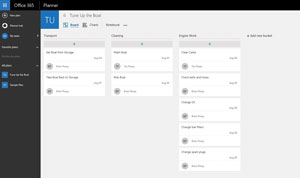
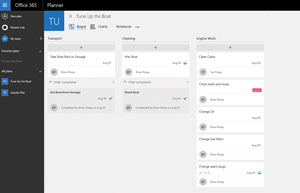
I created a series of buckets to categorize tasks (see Figure 4). The buckets are named Transport, Cleaning and Engine Work. Each bucket contains a series of individual tasks, each of which has been assigned to a user and given a due date.
 [Click on image for larger view.]
Figure 4. Tasks that have been organized into buckets.
[Click on image for larger view.]
Figure 4. Tasks that have been organized into buckets.
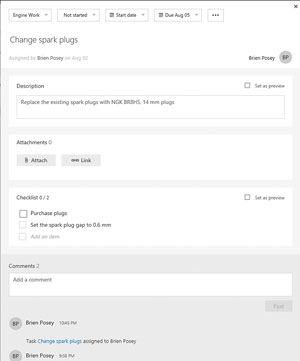
The individual tasks described here are somewhat sparse. Each task shown in the figure contains a name, an assigned user and a due date, and that's about it. However, it is possible to add additional information to a task. Clicking on an individual task reveals the dialog box (see Figure 5) where you can edit the task description or add a comment to the task. Planner also displays the task history. For instance, you can see at the bottom of the figure the task was assigned to me at 10:02 PM.
 [Click on image for larger view.]
Figure 5. A number of attributes can be configured for an individual task.
[Click on image for larger view.]
Figure 5. A number of attributes can be configured for an individual task.
The dialog box also lets you attach documents to a task, or to provide a link to a Web site. This allows team members to reference documentation to help complete the task. For example, because this task involves changing spark plugs, I might attach the boat's maintenance manual or link to a YouTube video showing the proper way to replace spark plugs.
You can also create a task checklist. In this case, for example, I can't change spark plugs until I purchase replacement plugs and set the proper plug gap.
The dialog box also contains a number of different droplists, which are displayed along the top. You can use these droplists to move the task into a different bucket, make changes to the task status, start date or due date, or delete the task. It's also possible to change the user to whom a task has been assigned, but you have to make assignment changes from the screen (in Figure 4).
Keep Projects on Schedule
Having explained how to use Planner to organize tasks, it's also useful for keeping a project on track. Planner uses color-coded charts to reflect the status of tasks, and of the project as a whole. As users delve into their assigned tasks, the Board view is updated to reflect the status of each task (see Figure 6).
 [Click on image for larger view.]
Figure 6. The Board view allows you to monitor the status of the tasks.
[Click on image for larger view.]
Figure 6. The Board view allows you to monitor the status of the tasks.
In this case, it shows two of the tasks, Get Boat from Storage and Wash Boat, are completed. The task name has been crossed out, and a green checkmark appears next to the due date.
Planner also shows tasks that haven't been completed on time. The task Check Belts and Hoses, for example, was due on July 31. Because that date has already passed, the due date is highlighted in red.
The board also shows tasks in progress. The Wax Boat task displays a circle icon, with the bottom half colored blue. This icon indicates the task is currently being worked on. Now with the Change Spark Plug task, not only does Planner show the task is in progress, it also shows one of the two checklist items within the task are complete.
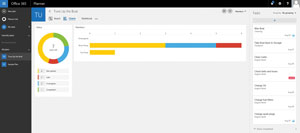
There are two other views: Charts and Notebook. The Charts view displays a graphical representation of the project. A circle chart indicates the number of tasks that must still be completed (see Figure 7). This chart also shows the number of overdue tasks, the number of tasks that haven't been started, the number of tasks in progress and the number of tasks completed.
 [Click on image for larger view.]
Figure 7. The Charts view provides a graphical representation of the plan's progress.
[Click on image for larger view.]
Figure 7. The Charts view provides a graphical representation of the plan's progress.
Balancing Workloads
A bar chart displays the same information, broken down by user. This makes it easy to monitor each user's progress and is also useful in determining whether some tasks might need to be reassigned, in an effort to more evenly balance the workload.
Clicking on the Notebook view opens OneNote Online. As noted, each plan is tied to an Office 365 group, and each group has a dedicated Notebook. The Notebook view provides a shortcut to the notebook.
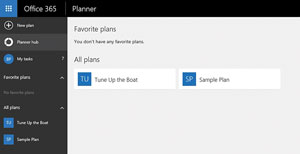
Circling back to the Sample Plan created earlier, I never did anything with it. The reason I created it was to show the Planner Hub (see Figure 8). The Planner Hub displays all of the current plans by clicking on a plan to access the tasks within that plan.
 [Click on image for larger view.]
Figure 8. The Planner Hub provides access to all existing plans.
[Click on image for larger view.]
Figure 8. The Planner Hub provides access to all existing plans.
The menu bar includes a link to My Tasks. The number displayed, in this case 7, reflects the total number of tasks assigned to the user across all plans. Clicking on this link shows the user all of their tasks, across all plans.
Planner does a good job helping Office 365 users manage projects. The best part of Planner, however, is the fact that Microsoft includes it with eligible subscriptions at no extra cost.
About the Author
Brien Posey is a 22-time Microsoft MVP with decades of IT experience. As a freelance writer, Posey has written thousands of articles and contributed to several dozen books on a wide variety of IT topics. Prior to going freelance, Posey was a CIO for a national chain of hospitals and health care facilities. He has also served as a network administrator for some of the country's largest insurance companies and for the Department of Defense at Fort Knox. In addition to his continued work in IT, Posey has spent the last several years actively training as a commercial scientist-astronaut candidate in preparation to fly on a mission to study polar mesospheric clouds from space. You can follow his spaceflight training on his Web site.