In-Depth
Added IT Flexibility with System Center Operations Manager 2016
The forthcoming release of System Center Operations Manager 2016 will provide administrators with scheduled maintenance, improved support for management packs, alert tuning and support for the new Windows Server Nano configuration option.
As Microsoft readies the release of its System Center 2016 management suite, one component that hasn't received much attention is System Center Operations Manager (SCOM). In many regards, SCOM is the broadest component of System Center as its console provides the monitoring of activities and performance across an entire environment and issues alerts when availability and security are at risk. It also provides support for third-party systems and network components via what's referred to as management packs.
SCOM 2016 introduces some important new features, especially for those planning to roll out the latest version of Windows Server 2016. In SCOM 2016, Microsoft says it's aiming to extend its monitoring scope in terms of infrastructure and applications encompassing public and private clouds. The company is also aiming to make it easier to maintain add-on management packs. In addition, Microsoft said SCOM 2016 will also offer improved Linux support and integration with its new Operations Management Suite (OMS), plus extended analytics and diagnostic capabilities.
After spending some time evaluating Technical Preview 5, among some new features that IT managers will welcome are support for scheduled maintenance, much-needed support for the GUI-less Nano Server option, improved updating of SCOM management packs and the ability to cut down on excessive alerts.
Scheduled Maintenance
It might be a relatively small feature, but the new Scheduled Maintenance Mode is one many administrators will be excited about and will make a big difference. Other System Center components, such as Virtual Machine Manager (VMM), have supported the creation of maintenance schedules for a while (VMM refers to this as the Servicing Window), but the capability is new to SCOM.
Microsoft has made it easy to create a maintenance schedule. Simply select the Maintenance Schedules container in the console tree, and then click on the Create Maintenance Schedule link, found in the Actions pane. Upon doing so, SCOM will ask you to select the objects to which you want to apply the maintenance schedule. Upon making your selection, you can decide whether to apply the maintenance schedule to only your selected objects, or also to child objects.
Click Next and to set the maintenance schedule for the selected objects. Doing so involves specifying the start and end time, and the recurrence frequency. Notably, SCOM 2016 lets you create multiple maintenance schedules to apply different schedules to different objects.
Nano Server Support
Another new feature Microsoft is including in SCOM 2016 is Nano Server support. No, you can't install SCOM 2016 onto a Nano Server, but you can use it to monitor Nano Server, which is important because the deployment option doesn't have a GUI -- and considering it'll be used for scale-out operations, administrators will likely be managing large clusters of them.
It's important to note that Nano Server must be joined to the same domain as the SCOM server. Logistically, this can pose a bit of a challenge because larger organizations often utilize multiple domains. If you plan to use Nano Servers in your organization, it's a good idea to join the Nano Servers to the domain at the time they're created. It's possible to join an existing Nano Server to a domain (instructions on how to do so can be found here), but doing so involves a long, complex process that, in my experience, doesn't always work on the first try. The Forwarders package must also be installed on the Nano Server.
As is the case with other servers, Nano Server monitoring is based on the use of SCOM agents. In order for the agents to function, the correct firewall ports must be open. These include TCP port 135 and TCP/UDP port 445. Microsoft has documented the full agent installation requirements in the TechNet Library.
There are two different ways in which you can deploy an agent to a Nano Server. One option is to copy a script from the SCOM server to the Nano Server, and then run the script.
Microsoft's preferred method for copying files to a Nano Server involves using the Copy-Item cmdlet. However, this method doesn't work (at least not yet) if you're running Windows PowerShell from a Windows Server 2012 R2 computer. The commands used are:
$Cred = Get-Credential
$Session = New-PSSession -ComputerName <nano server name> -Credential $Cred
Copy-Item -ToSession $Session -Path <source path> -Destination <destination path>
The reason these commands don't currently work from Windows Server 2012 R2 PowerShell is because the -ToSession parameter used with Copy-Item isn't supported within the current PowerShell version. As such, there are two other ways you can place the agent onto a Nano Server.
One method involves shutting down the Nano Server. Upon doing so, you can mount its virtual hard disk within another OS, and go to your SCOM server C:\Program Files\System Center 2016\Operations Manager\Server\Agent Management\Nano folder. Next, copy the folder named NanoServer to your SCOM server and place it in a path named C:\NanoAgent\NanoServer. Finally, dismount the virtual hard disk, and start your Nano Server.
If you've used either of these methods, then you'll need to establish a remote PowerShell session to your Nano Server. After doing so, navigate to the NanoServer folder and run the following PowerShell commands:
./InstallNanoServerScomAgentOnline.ps1 -ManagementServerFQDN <<Management Server Name FQDN>> -ManagementGroupName <<Management Group Name>> -NanoServerFQDN <<Nano server FQDN on which the agent will be installed>> -BinaryFolder ..\
Net Start HealthService
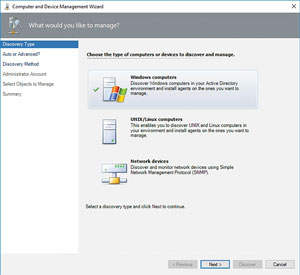
An alternative method for deploying the agent to a Nano Server is to use the SCOM Discovery Wizard. To do so, log into the Operations console, and then click on Administration, followed by Discovery Wizard. When the Discovery Wizard starts, you'll see a screen asking which type of computers you want to discover and manage (see Figure 1). Select the Windows Computers option, and click Next.
 [Click on image for larger view.]
Figure 1. Choose the Windows Computers option and click Next.
[Click on image for larger view.]
Figure 1. Choose the Windows Computers option and click Next.
The following screen asks you which discovery method you want to perform. The easiest thing to do is scan the entire domain, but that can, of course, be time consuming. If you need to add a single Nano Server, then use the Advanced Discovery option, choose the Servers Only option, and click Next.
On the following screen, choose the Browse for, or Type-In Computer Names option, and then type the name of your Nano Server (I named mine minwinpc.poseydemo.com). Click Next, and you will be prompted to select the service account you'd like to use. Enter your credentials, and click Discover.
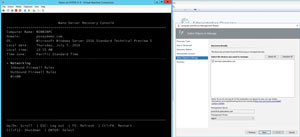
Assuming everything is configured correctly, SCOM 2016 should be able to detect your Nano Server (see Figure 2). Select the check box next to the listing for your Nano Server, and then click Next. When prompted, enter the credentials for your service account, and then click Finish. The console will deploy the agent, and you should see a task status of Success displayed upon completion.
 [Click on image for larger view.]
Figure 2. Detecting a Nano Server in SCOM 2016.
[Click on image for larger view.]
Figure 2. Detecting a Nano Server in SCOM 2016.
Management Pack Updates and Recommendations
Another welcome new feature is management pack updates and recommendations. As noted, SCOM leverages management packs for managing various types of systems. These management packs make SCOM extensible. If Microsoft were to release a new server product, the company wouldn't have to release a new version of SCOM in order to allow that new server product to be managed. Instead, Microsoft simply creates a management pack for the new server product. Third-party developers can -- and typically do -- create management packs for their own products.
As is the case for any other type of software that Microsoft creates, management packs are sometimes updated. In the past, there was no easy way to check for the existence of updated management packs. Thankfully, Microsoft has come up with a solution in SCOM 2016.
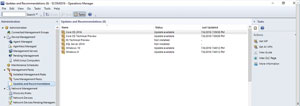
SCOM 2016 is designed to show whether you're using the latest version of the various management packs. To perform such a check, log into the SCOM console, and select the Administration workspace. Next, navigate through the console tree to Management Packs | Updates and Recommendations. At this point, SCOM will take a few minutes to compare the existing management packs against the management pack catalog in an effort to determine whether you have the current version installed. SCOM will let you know whether any updates are available for your management packs (see Figure 3).
 [Click on image for larger view.]
Figure 3. SCOM 2016 shows when updates are available for individual management packs.
[Click on image for larger view.]
Figure 3. SCOM 2016 shows when updates are available for individual management packs.
If you'd like to view more detailed information than what's shown on the Updates and Recommendations screen, simply click on the More Information link, located in the Actions pane. Doing so will cause SCOM 2016 to display detailed information about the currently selected management pack. When selecting the Core OS 2016 management pack, the More Information window shows this particular management pack is made up of multiple components, some of which are not installed. The one component installed (the Windows Server Operating System Library) is version 6.0.7218.0, and the available update is version 10.0.3.0. As such, you can tell right away this is a very significant update, because it is four versions newer than what's currently installed.
To update a management pack, click on the management pack you want to update, and then click on the Get MP link, found in the Actions pane. When you do, SCOM will open the Import Management Packs dialog box, which shows exactly what's going to be installed. In the case of the Core OS 2016 management pack, clicking Get MP not only updates the existing component, it also causes the missing components to be installed. It's possible to use the dialog box's Remove link to prevent the installation of individual items.
Incidentally, you don't have to update your management packs one at a time. The console's Actions pane contains a link labeled Get All MPs. You can use this link to update all of your management packs at once.
Alert Tuning
One of the major problems with SCOM has always been its tendency to issue excessive alerts. SCOM may sometimes generate dozens of alerts per hour in response to conditions that aren't even problematic. There have always been techniques for getting rid of these excessive alerts, but such techniques tend to be messy. SCOM 2016 solves this problem through automatic alert tuning.
To use the alert tuning feature, open the console and select the Administration workspace. Now, navigate through the console tree to Management Packs | Tune Management Packs. Finally, click the Identify Management Packs to Tune link, found in the Actions pane. Upon doing so, SCOM will generate a list of your management packs and the number of alerts those management packs have produced. For each management pack, SCOM also lists severity and a priority. If you find a management pack that needs to be tuned, you can right-click on the management pack and choose either the Override option or the option to view or edit settings for the monitor. With either choice, you will have the ability to override the rule generating the excessive alerts.
Observations and Recommendations
Overall, SCOM 2016 will include some very welcome improvements. In addition to the improvements covered here, Microsoft has introduced a number of other new and improved features such as scalability for Unix/Linux monitoring, a network monitoring management pack generator, and various UI improvements. If you're a systems administrator, it's worth taking a look at the latest technical preview by downloading a preconfigured virtual machine.