Windows Server How-To
How To Fix a Detached Virtual Disk in Windows Storage Spaces
While a rare occurrence, you may have a need to fix a virtual disk that has come attached.
In my experience, Windows Storage Spaces tends to be reliable and typically behaves in a predictable manner. On a couple of occasions, however, I have encountered problems related to detached virtual disks. Because one of my lab servers is experiencing this problem right now, I wanted to take the opportunity to show you how to fix it.
The server that I am currently experiencing problems with is a standalone Hyper-V server that makes use of Direct Attached Storage. This particular server contains a single virtual disk that was created from a storage pool consisting of six physical disks. You can see this virtual disk in Figure 1.
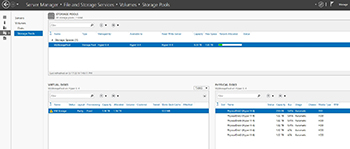 [Click on image for larger view.] Figure 1. Storage spaces indicates that there is a problem with my virtual disk.
As you can see in the figure above, Storage Spaces indicates that there is a problem with my virtual disk. The problem is that the virtual disk is not attached, and is therefore not available for use. I use this particular virtual disk to store my Hyper-V virtual machines. As such, if I open the Hyper-V Manager, all of my virtual machines are listed as being in a critical state, with corresponding status messages indicating that Hyper-V cannot connect to virtual machine configuration storage. You can see what this looks like in Figure 2.
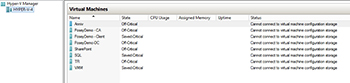 [Click on image for larger view.] Figure 2. Hyper-V cannot connect to virtual machine configuration storage.
This particular problem is simple to work around. I can attach the virtual disk by simply right clicking on it and choosing the Attach Virtual Disk command from the shortcut menu, as shown in Figure 3. Upon doing so, Storage Spaces presents a message asking if I want to attach the virtual disk to the server. The virtual disk is now attached. As you can see in Figure 4, the error is gone and the virtual disk has been mounted as volume F:. Within a few minutes, Hyper-V begins to recognize the virtual disk, and the errors go away, as shown in Figure 5.
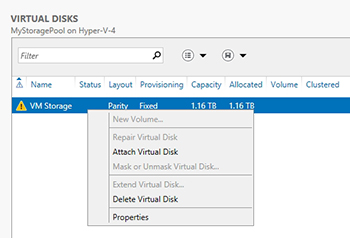 [Click on image for larger view.] Figure 3. Right click on the virtual disk and choose the Attach Virtual Disk command from the shortcut menu.
 [Click on image for larger view.] Figure 4 The virtual disk has been mounted as volume F:.
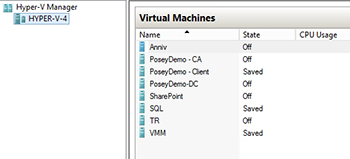 [Click on image for larger view.] Figure 5. Hyper-V recognizes that the storage is now available, and the errors go away.
Even though my server is now working correctly, the problem has not actually been resolved. If I were to reboot the server, the problem would come back and I would once again have to manually attach the disk.
This problem occurs because Windows was somehow configured to leave the virtual disk detached. I'm honestly not sure how or why this has happened. Leaving virtual disks detached is not the normal default behavior for Storage Spaces. Furthermore., Windows previously attached the virtual disk automatically. I don't know why Storage Spaces sometimes stops automatically attaching virtual disks, but I have seen this problem occur on multiple occasions. Of course this raises the question of how to fix the problem.
The first thing that I did in an effort to address this problem was to confirm that Windows is not even trying to attach the disk. To do so, I right clicked on the virtual disk, as shown in Figure 3, and chose the Properties command from the shortcut menu. This caused Windows to display the VM Storage Properties dialog box. Next, I clicked on Details, and selected the IsManualAttach option from the Property drop down list. As you can see in Figure 6, the value is set to True, indicating that Windows is configured to treat this disk as a manually attached volume. You will also notice that there is no option to change this configuration.
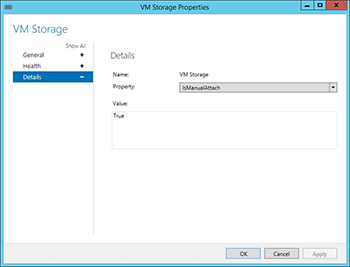 [Click on image for larger view.] Figure 6. Windows is configured to treat the disk as a manually attached volume.
In order to fix the problem, I had to delve into PowerShell. I used the Get-VirtualDisk cmdlet to double check the status of my virtual disk. After doing so, I used the following command to change any virtual disk that was configured for manual attachment to be automatically attached:
Get-VirtualDisk | Where-Object {$_.IsManualAttach –EQ $True} | Set-VirtualDisk –IsManualAttach $False
After entering this command, I entered the Get-VirtualDisk cmdlet one more time just to make sure that my changes took. You can see what this looks like in Figure 7.
 [Click on image for larger view.] Figure 7. I used PowerShell to fix the problem.
Finally, I rebooted the server, and confirmed that the virtual disk now attaches automatically.
About the Author
Brien Posey is a 22-time Microsoft MVP with decades of IT experience. As a freelance writer, Posey has written thousands of articles and contributed to several dozen books on a wide variety of IT topics. Prior to going freelance, Posey was a CIO for a national chain of hospitals and health care facilities. He has also served as a network administrator for some of the country's largest insurance companies and for the Department of Defense at Fort Knox. In addition to his continued work in IT, Posey has spent the last several years actively training as a commercial scientist-astronaut candidate in preparation to fly on a mission to study polar mesospheric clouds from space. You can follow his spaceflight training on his Web site.