In-Depth
How To Use PowerShell's Desired State Configuration To Configure Nano Server
Because the forthcoming Microsoft Nano Server doesn't have a GUI, here's how to create configuration scripts with the built-in Desired State Configuration in Windows PowerShell.
One of the most innovative features Microsoft is introducing with Windows Server 2016 is without a doubt the Nano Server configuration option. Nano Server is a Windows Server 2016 deployment type that, when deployed, has a footprint that's far smaller than that of Server Core. Microsoft was able to achieve this tiny footprint by removing everything that wasn't absolutely essential, including the UI.
If you've ever worked with a Server Core deployment, then you've seen that even though it's said to not have a GUI, the reality is that Server Core has a slimmed-down GUI. The command-line window does exist in a window after all. Server Core is different. Nano Server deployments do technically have an interface, but it's an extremely minimal text-based interface, consisting solely of a recovery console you can use to reconfigure networking and firewall settings.
Microsoft released the first preview of Windows Server 2016 with the Nano Server option last summer (see "First Look: Windows Nano Server"). Because Nano Server doesn't have the complete GUI and configuration options of the full server edition, the question is how to manage it. The only viable option for doing so is to manage Nano Server remotely. Most of the Windows Server administrative tools have the ability to establish remote connectivity, which means that Nano Server can be managed using the tools with which you're already familiar.
But there's a problem. Nano Server was designed for high density. Some of the Microsoft documentation discusses the possibility of placing 1,000 Nano Servers onto a single Hyper-V host. Imagine trying to manage 1,000 Nano Servers using the GUI-based Windows Server administrative tools. These tools might be fine for managing a relatively small number of servers, but are simply not practical for managing large-scale deployments.
Microsoft has said for many years that its preferred management tool is Windows PowerShell. Therefore, it should come as no surprise that Windows PowerShell is the best option for managing Nano Server. Windows PowerShell includes a built-in tool called Desired State Configuration (DSC). You can use DSC to script the intended configuration of a Windows Server. By doing so, you can use Windows PowerShell to not only configure a server, but also to put things back to the way that they're supposed to be if configuration drift were to occur. It's even possible to use automation to periodically compare a server's configuration against its desired configuration and automatically make any required changes. Best of all, because DSC is Windows PowerShell-based, it can scale to manage configurations for as many servers as is necessary.
Creating a Nano Server the Easy Way
Before getting into how to use DSC to configure a Nano Server, you must create a Nano Server that can be used for demonstration purposes. In the September 2015 First Look on how to create a Nano Server, Microsoft had just issued the early Windows Server 2016 preview releases, and as would be expected of such an early build, deploying Nano Server proved challenging. Recently, however, Microsoft hasn't only released Windows Server 2016 Technical Preview 4, the company has added a script that greatly simplifies the deployment of Nano Server.
To deploy Nano Server using the new script, you'll need to install Windows Server 2016 with a GUI. Upon doing so, you'll have to create a folder on the server that you can use to store the items to be used in the Nano Server creation process. For instance, you might create a folder named C:\Nano. After creating this folder, there are three resources you must download and save to the folder. These resources include:
After downloading the required components, verify all are in the correct folder. Next, open a Windows PowerShell window and execute the New-NanoServerVHD.ps1 script. When doing so, you must specify a few parameters for use within the Nano Server that you are creating. These parameters include:
- ServerISO The path and filename of the ISO file that you are using
- DestVHD – The path and filename of the VHD file that you are creating
- ComputerName – The name that you want to assign to the Nano Server
- AdministratorPassword – The password to be used for the built-in Administrator account
- Packages – Any packages that you wish to install into the Nano Server. You can find a list of available packages here.
- IPAddress – The IP address that you want to assign to the Nano Server.
Upon completing these procedures, you've created the Nano Server VHD in a lab environment (see Figure 1).
 [Click on image for larger view.]
Figure 1. The Nano Server VHD created with the script.
[Click on image for larger view.]
Figure 1. The Nano Server VHD created with the script.
Once the VHD was created, I simply copied the VHD file to my Hyper-V server and created a new virtual machine (VM) using the VHD. It's worth noting that the VM must be a Generation 1 VM, because you cannot attach a VHD file to a Generation 2 VM.
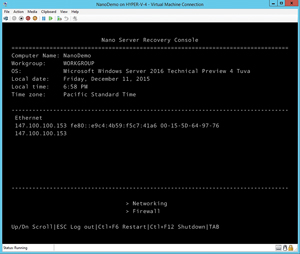
I noted that Nano Server has a very minimalistic, text-based interface, which appears upon logging into the Nano Server (see Figure 2).
 [Click on image for larger view.]
Figure 2. This is what a Nano Server looks like.
[Click on image for larger view.]
Figure 2. This is what a Nano Server looks like.
Working with DSC
By and large, working with DSC can be thought of as a two-step process. The first step is to create a configuration file known as an MOF file. The odd thing about this process is MOF files aren't usually created through manual processes. Instead, a Windows PowerShell script is used to generate the MOF file. The second step in the configuration process is to use the MOF file to configure the server in question (in this case, the Nano Server).
Building an MOF File
Prior to writing the Windows PowerShell code to produce your MOF file, it's advisable to consult with Microsoft documentation. The reason for this is MOF files are extremely varied. A MOF file's contents are a direct reflection of the way you want to configure the target server. One of the more common tasks that's performed by using DSC is verifying that particular server roles are installed (or that specific roles are not installed).
In an instance where you want to use DSC to ensure the Hyper-V role is installed onto the Nano Server, the first thing you'd have to do is write a Windows PowerShell script that would create the required MOF file. Such a script might look like this:
Configuration NanoConfig
{
Import-DscResource –ModuleName 'PSDesiredStateConfiguration'
  Node 'NanoDemo'
    {
    WindowsFeature InstallMyFeature
      {
      Ensure='Present'
      Name='Hyper-V'
      }
    }
}
NanoConfig
In this block of code, I've created a configuration. Configuration is a built-in function, but you must give the configuration a name. In this case, I decided to call it NanoConfig. The actual configuration details are enclosed in a series of braces. I have used a series of indentions to make the code easier to read, but in the real world, you can use any spacing you want.
The first line of text within my configuration uses the Import-DscResource cmdlet. This is necessary in order to import the various configuration items that DSC will use. The next line of code is: Node "NanoDemo." In this case, I've hardcoded the name of my Nano server. The main reason why I did this was to demonstrate the resulting MOF file will be server-specific. Hence, each Nano Server that you want to configure will usually need its own MOF file.
You don't have to use a hardcoded server name and, therefore, create a separate script for each server. It is possible to enter multiple server names so that a single script will produce multiple MOF files. Some organizations might even opt to import node names from a CSV file.
The next set of brackets defines the code that will be specific to the specified node. In this case, I'm calling a built-in function called Windows Feature. The WindowsFeature line includes InstallMyFeature. InstallMyFeature is just a name that I made up, and is useful in more complex scripts because of the way it allows you to call individual script sections.
The next two lines of text are self-explanatory. They allow you to ensure the Hyper-V role is present on the target server.
The very last line of the script is NanoConfig. Remember, the name NanoConfig was assigned to the Configuration function. The NanoConfig command at the end of the script calls this function, thereby generating the MOF file.
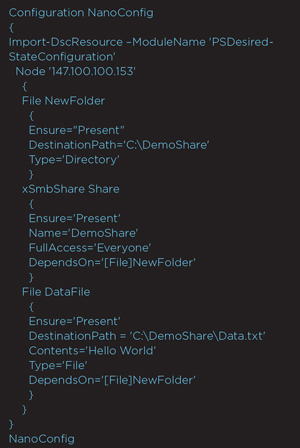
You can see another example of a configuration script adapted from a demo on Microsoft Channel 9. Incidentally, you'll need to install the xSmbShare PowerShell Module from the DSC Resource Kit in order to make this code work. In some cases you may have to explicitly tell Windows PowerShell to import this module and the xSmbShare Dsc resource, as shown in Figure 3.
 [Click on image for larger view.]
Figure 3. Windows PowerShell Script to check for three different things.
[Click on image for larger view.]
Figure 3. Windows PowerShell Script to check for three different things.
The block of code shown in Figure 3 works in a manner that is similar to the previous example. The biggest difference is rather than having a single function that checks for the presence of a Windows Server role, this block of code checks for three different things. It creates a folder named DemoShare, it shares the DemoShare folder and gives Everyone full access, and then creates a file named Data.txt within the folder. This file contains the text Hello World and exists only to demonstrate that you can use Windows PowerShell to create and populate files on Nano Servers.
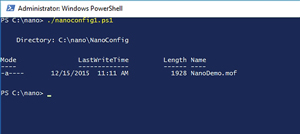
The Node line references an IP address rather than a node name. I did this simply to demonstrate that the script works with both server names and IP addresses. Regardless of the contents of your configuration script, the script is used in the same way. The first thing you'll have to do is open a Windows PowerShell window and execute your configuration script. This causes Windows to create an MOF file based on your script (see Figure 4).
 [Click on image for larger view.]
Figure 4. Executing the configuration script causes a MOF file to be created.
[Click on image for larger view.]
Figure 4. Executing the configuration script causes a MOF file to be created.
Now you must use the MOF file to configure your Nano Server. You can do this by using these two lines of code:
$Cred = Get-Credential
Start-DscConfiguration –Path 'C:\nano\nanoconfig' –ComputerName
  '<nano server name or IP address>' –Credential $Cred –Verbose
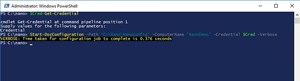
The first line of code simply retrieves a set of credentials. Windows PowerShell will ask you to enter the username and password for your Nano Server and will assign those credentials to a variable named $Cred. The second line of code performs the actual configuration. With this line of code, when you enter a name or an IP address for your Nano Server, the name that you use must match the name of the MOF file. For example, when I ran the script shown in Figure 4, the script created an MOF file named NANODEMO.MOF. I therefore had to use NANODEMO as the computer name when performing the configuration (see Figure 5).
 [Click on image for larger view.]
Figure 5. This is what the configuration process looks like.
[Click on image for larger view.]
Figure 5. This is what the configuration process looks like.
The Desired State Configuration tool makes it possible to apply a configuration to a Nano Server. Even though this probably seems like a lot of work for such a simple configuration, the script can be adapted to simultaneously configure large numbers of servers.