In-Depth
How To Connect to Microsoft Azure with PowerShell
Bypassing the Azure Portal and going straight to PowerShell will provide you with more options for managing Microsoft's cloud.
- By Adam Bertram
- 01/25/2016
Due to Microsoft's mission to provide services to a "cloud-first, mobile-first" world, Microsoft has been pouring more resources into Azure than ever before. If you work for one of those businesses that have decided to give Azure a try, how do you manage your Azure services today? It might be with the Azure Portal or with the Azure Preview Portal. If so, you might be wasting a ton of time by not leveraging the quick, one-liner management and automation capabilities of PowerShell.
In this article, I'll be showing you how to get started managing Azure resources with PowerShell. We'll cover installing the Azure PowerShell module, connecting to your Azure subscription and starting up an IaaS virtual machine as a test to give you a glimpse of what's possible with PowerShell and Azure.
You might be using PowerShell to automate other things in your environment. But what if you haven't yet had to chance or you've just been too stubborn to try it to manage your Azure resources? Automation is the key to reducing human error, delivering a predictable service and having the time to do more with less! It's time you take your cloud game to the next level and dive into managing Azure with PowerShell.
There are many benefits to using PowerShell to manage Azure services. One example is using PowerShell to orchestrate various Azure services together. Perhaps you have a Web application that needs 10 IaaS VMs, a virtual network, storage provisioned, etc. Regardless of the features of Azure you can build an automated workflow that kicks off all of these actions in a single script. This is just one example, however. You are able to manage just about anything in Azure with PowerShell nowadays.
Installing the Azure PowerShell Module
To get started, you'll need to download and install the Azure PowerShell module. This is a module provided by Microsoft and is available via the Microsoft Web Platform Installer package software. As of 11/18/15, the version that you will receive is 0.9. When ran, the Web Platform Installer will install the Azure PowerShell module and all prerequisites.
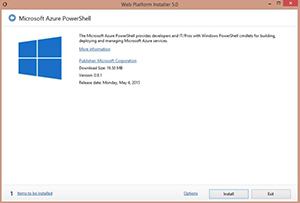 [Click on image for larger view.] Figure 1.
This installation will take a few minutes. Once installed, you must then connect your Azure subscription.
Connecting Your Azure Subscription
After you've gotten the Azure module installed, open up your PowerShell console and type Add-AzureAccount. This will bring up a small page asking you to input your account that has an active Azure subscription attached to it.
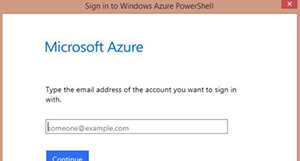 [Click on image for larger view.] Figure 2.
Input your credentials to attach your Azure subscription to the Azure PowerShell module. If all goes well, you should see an output showing your userID, subscription and tenant information.
 [Click on image for larger view.] Figure 3.
Once this happens, you're ready to begin looking around to see what you can do. If you happen to have more than one subscription you are also able to add as many as you'd like using this method.
If you'd like to see this information at a later time you can always use Get-AzureSubscription, which will show you all of the Azure subscriptions you have setup with PowerShell.
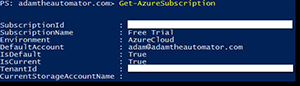 [Click on image for larger view.] Figure 4.
Perhaps you have more than one Azure subscription that you'd like to use with PowerShell. If you're planning on using the subscription for more than few commands you can set the subscription to be the "current" and default by using the Select-AzureSubscription cmdlet. This allows you to set both the Azure subscription in your current session as well as all other PowerShell sessions. To use this cmdlet, you will specify the SubscriptionName parameter and pass the name of the subscription that was retrieved earlier with Get-AzureSubscription.
Once you've gotten acclimated to the subscription cmdlets, you'll need to go exploring more. The first thing I always recommend to anyone when exploring a new module is to use the Get-Command cmdlet. By using this command, you can easily explore all of the cmdlets available to you in a module.
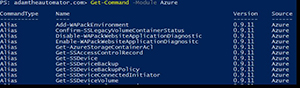 [Click on image for larger view.] Figure 5.
Starting/Stopping an Azure Iaas Virtual Machine
One of the most common Azure resources is its Infrastructure-as-a-service (IaaS) platform. If you're already using Azure you most likely already have a few Azure VMs running in the cloud. Let's try to start and stop an existing VM from PowerShell. To do this, we'll use the Get-AzureVM cmdlet.
First, let's just run Get-AzureVM and check out all of the VMs we currently have running under our subscription:
 [Click on image for larger view.] Figure 6.
You'll see that I have a single VM and that the PowerState property is Started (it's running). Let's shut it down. Since this is PowerShell, we can simply pipe the output to Get-AzureVM into Stop-AzureVM. Even though I only have a single VM in my environment I could technically pipe Get-AzureVM directly to Stop-AzureVM but you probably do not. It's always best practice to be as specific as you can so in the example below I'm getting the VM of MYVM running under the cloud service MYVM-2hr2jfi. I'm then piping that to Stop-AzureVM to turn it off.
 [Click on image for larger view.] Figure 7.
Notice the StayProvisioned parameter on Stop-AzureVM? This is necessary if you want to keep the current IP address of your VM. Without this, you'd lose the IP address and risk obtaining a new one. Depending on your situation this may or may not be necessary.
We now have a stopped VM. Let's bring it back up again. This is the super-easy part. All we need to do is pipe our VM to Start-AzureVM and we're done!
 [Click on image for larger view.] Figure 8.
At this point, you've got the Azure PowerShell module installed, linked up your Azure subscription and have performed some basic management of IaaS VMs. You've just scraped the surface to what you can do in PowerShell with Microsoft Azure. The next time you find yourself going into the Azure Portal to perform some kind of maintenance, try to figure out how to do it with PowerShell. The more you become accustomed to using PowerShell you'll soon find yourself building scripts and automating lots of those mundane tasks you found yourself doing with the GUI previously.
About the Author
Adam Bertram is a 20-year veteran of IT. He's an automation engineer, blogger, consultant, freelance writer, Pluralsight course author and content marketing advisor to multiple technology companies. Adam also founded the popular TechSnips e-learning platform. He mainly focuses on DevOps, system management and automation technologies, as well as various cloud platforms mostly in the Microsoft space. He is a Microsoft Cloud and Datacenter Management MVP who absorbs knowledge from the IT field and explains it in an easy-to-understand fashion. Catch up on Adam's articles at adamtheautomator.com, connect on LinkedIn or follow him on Twitter at @adbertram or the TechSnips Twitter account @techsnips_io.