Windows Server How-To
How To Enable Shadow Copies in Windows File Server
While the feature does eat up quite a bit of disk space, it's definitely worth it for those with demanding end users.
There have always been things about the world of IT that have been frustrating to administrators or to helpdesk professionals. Back in the early 1990s when I was working the helpdesk at a large insurance company, one of my pet peeves was document restorations. There were a handfull of users who would routinely call me and tell me that they made a change to a document and wanted me to put the document back to the way that it used to be. Back then that meant having to locate the correct backup tape (which often had to be retrieved from offsite at a considerable cost), mount the tape and restore the document. It was a costly and time consuming procedure that never seemed to occur quickly enough for the users who made the request. In some cases, the procedure was followed up by the user saying that the correct version was not restored or that they changed their mind and wanted the document to be put back to the way that it existed prior to the restoration.
Thankfully, there are a number of different mechanisms available today that can keep the helpdesk from having to deal with these types of issues. Many of the backup vendors, for example, include a self-service restoration feature in their products. Similarly, organizations that store documents in SharePoint document libraries can opt to turn on SharePoint's versioning feature which retains previous versions of documents.
Even if all you have is a Windows file server, there is still a way to enable self-service restoration for file data. The trick is to use Windows' shadow copy feature. Implementing this feature couldn't be simpler. It is worth noting however, that when you enable the retention of previous document versions, you will consume storage space on your file server more quickly than before. The actual rate of increased storage consumption varies considerably depending on how frequently documents are modified and on a number of other factors. It is possible however, to limit the total amount of storage space consumed by shadow copies.
Depending on how your backup software works, you may also find that your backup jobs become larger. Even so, my experience has generally been that the benefits of enabling shadow copy storage far outweigh the increase in storage consumption.
To enable shadow copy storage, open File Explorer on your Windows file Server and then choose the This PC option. Now, right click on the volume containing user data and choose the Properties command from the resulting shortcut menu, as shown in Figure 1. Keep in mind that the volume that you select must be a local volume. You cannot enable shadow copies for mapped network drives (at least not remotely).
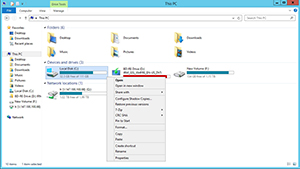 [Click on image for larger view.] Figure 1. Right click on the volume containing user files and choose the Properties command from the shortcut menu.
At this point, you should see the properties sheet for the volume that you have selected. Select the properties sheet's Shadow Copies tab, as shown in Figure 2.
 [Click on image for larger view.] Figure 2. Select the properties sheet's Shadow Copies tab.
As you can see in the figure above, the Shadow Copies tab lists the server's volumes and tells you whether shadow copies are enabled or disabled for each volume. You can also see the number of shares for each volume. To enable shadow copies for a volume, click the Enable button.
At this point, you will see a rather ominous warning message telling you that shadow copies are not appropriate for servers that have a heavy I/O load. The warning message will also tell you that if you enable shadow copies then the default schedule and settings will be used. If you want to go ahead and enable shadow copies then simply click the Yes button, as shown in Figure 3.
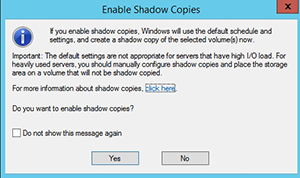 [Click on image for larger view.] Figure 3. You will see this warning message when enabling shadow copies.
So what if you don't want to use the default settings and the default schedule? Well, in that case, click No to avoid enabling shadow copies. When you are returned to the screen shown in Figure 2, click the Settings button. As you can see in Figure 4, the Settings dialog box lets you define a shadow copy creation schedule. You can also limit the total amount of storage space consumed by shadow copies.
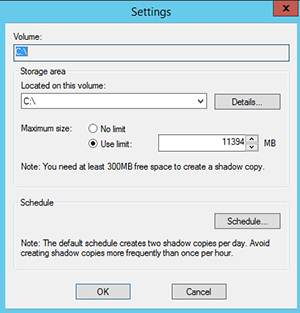 [Click on image for larger view.] Figure 4. The Settings dialog box allows you to place limits on shadow copy creation.
Once shadow copies have been enabled, users can use shadow copies to revert files to previous versions. To do so, the user must right click on the file and choose the Properties command from the shortcut menu. This will cause the file's Properties sheet to be displayed. At this point, the user can select the Previous Versions tab, choose the file version that they want to restore and click the Restore button.
Keep in mind that shadow copies are not a true versioning feature. Shadow copies are created on a scheduled basis and are not automatically created every time that a user makes a change to a file.
About the Author
Brien Posey is a 22-time Microsoft MVP with decades of IT experience. As a freelance writer, Posey has written thousands of articles and contributed to several dozen books on a wide variety of IT topics. Prior to going freelance, Posey was a CIO for a national chain of hospitals and health care facilities. He has also served as a network administrator for some of the country's largest insurance companies and for the Department of Defense at Fort Knox. In addition to his continued work in IT, Posey has spent the last several years actively training as a commercial scientist-astronaut candidate in preparation to fly on a mission to study polar mesospheric clouds from space. You can follow his spaceflight training on his Web site.