In-Depth
Migrating Windows Server 2003 Active Directory Domains
Migrating from Windows Server 2003 requires organizations to decommission existing Global Catalogs and domain controllers to conform with Active Directory schema in newer versions of the server OS.
- By John O'Neill Sr.
- 03/01/2015
Of the many remediation efforts IT organizations must undergo when migrating off Windows Server 2003, the decommissioning of antiquated Active Directory domain controllers to implement the more robust Active Directory functionality in Windows Server 2012 R2 is a top priority. It's not optional and, in addition to application- and hardware-compatibility issues, is a key reason many organizations have put off sunsetting their Windows Server 2003-based systems, even though Microsoft has made clear for years that it'll no longer support it after July 14, 2015.
But migrating your Windows Server 2003 Active Directory DCs to Windows Server 2012 R2 -- the most recent and, hence, recommended target platform to replace the decommissioned servers -- doesn't have to be a showstopper. This step-by-step, click-by-click process through a test environment's AD schema will demonstrate how to upgrade your AD schema, raise the forest functional level to get a Windows Server 2012 R2 Global Catalog (GC) DC up and running. It will also explain how to take the necessary step of decommissioning existing Windows Server 2003 GCs and DCs.
For this article, the test environment consists of a single forest, a single domain AD with a single Windows Server 2003-based DC. Therefore, this DC is also the AD GC and holds all five Flexible Single Master Operations (FSMO) roles. In addition, the server acts as the internal DNS server for the AD domain. The AD forest functional level is Windows Server 2003. Although this functionality list might seem daunting, with a bit of planning and a methodical approach, migrating all of these functions is a straightforward process.
Raise and Verify AD Forest Functional Levels
Pro Tip No. 1: If your organization's AD forest and/or domain functional level is still Windows 2000, it must be raised before going any further. Installing a Windows Server 2012 R2 DC into an existing domain requires the forest and domain functional level to be Windows Server 2003 or higher.
Verify the functional level of the domain by logging into the Windows Server 2003 DC with a domain admin-level account. Click Start, expand Administrative Tools and then click Active Directory Domains and Trusts. In AD Domains and Trusts, right-click the domain name and then select Raise Domain Functional Level. If it shows anything less than Windows Server 2003 as the current domain functional level, drop down the list box for available functional levels. Select Windows Server 2003, then click the Raise button. Click OK when prompted and then you've raised the functional level. No reboot of the server should be required, but if multiple DCs exist, allow ample time for the changes to replicate throughout the domain. Replication time required could vary from 15 minutes to four hours or more, depending on your particular network design.
Verifying the functional level of the forest is done in much the same manner. Log into the Windows Server 2003 DC with a domain admin-level account. Click Start, expand Administrative Tools and then click Active Directory Domains and Trusts. In AD Domains and Trusts, on the left side of the screen, right-click Active Directory Domains and Trusts. Note that this isn't the domain name as used in the previous step. After right-clicking Active Directory Domains and Trusts, a context-sensitive menu appears. Select Raise Forest Functional Level. Again, if the current forest functional level list box displays anything earlier than Windows Server 2003, select Windows Server 2003, then click the Raise button. Click OK to confirm understanding that the change is permanent and affects the entire AD forest. Click OK when prompted that raising the forest functional level completed successfully. Just as when raising the domain functional level, no reboot of the server should be required. As always when making domain architecture changes, if multiple DCs exist, allow ample time for the changes to replicate throughout the domain. Remember, replication time required could vary from 15 minutes to four hours or more, depending on your particular network design.
Step 1: Prepare a Windows Server 2012 R2 Server
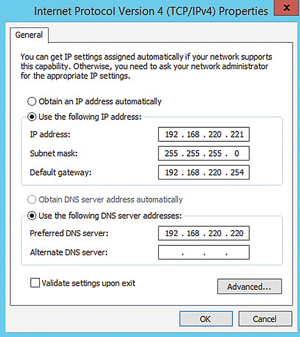
Begin with the basics. Set up Windows Server 2012 R2 on a new host, either physical or virtual. After installation, set a static IP and configure the subnet mask, gateway and DNS server settings consistent with the network (see Figure 1). Install any available critical and recommended Windows Updates. As a final step, join the new server to the existing AD domain. A basic Windows Server 2012 R2 member server is now up and running!
 [Click on image for larger view.]
Figure 1. Make sure your DNS settings are consistent with your network.
[Click on image for larger view.]
Figure 1. Make sure your DNS settings are consistent with your network.
Step 2: Add the AD DS Role on the New Server
To set up your target, log on to the Windows Server 2012 R2 server using an account with domain admin permissions. Open Server Manager. By default, the Dashboard view will display. Under Configure this local server click Add roles and features. The Add Roles and Features Wizard will open. Click Next. Click the radio button for Role-based or feature-based installation. Click Next.
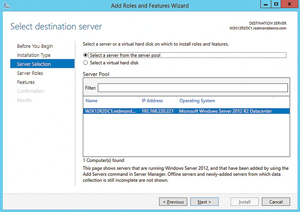
Click the radio button for Select a server from the server pool. In the list of displayed servers, verify the current server is highlighted (see Figure 2). Click Next.
 [Click on image for larger view.]
Figure 2. Selecting the destination sever and verifying the appropriate target.
[Click on image for larger view.]
Figure 2. Selecting the destination sever and verifying the appropriate target.
From the list of displayed roles, find and click the checkbox for Active Directory Domain Services. This will pop up a dialog asking to Add features required by Active Directory Domain Services. Click the checkbox to Include management tools (if applicable). Click the Add Features button to continue.
From the list of displayed roles, verify the Active Directory Domain Services checkbox is still selected. Find and click the checkbox for DNS Server. Click Next.
Notice in the Features list some options are already selected. Some of these represent previously installed features while others were selected when the Add features required by Active Directory Domain Services option was chosen earlier. Click Next.
The next step of the wizard displays a bit of background information regarding Active Directory Domain Services. Nothing mind-blowing or mind-boggling is presented here. Click Next. Another informational page explains DNS and its integration with AD. Click Next.
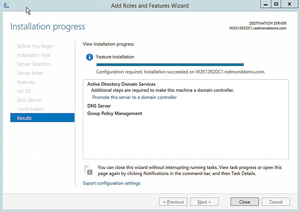
The final page of the Add Roles and Features Wizard displays a summary of the options selected for configuration. Click Install and watch the wizard work its magic! The wizard will confirm installation was successful while reminding you that additional steps are necessary to promote this server to DC functionality. Click the link to Promote this server to a domain controller (see Figure 3). The Active Directory Domain Services Configuration Wizard opens.
 [Click on image for larger view.]
Figure 3. After successful installation of the DNS Server is confirmed, choose Promote this server to a domain controller.
[Click on image for larger view.]
Figure 3. After successful installation of the DNS Server is confirmed, choose Promote this server to a domain controller.
Step 3: Promote the Windows Server 2012 R2 Server to a DC
On the initial page of the Active Directory Domain Services Configuration Wizard, select the radio button for Add a domain controller to an existing domain. Because this server is already a member of the domain, and is logged in using an account with domain admin-level privileges, the wizard will automatically populate the Domain and Credential information. Confirm everything, then click Next to continue.
Pro Tip No. 2: A warning appears that "A domain controller running Windows 2008 or later could not be located in this domain..." This warning applies to read-only DC (RODC) installation. Because you're not installing an RODC the warning can, and should, be ignored.
The next screen appears with the site name selected and both DNS Server and GC options already checked. If for some reason this isn't the case, select the appropriate site from the dropdown list and click the checkboxes beside the DNS Server and GC options.
Think up a secure Directory Services Restore Mode password. Mix capital and lowercase letters, numbers, and special characters. Type it in both the Password and Confirm password boxes. Try and cheat the system with a simple password and an error will appear. Click Next.
On the next screen, ignore the warning "A delegation for this DNS server cannot be created because the authoritative parent zone cannot be found..." Click Next.
Click Next on the Additional Options, Paths and Preparation Options screens. No changes are required.
On the Review Options screen, verify all the earlier selections. Interested in the Windows PowerShell commands that will run behind the scenes completing the DC promotion? Click the View Script button. Notepad opens displaying the necessary cmdlets, complete with customized parameters. The entire process is completed using just two cmdlets.
Click Next. A Prerequisite check runs, ultimately displaying warnings about the DNS delegation error encountered earlier and a note about security setting defaults in Windows Server 2012 R2. These issues won't prevent completing promoting the server to a DC. Scroll down the results window and a green checkmark is displayed next to: All prerequisite checks passed successfully. Click "Install" to begin installation. This information is also displayed at the top of the window and is the all clear to proceed. Note, the server will automatically reboot after promotion to a DC. Click the Install button to kick things off.
The actual promotion process takes a few minutes. There's a lot to be done! The entire AD schema is being upgraded. The saying "patience is a virtue" comes to mind. Once the server reboots on its own, log on with a domain admin-level account. Congratulations! A new Windows Server 2012 R2 DC and DNS server is now up and running!
Step 4: Transfer the FSMO Roles
Transferring the five Flexible Single Master Operation (FSMO) roles isn't as difficult as it might seem. In fact, simply decommissioning the existing Windows Server 2003 DC will automatically transfer the FSMO roles. While automatic is attractive, manually transferring the roles isn't difficult and has the added benefit of granular control.
To transfer the Relative ID (RID) Master, PDC Emulator and Infrastructure Master Roles, log on to the newly minted Windows Server 2012 R2 DC using an account with domain admin-level privileges. On the Start screen begin typing Active Directory Users and Computers. The Search Charm opens. Click Active Directory Users and Computers from the results list. The AD Users and Computers app opens on the desktop. Right-click the domain name in the left pane, then select Operations Masters from the context-sensitive menu. The Operations Masters window appears, displaying three tabs; RID, PDC and Infrastructure. Each tab displays the current operations master for that role. The current server is also displayed along with a change button enabling the transfer of each role.
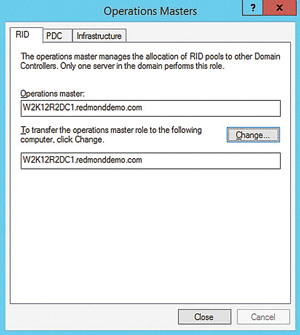
On the RID tab, click the Change button. When prompted, click Yes to transfer the role to the current server. A message box quickly confirms the role transferred successfully. Click OK to dismiss the message. The current server is now the RID operations master (see Figure 4). Complete the same process for the PDC and Infrastructure tabs. Click the Close button, exiting the Operations Masters dialog. Close the Active Directory Users and Computers app. Three roles down, two to go!
 [Click on image for larger view.]
Figure 4. Transfer the operations master role to the new server.
[Click on image for larger view.]
Figure 4. Transfer the operations master role to the new server.
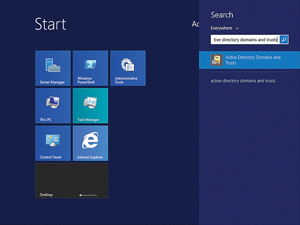
On the Windows Server 2012 R2 Start Screen, type Active Directory Domains and Trusts. The Search Charm will open displaying Active Directory Domains and Trusts in the results (see Figure 5). Click Active Directory Domains and Trusts, or simply hit Enter, to open the application.
 [Click on image for larger view.]
Figure 5. Using the Search Charm to open Active Directory Domains and Trusts.
[Click on image for larger view.]
Figure 5. Using the Search Charm to open Active Directory Domains and Trusts.
In the left pane, right-click Active Directory Domains and Trusts right above the domain name. Click Operations Masters in the context-sensitive menu that appears. As before, an Operations Masters dialog will open. Click the Change button. Click Yes to confirm the role transfer and then click OK to dismiss the transfer successful message box. Click Close and exit the Active Directory Domains and Trusts app.
Transferring the Schema Master role is a bit more involved. Log on to the Windows Server 2003 DC using an account with domain admin-level privileges. Click Start, then Run. In the Run dialog box, type regsvr32 schmmgmt.dll, then click OK. A message box displays, confirming the schmmgmt.dll registration succeeded. Click OK to dismiss the message box.
Click Start, then Run. Type MMC and hit Enter. An empty Microsoft Management Console will open on the desktop. Press Ctrl and M simultaneously to open the Add or Remove Snap-ins dialog. If you prefer, clicking File, then Add/Remove Snap-in accomplishes the same thing. Click the Add button. From the list of available snap-ins, select Active Directory Schema. Click the Add then Close button. Click the OK button to close the Add/Remove Snap-in dialog.
In the left pane of the MMC window, right-click Active Directory Schema. Click Change Domain Controller. Click Specify Name, type the name of the Windows Server 2012 R2 DC, and then click OK. Almost done. Right-click Active Directory Schema in the left-pane again, then click Operations Masters. Click Change, confirm by clicking Yes, then click OK when the transfer successful message box pops up. All five FSMO roles are transferred!
Step 5: Decommission the Windows Server 2003 DC
The final step is to decommission the Windows Server 2003 DC. Logged onto the Windows Server 2003 DC with a domain admin-level account, click Start, and then Run. Type DCPromo and click OK. The Active Directory Installation Wizard opens. Because the system is already a DC, the wizard will remove Active Directory Services demoting the DC to a member server.
Click Next. A warning cautions that another Global Catalog server must be on the network before this DC is decommissioned. There's nothing to worry about because the Windows Server 2012 R2 DC commissioned earlier was configured as a GC. Click OK to continue the wizard.
Make absolutely sure the checkbox next to "This server is the last domain controller in the domain" is not selected. I repeat, do not check this checkbox!
Click Next. Type a password to be used for the local administrator account. Type the password again to confirm, then click Next.
Click Next one last time on the summary screen. The demotion takes a few minutes. Once the process completes, click Finish, and then Restart Now. That's it! The Windows Server 2003 DC is decommissioned.
Even those organizations still running Windows Server 2003 DCs needn't panic over the looming Windows Server 2003 end of support. Following this guide, you can quickly, and fairly painlessly I might add, migrate a Windows Server 2003 AD to the much more stable and robust Windows Server 2012 R2 AD. Of course, completing the process before the July 14 deadline certainly lowers the overall stress level!