Windows Server How-To
How To Create a Self-Signed Certificate
Using the MakeCert utility of the Windows SDK will allow for you to issue your own self-signed certs.
Over the last few months I have run into more and more organizations that are extending their on-premises network to the cloud through Microsoft Azure. Quite naturally doing so requires secure communications between your network and Azure. In order to do so, Azure makes extensive use of certificates.
In a production environment it's always a good idea to use a certificate that was purchased from a well-known enterprise certificate authority. However, if you are only trying to learn about Azure then you can often get away with using a self-signed certificate instead of purchasing a commercial certificate.
A self-signed certificate is something that you can make yourself for free, but self-signed certificates aren't trusted the way that commercial certificates are. There are a number of different methods that can be used for creating a self-signed certificate, but one of the easiest methods involves using a free utility called MakeCert.
The MakeCert utility is a part of the Windows SDK (download it here). As you can see in Figure 1, there are several components included in the Windows Software Development Kit for Windows 8.1, but the only component that you have to install is the one named Windows Software Development Kit.
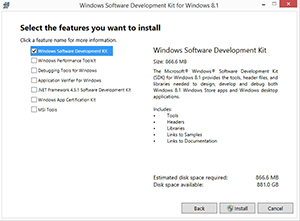 [Click on image for larger view.] Figure 1. The only component that you have to install is the Windows Software Development Kit.
Once the Windows Software Development Kit and the MakeCert utility have been installed, you can move forward with making a self-signed certificate. To do so, open an elevated Command Prompt window and then navigate to C:\Program Files (x86)\Windows Kits\8.1\Bin\X64. Now, enter the MakeCert command, followed by any necessary parameters.
The first time that I ever used the MakeCert tool, I was trying to create a certificate for use with Azure Recovery Manager. The command that I used was:
makecert.exe -r -pe -n CN=AzureBackup -ss my -sr localmachine -eku 1.3.6.1.5.5.7.3.2 -len 2048 -e 01/01/2016 AzureBackup.cer
When I used the command listed above, I found that MakeCert was really picky about the parameter usage. You have to get the command exactly right or the certificate will not be generated. If the command is successful then you should receive a Success message like the one shown in Figure 2..
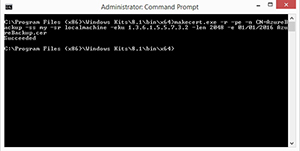 [Click on image for larger view.] Figure 2. The certificate creation process was successful.
Although the command shown above works, you will probably have to switch it up a bit depending on what you are going to use the certificate for. So with that in mind, let's take a look at what the command is really doing.
The first parameter after the MakeCert command is –R. Normally, if you wanted to find out what a parameter was used for, you could enter the command followed by -?. For most of the command line utilities that I have worked with, the -? Parameter displays the command syntax. However, take a look at what happens in Figure C when I attempt to use the -? Parameter.
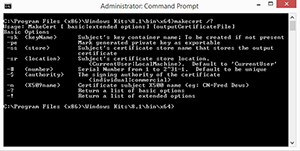 [Click on image for larger view.] Figure 3. The -? Switch displays the command syntax.
Although using the -? Parameter with the MakeCert utility does cause the command syntax to be displayed, there is no mention of the –R parameter. If you want to find out what –R and some of the other parameters do, you will have to follow the MakeCert command with the -! Parameter instead of the -? Parameter. Doing so causes the complete syntax to be displayed, as shown in Figure 4.
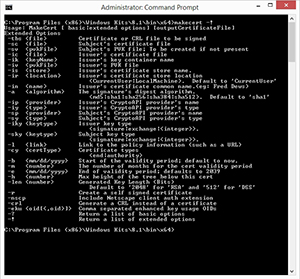 [Click on image for larger view.] Figure 4. The -! Parameter causes the full MakeCert syntax to be displayed
If you look at the full command syntax, you can see that the –R parameter is what causes a self-signed certificate to be created.
The next parameter is –PE. This parameter marks the certificate's private key as exportable (this is often essential when creating a certificate for use with Azure). If you look back at Figure 4, you will notice that the –PE parameter is not listed. The –PE parameter is only listed in the basic syntax, which is shown in Figure 3.
The next parameter used is –N. This parameter is followed by the certificate's subject name, which in this case is CN=AzureBackup. The subject name will vary depending on the certificate's purpose.
After the subject name is the –SS parameter. This parameter allows you to specify the certificate store that will store the certificate. Since the certificate is going to be local, we are simply using MY. The –SR parameter allows you to specify the certificate store's location. In this case, it is the local machine.
The next parameter is –EKU. This parameter is followed by comma separated enhanced key usage OIDs. After that, we have the –LEN parameter, which specifies the key length.
The next parameter that has been specified is the –E parameter. This parameter allows you to specify the certificate's expiration date.
Finally, we specify the name of the certificate that we want to create. In this case, it is AzureBackup.cer. The new certificate is created in the current folder.
As you can see, it is relatively easy to create a self-signed certificate using the MakeCert utility. The trick is to get the syntax right.
About the Author
Brien Posey is a 22-time Microsoft MVP with decades of IT experience. As a freelance writer, Posey has written thousands of articles and contributed to several dozen books on a wide variety of IT topics. Prior to going freelance, Posey was a CIO for a national chain of hospitals and health care facilities. He has also served as a network administrator for some of the country's largest insurance companies and for the Department of Defense at Fort Knox. In addition to his continued work in IT, Posey has spent the last several years actively training as a commercial scientist-astronaut candidate in preparation to fly on a mission to study polar mesospheric clouds from space. You can follow his spaceflight training on his Web site.