Windows Server How-To
Using PowerShell To Evaluate Storage Health
Here's how to access the information you need when analyzing storage status.
It never ceases to amaze me just how many cool things PowerShell can do in Windows Server 2012 R2. This is especially true when it comes to storage. PowerShell can be used for a variety of storage provisioning tasks, but it can also be used to determine storage health. In this column, I want to show you some of the storage health-related information that you can get through PowerShell.
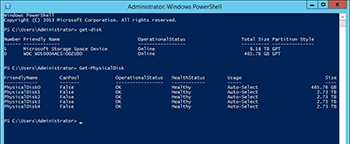
The first thing that you need to understand about PowerShell is that it differentiates between disks and physical disks. For example, if I enter the Get-Disk cmdlet on my server, I see two disks, as shown in Figure 1.
 [Click on image for larger view.] Figure 1. The Get-Disk cmdlet reveals two disks.
Now take a look at what happens when I enter the Get-PhysicalDisk command. Windows shows five disks, as shown in Figure 2. The reason for the discrepancy is that I am using Windows Storage Spaces. Windows Storage Spaces has created two disks on top of a storage pool that is made up of four disks. The fifth physical disk is used for the operating system in this case.
 [Click on image for larger view.] Figure 2. The Get-PhysicalDisk cmdlet reveals five disks.
The reason why I am showing you this is because when you check a server's storage health, you need to know what it is that you are really checking. Are you checking a physical disk's health or are you checking a logical disk?
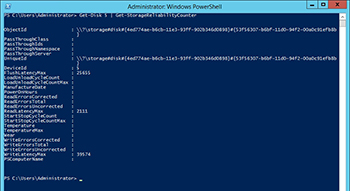
So with that said, let's take a look at how to evaluate your storage health. The key to evaluating storage health is to make use of a storage module component called the Storage Reliability Counter. Using the Storage Reliability Counter is easy. All you have to do is to specify the storage that you want to evaluate and then use the Get-StorageReliabilityCounter command. You can do this for physical or logical disks. For example, if you look back at the previous figure, you will notice that I have an 8.18TB logical disk that has been assigned as disk number 5. This is a logical disk that is made up of four physical disks. If I wanted to check this disk's health, I would use the following command:
Get-Disk 5 | Get-StorageReliabilityCounter
You can see what the output looks like in Figure3.
 [Click on image for larger view.] Figure 3. We can use this command to check the health of a logical disk that has been defined in Windows Storage Spaces.
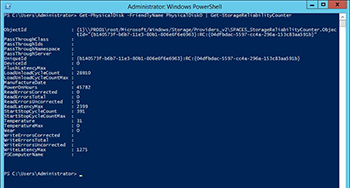
The process works similarly for checking physical disks. If you look at Figure 2, you will notice that each physical disk is assigned a friendly name. If I wanted to check the health of the disk with the friendly name PhysicalDisk0, I could do so by using the following command.
Get-PhysicalDisk –FriendlyName PhysicalDisk0 | Get-StorageReliabilityCounter
You can see what the output looks like in Figure 4.
 [Click on image for larger view.] Figure 4. You can use this command to check the health of a physical disk.
As you look at the two previous figures, you will probably notice that a lot of the fields that are displayed sound useful, but are empty. The reason for some of the empty fields is that I am not using enterprise-class hardware.
You can actually use the Storage Reliability Counter to create health reports. Let me show you an example of how this might work.
If you look back at Figure 2, you will notice that each physical disk's friendly name included a number (such as PhysicalDisk0). This number uniquely identifies the disk. The Storage Reliability Counter doesn't have a way of outputting the friendly name (at least not by itself), but it can output the disk number that appears in the friendly name. So with that said, let's pretend that we wanted to create a report that shows each physical disk's temperature. We could do so by running the following command:
Get-PhysicalDIsk | Get-StorageReliabilityCounter | Select-Object DeviceID, Temperature
As you can see in Figure 5, this command makes it easy to check each disk's temperature.
 [Click on image for larger view.] Figure 5. You can create a custom health report for your disks.
Of course this is just a quick demonstration of what you can do with the Storage Reliability Counter. The counter is actually a really versatile tool that you can use to gather a wealth of information.
About the Author
Brien Posey is a 22-time Microsoft MVP with decades of IT experience. As a freelance writer, Posey has written thousands of articles and contributed to several dozen books on a wide variety of IT topics. Prior to going freelance, Posey was a CIO for a national chain of hospitals and health care facilities. He has also served as a network administrator for some of the country's largest insurance companies and for the Department of Defense at Fort Knox. In addition to his continued work in IT, Posey has spent the last several years actively training as a commercial scientist-astronaut candidate in preparation to fly on a mission to study polar mesospheric clouds from space. You can follow his spaceflight training on his Web site.