In-Depth
How To Migrate to Hyper-V
Here's a rundown of how to use Microsoft Virtual Machine Converter to switch from VMware hypervisors to Hyper-V.
A growing number of organizations are starting to show an interest in using Microsoft Hyper-V to virtualize their infrastructures. With the improvements to Hyper-V introduced in the latest release of Windows Server, it's become feasible to run it alongside existing VMware virtual environments as explained earlier this year (Redmondmag.com/Posey0214). But when it comes to migrating from VMware, there's more heavy lifting involved.
In its latest effort to make migrating from VMware less of an obstacle, Microsoft has upgraded its Virtual Machine Converter, the company's free tool for converting VMware virtual machines (VMs) into Hyper-V VMs. Although there are a number of different conversion tools available, there are two things that make the Microsoft Virtual Machine Converter attractive: it's free and easy to use.
The company released version 2.0 of the Microsoft Virtual Machine Converter in late March. When you go to the download page (bit.ly/1m1IGVH), you'll have the opportunity to obtain the installer for the Microsoft Virtual Machine Converter, but you can also use the same link to download the tool's documentation.
System Requirements
While it's easy to use (assuming you work from the GUI), there's some prep work required prior to using the tool. First, you must set up a computer to run the Virtual Machine Converter. The computer you use can be physical or virtual, but it must have sufficient storage space to accommodate a full copy of the VMs you're converting.
The computer you'll use for the conversion must run Windows Server 2008 R2, Windows Server 2012 or Windows Server 2012 R2. In addition, the systems must have the Microsoft .NET Framework (version 3.5 plus either version 4 or version 4.5, depending on the OS). Finally, you'll need to install Visual C++ Redistributable for Visual Studio 2012 with Update 1 or higher.
Besides making sure the machine set to run the conversion process is properly configured, you'll also need to set up a file share on your Hyper-V Server. The Virtual Machine Converter will copy the virtual hard disks (VHDs) to this file share. If Hyper-V is running in a clustered configuration, you can create a file share on any node with enough free local storage space to accommodate the VM. After the conversion is complete you can move the VM to a cluster shared volume.
Of course, this assumes you're migrating the VM to Hyper-V. As an alternative, you can migrate the VM to the Microsoft Azure public cloud service, but the focus of this article is on Windows Server.
The VMware server doesn't need preparation, but you must make sure it's running a supported VMware version. The Microsoft Virtual Machine Converter is designed to work with vSphere 4.1, 5.1 and 5.5. Also supported are vCenter, ESX and ESXi 5.5.
Ideally, the VMs you're converting should be running Windows Server 2012, Windows Server 2012 R2, or Windows 8 as a guest OS. When converting a VM running one of these OSes, the Virtual Machine Converter will actually uninstall the VMware Tools from the VM as a part of the conversion process (the VMware Tools will be disabled, but not uninstalled if the VM is in an offline state). This VM conversion tool also now supports various Linux builds including CentOS, Debian, Oracle, Red Hat Enterprise, SuSE Enterprise and Ubuntu. However, the VMware Tools are not automatically uninstalled from Linux VMs.
The Installation Process
You can install the Microsoft Virtual Machine Converter by double-clicking the MVMC_Setup.MSI file you previously downloaded. When you do, Windows will launch the Microsoft Virtual Machine Converter Setup Wizard.
Click Next to bypass the wizard's Welcome screen and you'll see a prompt asking you to accept the End User License Agreement. After doing so, click Next and you'll have a chance to specify the installation path. The default path should be fine for most deployments. Click Next, followed by Install to install the Virtual Machine Converter. When the installation process completes, click Finish.
Performing a VM Conversion
The easiest way to convert a VM is to open File Explorer and navigate to C:\Program Files\Virtual Machine Converter (or the path that you specified during the installation) and then double-click on the MVMC.GUI.EXE file. This will cause Windows to launch the Virtual Machine Converter with a GUI interface.
When the Virtual Machine Converter opens, you'll see a Before You Begin screen that explains what the tool is and reminds you to check the Administration Guide for a list of supported guest OSes. Click Next and you'll see a screen asking you if you want to perform a migration to Azure or to Hyper-V. The remaining steps vary considerably depending on which option you choose.
Again, the focus of this article is to explain how to migrate a VM from vSphere 5.5 to Windows Server 2012 R2 Hyper-V. The VM I'm using for this demonstration is running Windows Server 2012 R2 as a guest OS.
First, choose the Migrate to Hyper-V option and click Next, which will prompt you to specify either the IP address or the Fully Qualified Domain Name of your Hyper-V host, as well as a set of administrative credentials.
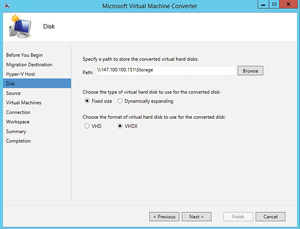
Click Next, and you'll be prompted to provide a location in which to store the converted VHD files. It's worth noting you'll have to provide a UNC path to a file share (see Figure 1). As such, it might be necessary to create a file share with read/write permissions on your Hyper-V server prior to continuing.
 [Click on image for larger view.]
Figure 1. You must specify a UNC path on your Hyper-V server.
As you can see in Figure 1, you must also choose whether to create a fixed size or a dynamically expanding VHD. Further, you'll also have to choose whether to create a VHD or a VHDX. As a general rule, it's best to create a fixed-length VHDX unless you have a compelling reason to do otherwise.
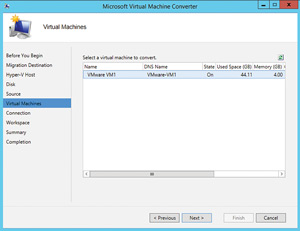
Click Next and you'll see a screen asking you for the address and credentials for your VMware server. You can connect to a vCenter server, or to an ESX or an ESXi server. When you click Next, the Virtual Machine Converter will validate your credentials and will then display a list of the VMs running on the VMware server you've specified (see Figure 2).
 [Click on image for larger view.]
Figure 2. The Microsoft Virtual Machine Converter displays your VMware virtual machines.
Select the VM you want to convert and then click Next. At this point, you'll see a screen explaining VMware VMs can be converted whether they're powered on or off. If the VM is powered on, however, you'll have to connect to the VM in order for the VMware tools to be uninstalled. As such, you can use this screen to control the final power state of both the source and destination VM, as well as provide a set of administrative credentials that can be used to remove the VMware Tools.
Click Next and the credentials that you've specified will be validated. If the validation process fails, take a moment to make sure the VM has remote access enabled and that the account you've specified has been granted remote access permissions.
The next thing you'll have to do is specify a location to store the converted VHD files. Although you previously specified a location on the Hyper-V server, you must now specify a location on the computer on which you're running the Virtual Machine Converter.
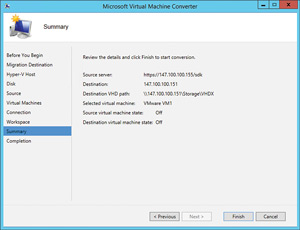
Click Next and the Virtual Machine Converter will take a moment to validate your settings. Assuming everything is correct, you'll see a summary screen (see Figure 3).
 [Click on image for larger view.]
Figure 3. Take a moment to verify the information displayed on the summary screen is correct.
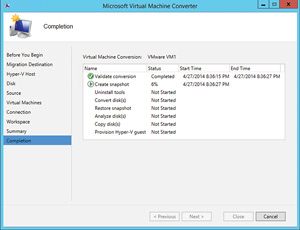
Click Finish and the conversion process will begin. There are a number of tasks that must complete as a part of the conversion process (see Figure 4). The amount of time it takes these tasks to complete depends largely on the resources that have been allocated to your VM.
 [Click on image for larger view.]
Figure 4. The conversion process consists of several different steps.
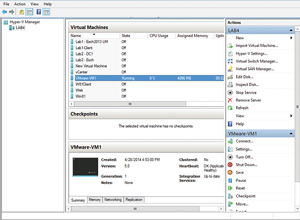
After the conversion process was complete, I was able to boot the VM in Hyper-V without any problems (see Figure 5).
 [Click on image for larger view.]
Figure 5. The VMware virtual machine is now running in Hyper-V.
During my tests, once the VM had booted, I logged into the VM and verified it was still functional and that the VMware Tools had been removed.
One of the nice things about the way the conversion process works is it doesn't expose your VMs to unnecessary risks. As noted, the wizard requires credentials for your VMware server and for your Hyper-V server, but it also needs access to storage space on the server on which the wizard is running. The reason for this is the wizard doesn't attempt to directly modify the VMware VM. Instead, the wizard takes a snapshot of the VM prior to making any modifications. The modified VM is copied from the VMware server to the local server on which the wizard is running, and then the snapshot is restored, thereby returning the VMware copy of the VM to its original state.
The reason this is so important is there are many things which can potentially go wrong during the conversion process. That being the case, it's comforting to know the wizard protects your original VMware VM. My VMware VM still existed even after the conversion process had completed. I wanted to check the state of the VM, so I powered it up and verified that the VMware Tools were still installed.
Observations and Recommendations
The Microsoft Virtual Machine Converter does a good job but it isn't the best tool for every situation. If you need to convert a few VMs from VMware to Hyper-V then the Virtual Machine Converter can certainly do that. However, the Virtual Machine Converter lacks any sort of bulk conversion mechanism (unless you want to script the conversion process through Windows PowerShell). As such, the Virtual Machine Converter probably isn't going to be the tool of choice for converting large numbers of VMs.
About the Author
Brien Posey is a 22-time Microsoft MVP with decades of IT experience. As a freelance writer, Posey has written thousands of articles and contributed to several dozen books on a wide variety of IT topics. Prior to going freelance, Posey was a CIO for a national chain of hospitals and health care facilities. He has also served as a network administrator for some of the country's largest insurance companies and for the Department of Defense at Fort Knox. In addition to his continued work in IT, Posey has spent the last several years actively training as a commercial scientist-astronaut candidate in preparation to fly on a mission to study polar mesospheric clouds from space. You can follow his spaceflight training on his Web site.