In-Depth
How To Move Workloads Among Hybrid Clouds with System Center
Here's a look at how you can extend your infrastructure from private to public clouds with System Center 2012 R2 App Controller.
Nothing has changed the face of IT and the enterprise datacenter more than server virtualization and the move to the cloud in recent years. As the two become more intertwined and organizations look to create more elastic datacenters via hybrid cloud architectures with the help of hosting providers and public cloud services including Microsoft Azure, you need a tool to move workloads between resources.
The Microsoft cloud OS consists of Windows Server 2012 R2, System Center 2012 R2 and the Microsoft Azure Pack. Now with the new Microsoft System Center 2012 R2 App Controller, the line between public clouds and private resources may forever be blurred.
To understand the true significance of App Controller, it's important to have a historical perspective. A few years ago, Microsoft was involved in an all-out push to drive customers to host as many resources as possible in the cloud. In doing so, however, Microsoft received a considerable degree of pushback from customers. Some were afraid of outsourcing their own jobs, while others simply did not want to give up control of their data and applications.
Today, Microsoft has adopted a completely different approach toward cloud services. Microsoft has finally embraced the idea that businesses are likely to have resources in a variety of locations. Some resources will inevitably be kept on-premises, but organizations might also host resources on Azure and on service provider clouds (such as Office 365).
Having three different ways to host business resources gives you a tremendous degree of flexibility, but it also introduces a number of management challenges. You not only need a solution for managing multiple distinct "clouds," but also for moving resources between them. This is where App Controller comes into play. It provides you with a single interface you can use to connect to both private clouds and public cloud resources.
While its management capabilities alone might be sufficient to justify taking a look at App Controller, the most important reason for using it is because App Controller allows you to seamlessly move virtual machines (VMs) between Azure and your own private clouds, without having to modify your VMs. Being able to move VMs to the public cloud and then bring them back on-premises with minimal effort has long been considered to be the holy grail of server virtualization and cloud services.
App Controller Interface
App Controller is a Web-based utility that allows you to manage both public and private clouds. App Controller provides much of the same functionality as the System Center Virtual Machine Manager (VMM) console, but also allows VMs to be moved between clouds.
Your copy App Controller must match the version of VMM you're running. For instance, if you're running System Center 2012 R2 VMM then you must use the 2012 R2 version of App Controller. Similarly, if you're using the System Center 2012 version of VMM then you must use the 2012 version of App Controller. You cannot mix and match. I'm basing the instructions in this article on System Center 2012, but the techniques used for System Center 2012 R2 are nearly identical.
I'll walk you through the basics of using App Controller to move VMs between clouds. In a production environment there might be other considerations. For example, you might need to extend a virtual network to Azure in order to facilitate moving VMs without modifying their IP addresses.
Deployment Steps
I'll assume you already have VMM up and running and you've already created a private cloud. This section will focus on deploying App Controller and connecting it to your existing private cloud.
Begin the App Controller deployment process by making sure you have a SQL Server that App Controller can use. I'm using SQL Server 2012.
Now, insert the App Controller installation media and run Setup. When the splash screen appears, click the Install link. When prompted, enter your product key and click Next. Review and accept the license requirements and click Next once more.
Setup will now check to make sure your server has all of the prerequisites installed. You'll most likely see a message indicating that WCF Data Services 5.0, IIS and the Windows Identity Foundation need to be installed. Click the Install button and these components will be installed automatically.
Once the prerequisites are installed, enter an installation path. Click Next to go with the defaults. The following screen asks if you want to use an existing certificate or use a self-signed certificate. I used a self-signed certificate, but you would obviously want to use a "real" certificate in a production environment.
Click Next and you will be prompted to select your SQL Server instance. Then you'll see another prompt asking if you want to participate in Microsoft's Customer Experience Improvement program. Make your selection, click Next, and you'll see a summary screen. Take a moment to review the configuration information and click the Install button. When the installation completes, click Finish. Now App Controller is installed.
Connecting App Controller to VMM
Next, connect App Controller to VMM. To do so, open a Web browser and enter https:// followed by your App Controller server's fully qualified domain name. You'll probably see a message telling you that you need to install Silverlight. Then, log into App Controller with administrative credentials.
When you finally reach the App Controller interface, click on the Connect a Virtual Machine Manager Server and Clouds link, located on the Overview tab. This will cause the Add a New VMM Connection screen to be displayed. Enter a name for your connection, as well as the name of your VMM server. When you click OK, App Controller will connect to VMM.
Connecting to Azure
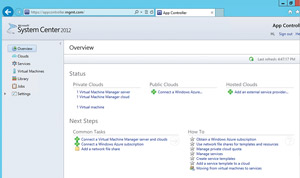
Now that App Controller is up and running and connected to VMM, you need to connect it to Azure. Select the Overview workspace (see Figure 1) and then click on the Connect a Windows Azure... link, located beneath the Public Clouds header.
 [Click on image for larger view.]
Figure 1. System Center 2012 App Controller is connected to a private cloud.
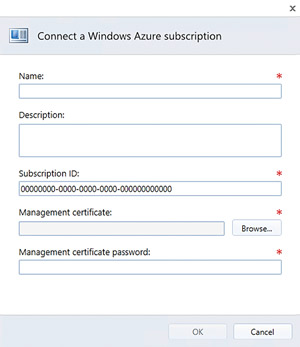
Next, you'll see the Connect a Windows Azure subscription dialog box (Figure 2). Enter a friendly name and an optional description for the connection. After doing so, you'll need to enter your subscription ID. You can find the Subscription ID in the Azure Management Portal.
 [Click on image for larger view.]
Figure 2. Populate the Connect a Windows Azure subscription dialog box.
It shows you need to provide a management certificate and a management certificate password. App Controller uses this certificate to establish a trust relationship with Azure. In a production environment it's a good idea to get a certificate from a trusted certificate authority. For demonstration purposes, I'll show you how to create a self-signed certificate you can use.
Because App Controller runs on top of IIS, you can use the Web server to create the certificates you need. To do so, launch the IIS Manager. When the console opens, select the container corresponding to your server and then double click on the Server Certificates icon.
When the Server Certificates screen appears, click on the Create Self-Signed Certificate link. You'll be prompted to enter a name for the certificate. I called the certificate Windows Azure. Leave the Certificate Store option set to Personal and then click OK. The newly created certificate will now be displayed in the IIS console.
Now, you need to export the certificate. Because App Controller requires a public/private key pair, you'll need to export the certificate in two different ways. Select the certificate and then click on the Export link. When the Export Certificate dialog box appears, provide a path for the certificate and then enter and confirm a certificate password. The exported certificate will be in PFX format and will be linked to App Controller.
Next, you'll need to export the same certificate again, but in a format that Azure can use. To do so, select the certificate and click on the View link. When the Certificate dialog box appears, go to the Details tab and click on the Copy to File button. This will launch the Certificate Export Wizard.
Click Next to bypass the wizard's Welcome screen. You'll now see a screen asking if you want to export the private key. Choose the No, Do Not Export the Private Key option, and click Next. On the following screen, make sure the DER Encoded Binary X.509 option is selected and click Next. Enter a path and filename for the certificate and then click Next, followed by Finish and OK. You can now close the IIS manager. This process will export the certificate in .CER format.
Next, you need to import the certificate into Azure. To do so, open a browser window and log into Azure. When you reach the management portal, click on the Settings workspace, and then click on the Management Certificates link. You should see a message indicating you have no management certificates. Click on the Upload a Management Certificate link and then import the .CER file you just exported. When the import completes, you should see the certificate listed in the management portal. Incidentally, this screen also lists your subscription ID.
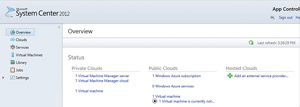
Now that the certificate has been imported into Azure, go back to App Controller and import the PFX certificate. You'll also need to enter the certificate's password into the Manage Certificate Password field. When you click OK, App Controller will link to Azure. The Azure subscription will appear in the App Controller console's Public Clouds section (Figure 3).
 [Click on image for larger view.]
Figure 3. A Microsoft Azure subscription added to App Controller.
Moving Virtual Machines
Now that App Controller is linked to VMM and to Azure, it's possible to move VMs between the two environments. Before I show you how, I need to point out that Azure doesn't support the VHDX file format. So, if your VMs use VHDX virtual hard disks, you'll need to convert them to VHD using Hyper-V editing tools prior to attempting a move to Azure.
In the VMM console, right-click on your private cloud and select the Properties command from the shortcut menu. When the resulting properties sheet appears, go to the Library tab and specify a path for stored VMs. The path that you use must be a library path, and it must be completely different from the existing read only library shares. You will need to manually create a share and add it to the library. After adding the path for stored VMs, it's a good idea to reopen the properties sheet to make sure the path was retained. Incorrect paths will not be retained, and no error message is displayed.
Next, go to App Controller and select the Virtual Machines container. Right-click on the VM that's currently running in your private cloud and select the Store command from the shortcut menu. Doing so saves the VM's state to the library share you created a moment ago. When the process completes, you'll see the VM's status change from Running to Stored.
Now, right-click on the VM, and choose the Copy command from the shortcut menu. Upon doing so, you'll see a message indicating the VM is about to be copied. Click the Configure link, select Windows Azure and click OK. You'll also need to click on the Configure link in the Cloud Service section, and then select an Azure cloud to which the VM will be copied.
At this point, the VM will be displayed in a diagram beneath the Azure cloud. Click on the Configure link beneath the VM. You'll then be prompted to enter a VM name, choose an instance size, provide an upload disk location, and a few other configuration items. Upon clicking OK, you'll be returned to the diagram. Assuming that everything is ready, click the Deploy button and the VM will be copied to Azure. A yellow banner at the bottom of the interface will indicate the Azure VM deployment has started.
The copy process can take quite a bit of time to complete, but when it finishes you'll see the VM's cloud name change to reflect its new location.
Smooth Migration
As you can see, Microsoft makes it relatively easy to move VMs between private clouds and Azure. Generally speaking, anything that can run on VMs in your private cloud should also work in Azure, although some types of VMs (such as those running Exchange Server) are not officially supported in Azure