Windows Server How-To
How To Deploy WSUS in Windows Server 2012 R2
Windows Server defaults to receiving updates from Windows Update. In large environments however, it typically makes more sense to use Windows Server Update Services (WSUS). WSUS provides centralized downloading of updates, which conserves Internet bandwidth. WSUS also provides a bit more control over the update process, especially when it is combined with System Center.
There is a little bit of prep work that you will need to do before you install WSUS. For starters, you will need to join the server that will be hosting WSUS to your domain. You will also want to decide where you want the updates to be stored and create a folder, if necessary. It's also a good idea to decide up front what type of database you want to use. For the purposes of this article, I will be using the Windows Internal Database, although SQL Server 2012 SP1, 2012, 2008 R2 SP1 and 2008 R2 SP2 are also supported. In the interest of keeping things simple, I am going to perform a simple WSUS deployment. If you want to perform a multi-server deployment, Microsoft discusses how to do so here.
Prior to the release of Windows Server 2012, WSUS was a separate download. In Windows Server 2012 and 2012 R2, WSUS is included with the Windows Server operating system. To install WSUS, open the Server Manager and select the Add Roles and Features command from the Manage menu. When you do, Windows will launch the Add Roles and Features Wizard.
Click Next to bypass the wizard's Before You Begin screen. When you arrive at the Installation Type screen, choose the Role-Based or Feature-Based Installation option and click Next. Windows will now display the Server Selection screen. Make sure that the correct server is selected and click Next. The wizard will now display the Server Roles screen. Scroll to the bottom of this screen and select the Windows Server Update Services check box, shown in Figure 1.
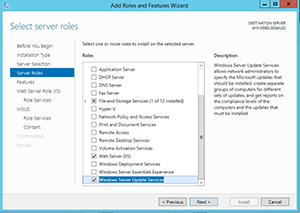 [Click on image for larger view.] Figure 1. Select the Windows Server Update Services check box.
Upon selecting the Windows Server Update Services option, you will typically be presented with a screen indicating that additional features must be installed. WSUS depends on the Web Server (IIS), the .NET Framework 4.5 and the Remote Server Administration Tools. Therefore, if you see the prompt telling you that additional features are required, simply click the Add Features button.
Click Next and you will be taken to the Feature selection screen. Assuming that you have added the necessary features in the previous step, you won't have to install anything else, so just click Next.
The Wizard will now display the Web Server Role (IIS) screen. You can just click Next on this screen and on the Role Services screen.
You will now see the WSUS screen. Click Next on the introductory screen. Now, you will see a screen asking you which components you want to install. If you are going to use the Windows Internal Database like I am, then be sure to select the WID Database option, as shown in Figure 2.
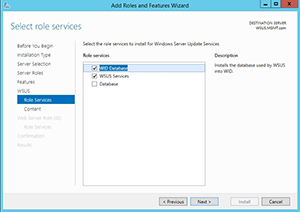 [Click on image for larger view.] Figure 2. Be sure to select the WID Database option if you plan to use the Windows Internal Database.
Click Next and you will be prompted for a path in which to store the updates. Make your selection and click Next.
You will now be taken to the Web Server role screen. You can click Next on this screen and on the Role Services screen. When you reach the Confirmation screen, click Install. WSUS will now be installed. When the process completes, click Close.
Once WSUS has been installed, you can access the WSUS management console by selecting the Windows Server Update Service command from the Server Manager's Tools menu. The first time that you open the management console, you will be prompted to choose a location in which to store the update files. Enter the desired path and then click the Run button. This will cause some post installation tasks to run. This process usually takes a few minutes to complete.
The next time that you launch the WSUS console, you will be taken to the Windows Server Update Services Configuration screen. Click Next on the Before You Begin screen and you will be taken to the Microsoft Update Improvement Programs screen. This screen simply asks if you want to participate in the Microsoft Update Improvement Program. Make your selection and click Next.
You will now see a screen asking if you want to synchronize updates from Microsoft Update or if you would prefer to synchronize from an upstream WSUS server. Make your selection and click Next. If you are using a proxy server you will need to select the Use a Proxy Server When Synchronizing check box and fill in the applicable details. Otherwise, just click Next. You must now click the Start Connecting button to connect to your update source.
The connection process takes a few minutes to complete. During that time, WSUS downloads information about the types of updates that are available, the products that can be updates, and the available languages. Once this process completes, click Next.
You will now be prompted to select the languages to include in the downloaded updates. Make your selection and click Next. The following screen lists all of the Microsoft products that WSUS can update. Select the products for which you want to download updates and click Next. Now, choose the update classifications that you want to download and click Next. Now, simply select your desired synchronization schedule, click Next and then click Finish to complete the process.
About the Author
Brien Posey is a 22-time Microsoft MVP with decades of IT experience. As a freelance writer, Posey has written thousands of articles and contributed to several dozen books on a wide variety of IT topics. Prior to going freelance, Posey was a CIO for a national chain of hospitals and health care facilities. He has also served as a network administrator for some of the country's largest insurance companies and for the Department of Defense at Fort Knox. In addition to his continued work in IT, Posey has spent the last several years actively training as a commercial scientist-astronaut candidate in preparation to fly on a mission to study polar mesospheric clouds from space. You can follow his spaceflight training on his Web site.