Posey's Tips & Tricks
Restoring a File from a Windows Image Backup
PowerShell recovery scripts using WBAdmin no longer work in Windows 11, but VHDX mounting offers a manual workaround for restoring files.
I recently wrote an article in which I walked you through the creation of a PowerShell script that created an image backup of a Windows 11 machine. My original plan had been to follow up by writing a companion piece explaining how to use PowerShell to restore a file from the backup.
I designed the recovery script to restore a file named C:\Users\Brien\Documents\My Important Document.txt. Rather than recovering the file to its original location, I opted to place the file into a folder named C:\Recovered_Files. The script is designed to check to see if this folder exists, and then create the folder if necessary.
Since a new backup version is created every time that you run the backup script, I designed my script to use the WBAdmin Get Versions command to retrieve a list of all the backup versions that exist. I then used PowerShell string parsing techniques to extract the name of the latest backup version.
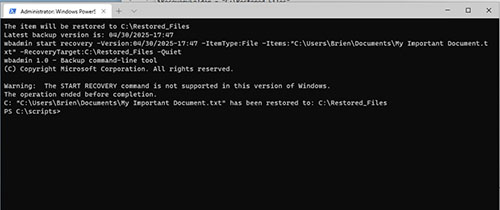
All of this information was then fed into the WBAdmin command with the goal of recovering the file. There was just one thing that I forgot about. Microsoft removed the recovery capabilities from Windows 10 and Windows 11. If you try to use my recovery script to perform a restoration on a Windows 11 machine, it will generate the warning message shown in Figure 1, stating that the start recovery command is not supported in this version of Windows.
 [Click on image for larger view.]
Figure 1. You can no longer use WBAdmin to restore a file to a Windows 11 machine.
[Click on image for larger view.]
Figure 1. You can no longer use WBAdmin to restore a file to a Windows 11 machine.
Fortunately, there is another way to perform a restoration. Before I show you how it works though, I want to provide you with the PowerShell script that I created. As previously noted, the script does not work on Windows 11. However, it does work on Windows Server. Here is the script:
$VolumeToBackup = "C:"

  $RecoveryFolder = "C:\Restored_Files"

  $ItemToRestore = '"C:\Users\Brien\Documents\My  Important Document.txt"'

  $BackupTarget = "E:"
#Create a Recovery Folder if Necessary
# Check if the file exists

  If (-Not (Test-Path -Path $RecoveryFolder)) {

  Write-Host  "Creating $RecoveryFolder"

  New-Item -Path  $RecoveryFolder -ItemType Directory

  Write-Host  "The item will be restored to $RecoveryFolder"

  } else {

  Write-Host  "The item will be restored to $RecoveryFolder"

  }

# Find the backup versions

  $VersionsOutput = wbadmin get versions  -backuptarget:$backupTarget
# Find the most recent backup versions

  $LatestVersionLine = $VersionsOutput | Where-Object { $_  -match "Version identifier" } | Select-Object -Last 1
# Extract the version string using regex

  If ($LatestVersionLine -match "Version  identifier:\s+([0-9/:\-]+)") {

  $LatestVersion  = $Matches[1]

  Write-Host  "Latest backup version is: $LatestVersion"

  } else {

  Write-Host  "No backup versions found." -ForegroundColor Red

  Exit

  }

$RestoreString = "wbadmin start recovery  -Version:$LatestVersion -ItemType:File -Items:$ItemToRestore  -RecoveryTarget:$RecoveryFolder -Quiet"
Write-Host $RestoreString

  Invoke-Expression $RestoreString

  Write-Host "$VolumeToBackup $ItemToRestore has been  restored to: $RecoveryFolder"
OK, so now that I have shown you the PowerShell script, let's get back to the topic at hand. How do you perform a restoration in Windows 11?
There are two main options for performing a restoration from an image backup on a Windows 11 machine. The first option is to perform a full restoration, meaning that the entire machine is rolled back to an earlier point in time. Obviously, this action is a bit drastic and so you probably don't want to do this unless you have no other options. If you do need to perform a full restoration, then you will need to boot your system from the Windows installation media. When prompted, choose the Advanced Startup option and then click Troubleshoot, followed by System Image Recovery. It's worth noting that the exact steps will vary depending on the version of Windows that you are running.
The other option is to perform a VHDX based recovery. For those who might not be familiar with this approach, .VHDX is the file extension that Microsoft uses for Hyper-V virtual hard disk files. When you create a Windows image backup, the data is stored within a .VHDX file.
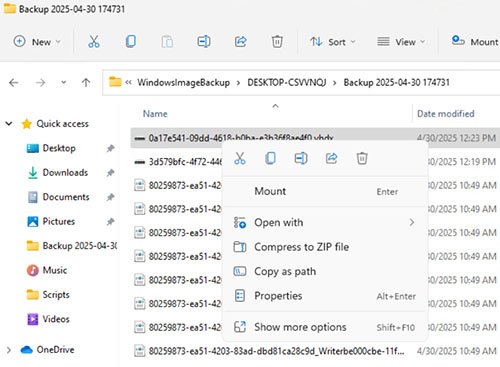
To access your data, open the backup volume and then open the WindowsImageBackup folder. Next, open the folder bearing the name of your PC and then open the Backup folder. Locate the .VHDX file that you want to restore data from (there may be multiple VHDX files), right click on the file and select the Mount command from the shortcut menu, as shown in Figure 2.
 [Click on image for larger view.]
Figure 2. Right click on the .VHDX file and choose the Mount command.
[Click on image for larger view.]
Figure 2. Right click on the .VHDX file and choose the Mount command.
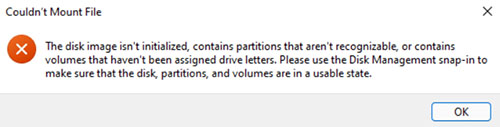
There is a good chance that you will end up receiving an error message telling you that the disk isn't initialized, or that it contains unrecognized partitions, or that the drive letter is missing. You can see what this error message looks like in Figure 3. You can safely ignore this message.
 [Click on image for larger view.]
Figure 3. You may receive this error message.
[Click on image for larger view.]
Figure 3. You may receive this error message.
Now, enter the DiskMgmt.msc command at the Windows Run prompt. This will cause Windows to open the Disk Management Console. Scroll down through the list of disks until you find the disk associated with your backup. It should contain a volume that's the same size as the volume that you backed up, but there might not be a drive letter associated with it. Now, right click on the backup volume and select the Change Drive Letter and Paths command from the shortcut menu. Follow the prompts to add a drive letter to the disk.
Now, you can open the backup disk in File Explorer by using the drive letter that you have assigned. Be careful not to make any modifications to any of the data stored on the backup disk or you could corrupt your backup. Copy the files that you want to restore from the backup disk to the restore location.
When you are done, go back to the Disk Management console and right click on the disk (right click on the disk itself, not the volume) and select the Detach VHD command from the shortcut menu. This will cause the backup volume to be detached and will put everything back to normal.
About the Author
Brien Posey is a 22-time Microsoft MVP with decades of IT experience. As a freelance writer, Posey has written thousands of articles and contributed to several dozen books on a wide variety of IT topics. Prior to going freelance, Posey was a CIO for a national chain of hospitals and health care facilities. He has also served as a network administrator for some of the country's largest insurance companies and for the Department of Defense at Fort Knox. In addition to his continued work in IT, Posey has spent the last several years actively training as a commercial scientist-astronaut candidate in preparation to fly on a mission to study polar mesospheric clouds from space. You can follow his spaceflight training on his Web site.