In-Depth
First Look: Windows Nano Server
The second Technical Preview of Microsoft Windows Server 2016 provided us with the first glimpse of Microsoft's scaled-down Windows Server deployment.
One of the more unique capabilities of Windows Server 2016 likely to be popular will be its ability to be deployed as a massively scaled down version of the server OS. Microsoft calls it Nano Server, which refers to a tiny, completely bare-bones Windows Server deployment. Microsoft dabbled with this idea in Windows Server 2012 when the company introduced Server Core, but Nano Servers are substantially smaller than Server Core deployments. In fact, Nano Servers won't even have a UI.
Of course, this raises a lot of questions: Without a UI, how do you deploy a Nano Server? How small is a Nano Server? How do you manage a Nano Server that lacks the UI? And, most important, what can you do with a Nano Server? In this overview of the Microsoft Nano Server, I'll answer these questions.
Deploying Nano Server
The process used to deploy Nano Server is different from what you'd expect. With Windows Server 2012 and Windows Server 2012 R2, you run a Setup and then you're given the choice of installing Server with a GUI or Server Core Installation. The Server Core Installation is also just a recommended installation option.
It would be easy to anticipate Windows Server 2016 will have three installation options: Server with a GUI, Server Core and Nano Server. However, this simply is not the case. The current installations are Windows Server Technical Preview 2 and Windows Server Technical Preview (with local admin tools). The Windows Server Technical Preview 2 option is similar to a Server Core deployment. The option to deploy Windows with local admin tools is similar to a GUI-based deployment, but the interface is much more sparse than a full Windows Server 2012 R2 deployment. More important, however, is the option to perform a Nano Server deployment is conspicuously absent.
Contrary to its appearance, Nano Server is included in the second Windows Server 2016 Technical Preview, but you won't be able to install Nano Server using Windows Setup. Instead, you're going to need to delve into Windows PowerShell. It's possible Microsoft may eventually provide a graphical method for installing Nano Server, but for now, the process is anything but intuitive. In fact, there's very little documentation for the process and the little bit of documentation that does exist is somewhat convoluted. Fortunately, I have figured out how to deploy Nano Server and will walk you through the process.
Nano Server Requirements
There are a few different things you'll need to deploy Nano Server. First, of course, you'll need the Windows Server 2016 Technical Preview 2. Nano Server was not included in the first technical preview.
You're also going to need a Windows PowerShell script that can convert a Windows image to a virtual hard disk (VHD). You can download the necessary script from the Microsoft Script Center.
The other thing you'll need is a couple of virtual machines (VMs). One VM needs to be running Windows 8.1 and the other needs to be running the latest version of Windows 10. So why do we need two different VMs? The Windows PowerShell script you'll be using doesn't yet work on Windows 10. There are some Web sites that provide hints for making the script work with Windows 10, but I spent several hours working with the script and could not get past an error related to making the newly created VHD bootable.
Conversely, once you convert the Nano Server .WIM file to a VHD, you'll have to use the Add-WindowsPackage cmdlet to add some packages to the VHD. The problem is the Add-WindowsPackage cmdlet makes use of the DISM command and the Windows 8.1 version of DISM doesn't support Windows Server 2016. There's a preview version of the Assessment and Deployment Kit for Windows 10 available, but I find it easier to just use a Windows 10 VM for the package injection process.
It appears the easiest way to deploy Nano server is by installing Windows 8.1 to a Hyper-V VM (Windows Server 2012 R2 Hyper-V is fine). Next, create a folder named ISO on your Hyper-V server's hard disk and copy the Windows Server 2016 Technical Preview 2 ISO file to the ISO folder. The actual file name is en_windows_server_technical_preview_2_x64_dvd_6651466.iso.
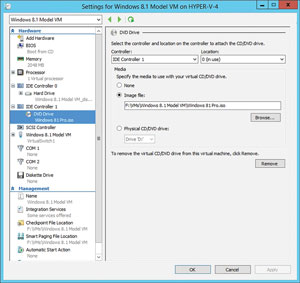
Next, you'll need your Windows 8.1 VM to treat the Windows Server ISO file as a virtual DVD. The way you'd accomplish this varies depending on whether you're using the Hyper-V Manager or Virtual Machine Manager. Assuming you're working with Hyper-V Manager, right-click on the Windows 8.1 VM and select the Settings command from the shortcut menu. When the Settings screen appears, select the virtual DVD drive and link it to the Windows Server ISO file (see Figure 1). Click OK to accept the changes and then boot the VM to the Windows 8.1 OS you previously installed.
 [Click on image for larger view.]
Figure 1. Link the Windows 10 VM virtual DVD drive to the Windows Server ISO file.
[Click on image for larger view.]
Figure 1. Link the Windows 10 VM virtual DVD drive to the Windows Server ISO file.
When Windows 8.1 boots, open File Explorer and take a moment to explore the virtual DVD drive. You'll need to make sure the NanoServer folder exists and it contains a file named NanoServer.wim.
Next, create a folder named Scripts and copy the Convert-WindowsImage.ps1 script you downloaded earlier to this folder. Once the script is in place it's time to begin the NanoServer creation process. To do so, open an elevated Windows PowerShell and enter the following commands:
CD\
MD VHD
CD Scripts
Set-ExecutionPolicy Unrestricted -Force
.\Convert-WindowsImage.ps1 –WIM ‘D:\nanoserver\nanoserver.wim' –VHD ‘c:\vhd\nanoserver.vhd' -DiskType Fixed –VHDFormat VHD -SizeBytes 2GB –Edition 1
Set-ExecutionPolicy Restricted -Force
When you've finished entering those commands, open File Explorer and copy the newly created VHD file from the C:\VHD folder to a network location. Next, go ahead and boot the Windows 10 VM, log in, and then copy the network-based VHD file to the C:\VHD folder on the Windows 10 VM (you'll have to create this folder).
Once the file copy operation completes, navigate to your VHD folder. Right-click on the VHD file and choose the Mount command from the shortcut menu. This will cause the VHD file to be mounted as a hard disk. Be sure to pay attention to the drive letter assigned to the VHD when it's mounted.
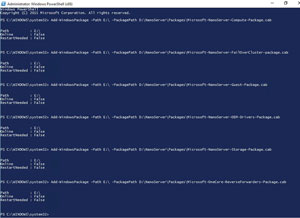
Now you need to add some Windows packages to the VHD. The D:\NanoServer\Packages folder contains everything you need. The commands shown in Figure 2 assume the VHD was mounted as E: and the drive letter for your virtual DVD drive is D: -- if a different drive letter is used you'll need to make the substitution. Run the commands from Figure 2.
 [Click on image for larger view.]
Figure 2. You must inject some packages into your virtual hard disk running these commands.
[Click on image for larger view.]
Figure 2. You must inject some packages into your virtual hard disk running these commands.
Before you wrap things up, you will need to create an Unattend.xml file and add it to your disk image. Otherwise you won't have a way of setting up an administrative password. You can find guidance for the Unattend.xml file here.
Now, dismount the VHD. You can accomplish this by opening File Explorer, right-clicking on the E: drive, and choosing the Eject command from the shortcut menu. At this point the Nano Server VHD is ready to use. Given the amount of work involved in preparing the VHD, however, I highly recommend making a copy of your VHD before moving on to the next step.
Sizing the Nano Server
When we ran the Convert-WindowsImage.ps1 script, we had to specify a VHD size. I set the VHD size at 2GB just to give myself plenty of space with which to work. However, the total amount of disk space consumed within the VHD at this point is a mere 0.55GB. This includes the package files. Keep in mind this is a preview release, so there's always the chance the storage requirements could change in the release that ships next year.
Creating a Nano Server VM
Now that you've created a Nano Server VHD, we must build a VM around it. The actual steps you'll use to do so vary considerably depending on your version of Hyper-V and whether you're using Virtual Machine Manager or the Hyper-V Manager. The instructions in this article are based on using Windows Server 2012 R2 Hyper-V and the Hyper-V Manager.
To create a VM, open the Hyper-V Manager, right-click on the listing for your Hyper-V Server, and choose the New | Virtual Machine commands from the shortcut menu. This will cause Windows to launch the New Virtual Machine Wizard.
Click Next to bypass the Before You Begin screen and you'll be taken to the Specify Name and Location screen. Enter a name for the VM and click Next. At this point, you'll need to specify a VM generation. I strongly recommend creating a Generation 1 VM because there have been a lot of reports of people having problems running Nano Server on Generation 2 VMs.
Click your way through the next few screens, configuring memory and network connectivity along the way. When you reach the New Virtual Hard Disk screen you'll need to copy the VHD you created to a location on your Hyper-V server. After doing so, select the Use an Existing Virtual Hard Disk option in the New Virtual Machine Wizard, specify the VHD path, and click Next, followed by Finish.
Accessing the Nano Server
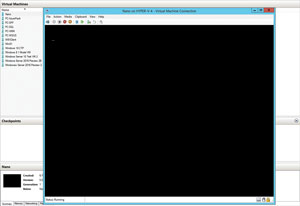
Booting a new Nano Server for the first time takes longer than you might expect. When the boot process eventually completes, however, Hyper-V displays a black screen (see Figure 3).
 [Click on image for larger view.]
Figure 3. This is what Nano Server looks like when running.
[Click on image for larger view.]
Figure 3. This is what Nano Server looks like when running.
The best way of managing Nano server is to use Windows PowerShell remoting. I suspect some of the GUI-based management tools might eventually be able to manage Nano Server, but this approach does not seem to work yet.
Role Nano Server Will Play
So now that your Nano Server is up and running, you might wonder how you'd use it in your systems environment. According to Microsoft, Nano Server is ideal for use as a Hyper-V host, a scale-out file server, or a container or VM guest OS for applications developed solely in the cloud. Incidentally, Microsoft has created a page that discusses the current capabilities and limitations of Nano Server.
Deploying Nano Server requires a lot of work. My guess is the process will get a lot easier in the next preview release, which is expected later this year.
About the Author
Brien Posey is a 22-time Microsoft MVP with decades of IT experience. As a freelance writer, Posey has written thousands of articles and contributed to several dozen books on a wide variety of IT topics. Prior to going freelance, Posey was a CIO for a national chain of hospitals and health care facilities. He has also served as a network administrator for some of the country's largest insurance companies and for the Department of Defense at Fort Knox. In addition to his continued work in IT, Posey has spent the last several years actively training as a commercial scientist-astronaut candidate in preparation to fly on a mission to study polar mesospheric clouds from space. You can follow his spaceflight training on his Web site.