Windows Server How-To
How To Create a Windows Server Failover Cluster Without Shared Storage
Follow these step-by-step instructions and you will be up and running in about 15 minutes.
One of the really great things about Windows Server 2012 and Windows Server 2012 R2 is that it removes the requirement for shared storage. Microsoft recommends the use of a cluster shared volume whenever possible, but it is possible to build a cluster without it.
The first step in the process is to install the Failover Clustering feature. To do so, select the Add Roles and Features command from Server Manager's Tools menu. Next, work your way through the Add Roles and Features Wizard until you reach the wizard's Features page. Select the Failover Clustering feature, as shown in Figure 1. If you are prompted to deploy additional features, click on the Add Features button. Now, click Next, followed by Install to complete the installation process. You will need to install the Failover Clustering feature on each cluster node
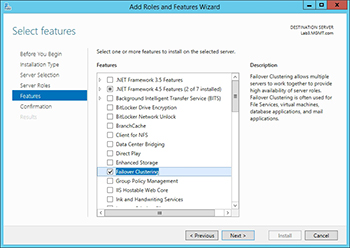 [Click on image for larger view.] Figure 1. You must install the Failover Clustering feature onto each cluster node.
Once the Failover Clustering feature has been installed onto each cluster node, you can build your cluster. To do so, choose the Failover Cluster Manager command from the Server Manager's Tools menu.
The first thing that you will have to do is to validate your hardware configuration to make sure that it meets the requirements for building a failover cluster. To do so, click on the Validate Configuration option, found in the Actions pane. This will cause Windows to launch the Validate a Configuration Wizard.
Click Next to bypass the wizard's Welcome screen. You must then add the names of the servers that you want to cluster to the Selected Servers list, as shown in Figure 2.
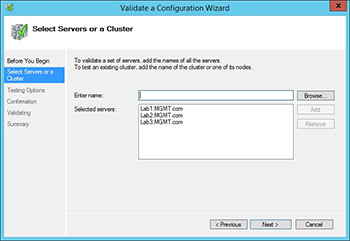 [Click on image for larger view.] Figure 2. Specify the names of the servers that you would like to validate.
Click Next, and then tell Windows that you would like to run all tests. Click Next two more times and the testing process will begin. The length of time that the tests take to complete varies depending on the number of servers in your cluster and on your hardware's performance. In my experience the validation tests usually complete within five minutes. It is normal for the validation report to contain warnings, as shown in Figure 3, but it should not contain any errors.
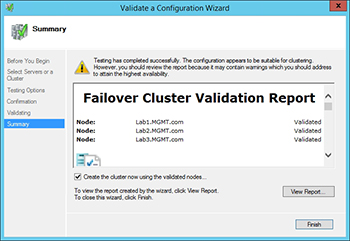 [Click on image for larger view.] Figure 3. The validation report should not contain any errors.
When you click Finish, Windows will launch the Create Cluster Wizard. Click Next to bypass the wizard's Welcome screen and then you will be prompted to enter a name for the cluster. The cluster name works similarly to a computer name in that it identifies the cluster on the network. You must enter a unique name and it must adhere to NetBIOS naming conventions. While you are on this screen, you must also enter an IP address for the cluster, as shown in Figure 4.
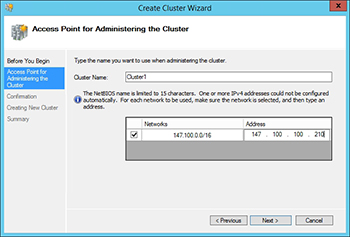 [Click on image for larger view.] Figure 4. Enter a name and an IP address for the cluster.
Click Next and you will see a confirmation screen outlining the cluster configuration. There is a checkbox on this screen that allows you to add all eligible storage to the cluster. You will need to deselect this check box if you wish to avoid having storage claimed by the cluster.
Click Next and the cluster will be created. This process usually takes less than a minute to complete. Upon completion, you should see a summary screen indicating that the cluster has been created successfully. You can see what this screen looks like in Figure 5. Click Finish to complete the process.
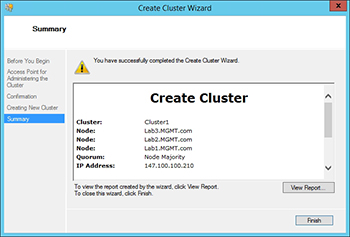 [Click on image for larger view.] Figure 5. The cluster was created successfully.
Now that the failover cluster has been created, you will see it listed in the Failover Cluster Manager. The Roles container lists your clustered roles. No roles are clustered by default, so this container will be empty.
The Nodes container lists the cluster nodes and their status, as shown in Figure 6. This is also where you would go to add additional nodes to the cluster. As you can see in the figure, the Actions pane contains an Add Node link.
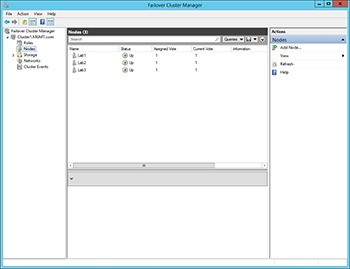 [Click on image for larger view.] Figure 6. The Nodes container lists all of the cluster nodes and the status of each node.
Keep in mind that even though the cluster is not using shared storage, it still needs to have some storage available to it. Otherwise, you won't be able to fail over storage dependent resources (such as virtual machines). You can add storage by selecting the Disks container and then clicking on the Add Disks link.
As you can see, it is relatively easy to set up failover clustering. The entire process can usually be completed in less than fifteen minutes.
About the Author
Brien Posey is a 22-time Microsoft MVP with decades of IT experience. As a freelance writer, Posey has written thousands of articles and contributed to several dozen books on a wide variety of IT topics. Prior to going freelance, Posey was a CIO for a national chain of hospitals and health care facilities. He has also served as a network administrator for some of the country's largest insurance companies and for the Department of Defense at Fort Knox. In addition to his continued work in IT, Posey has spent the last several years actively training as a commercial scientist-astronaut candidate in preparation to fly on a mission to study polar mesospheric clouds from space. You can follow his spaceflight training on his Web site.