Posey's Tips & Tricks
Provisioning Outdated OSes with Hyper-V 2016 Integration Services
Managing Integration Services used to be a pain until Microsoft began including it in all Windows OSes, starting with Windows Server 2016. But administrators of older platforms don't need to be left high and dry.
Prior to the release of Windows Server 2016, managing Hyper-V Integration Services was a bit of a hassle.
For those who might not be familiar with Integration Services, they are essentially a set of drivers that allow virtual machines (VMs) to communicate directly with the host's hardware. Integration Services also allow a VM to interact with the hypervisor for the sake of keeping clocks in sync, allowing the host to shut down the guest operating system, and several other functions.
You can see some of the Integration Services functions in Figure 1.
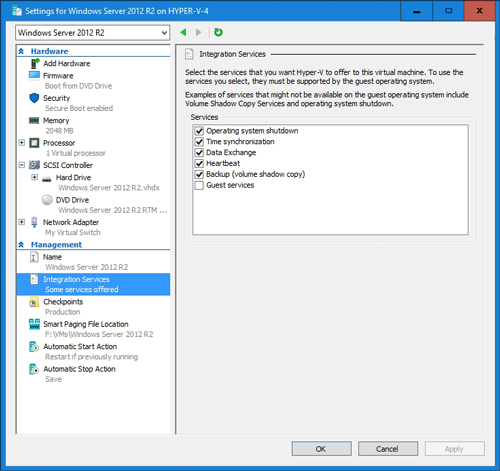 [Click on image for larger view.] Figure 1: Windows Server 2016 Hyper-V allows you to enable or disable Integration Services on an individual basis.
There were a couple of reasons why managing Integration Services used to be a pain. For starters, Integration Services usually had to be installed after the guest operating system was up and running, unless you had installed the guest from an image that already included Integration Services.
Another reason why Integration Services were cumbersome to manage was because they usually had to be updated manually, often on a per-VM basis.
When Microsoft created Windows Server 2016, it sought to address these two pain points. Integration Services are now pre-installed into newer operating systems such as Windows Server 2016 and Windows 10. Also, Microsoft now delivers updates to Integration Services through Windows Update.
These two changes have undeniably made life easier for Hyper-V administrators. Even so, the way in which Microsoft implemented these changes can be problematic for those who need to run older operating systems inside of Hyper-V. Let me show you why this is the case.
If you look at Figure 2, you can see a VM that is hosted on Windows Server 2012 R2 Hyper-V. As you can see in the figure, the VM's Action menu contains an option to insert the Integration Services Setup Disk. If I needed to install Integration Services into this particular VM, I would simply log in to the VM and use the Insert Integration Services Setup Disk option. This would cause the VM to mount a virtual drive containing Integration Services. Typically, the VM would then automatically run the Setup program that installs Integration Services.
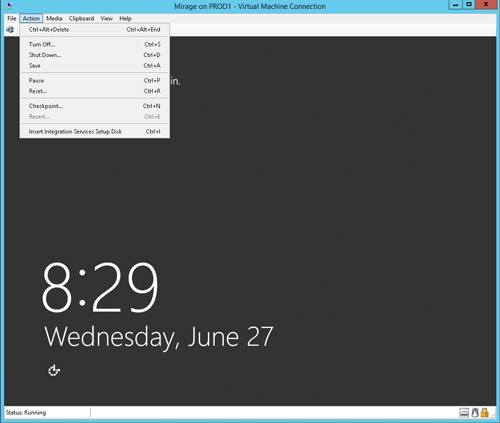 [Click on image for larger view.] Figure 2: Previous versions of Hyper-V included an option to insert the Integration Services Setup Disk.
So with that said, take a look at Figure 3. This figure shows a VM that is hosted on Windows Server 2016 Hyper-V. As you can see in the figure, the option to insert the Integration Services Setup Disk no longer exists.
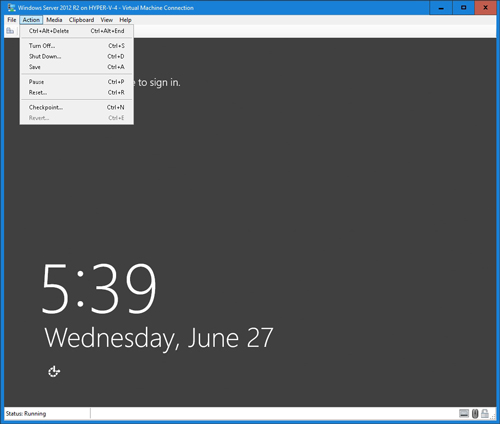 [Click on image for larger view.] Figure 3: The option to insert the Integration Services Setup Disk no longer exists.
Theoretically speaking, the absence of the option to insert the Integration Services Setup Disk should not be a problem. All supported versions of Windows now have Integration Services built-in. The problem is that there are those who may need to run older Windows versions that are not officially supported.
Recently, for example, I had to install Windows Server 2008 R2 into a Hyper-V VM because of a project that I was working on. So how can you install Integration Services into an aging Windows OS that does not have Integration Services pre-installed?
The thing to keep in mind is that the so-called Integration Services Setup Disk is really just an ISO file. If you look at Figure 4, you can see that this file is named VMGuest.iso and normally resides in the C:\Windows\System32 folder. As such, my solution to the missing Integration Services problem is to copy this file to an ISO library, and then mount the ISO file from within the VM that is running on Windows Server 2016. Incidentally, the screen capture showing the VMGuest.iso file was taken on a Windows Server 2012 R2 server that has the Hyper-V role installed.
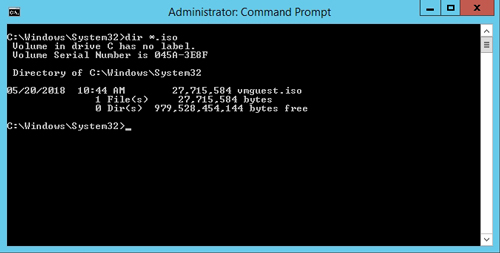 [Click on image for larger view.] Figure 4: The Integration Services Setup Disk is really just an ISO file.
If you look at Figure 5, you can see that I have a VM running Windows Server 2008 R2 Enterprise. The absence of any Integration Services-related commands on the Action menu confirms that this VM is running on Windows Server 2016. Even so, mounting the VMGuest.iso file launches AutoPlay, and I am presented with the option to install Hyper-V Integration Services.
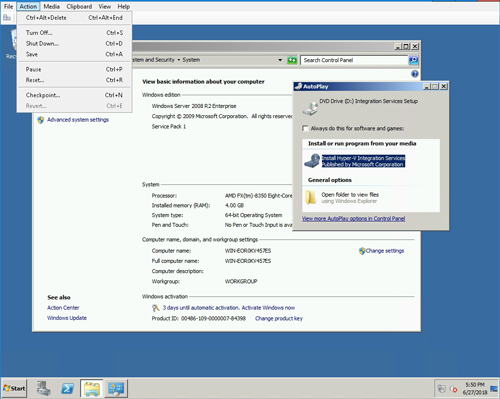 [Click on image for larger view.] Figure 5: I now have an option to install Hyper-V Integration Services.
After running Setup, Hyper-V Integration Services are installed, as shown in Figure 6.
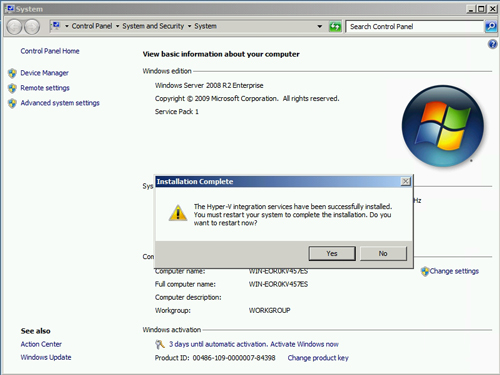 [Click on image for larger view.] Figure 6: Hyper-V Integration Services have been installed.
About the Author
Brien Posey is a 22-time Microsoft MVP with decades of IT experience. As a freelance writer, Posey has written thousands of articles and contributed to several dozen books on a wide variety of IT topics. Prior to going freelance, Posey was a CIO for a national chain of hospitals and health care facilities. He has also served as a network administrator for some of the country's largest insurance companies and for the Department of Defense at Fort Knox. In addition to his continued work in IT, Posey has spent the last several years actively training as a commercial scientist-astronaut candidate in preparation to fly on a mission to study polar mesospheric clouds from space. You can follow his spaceflight training on his Web site.